To access your Gibbon account, you need to login. The login window is available in the sidebar of the homepage of your Gibbon installation.
Options
The login screen has two main options, which can be revealed by clicking on the Options link below the password field.
School Year - by default Gibbon logs you in to the current school year (e.g. 2015-16). If you want to log into previous or future years (given that you have permission), select the year here.
Language - Gibbon is currently (as of August 2015) available in 7 different languages, with more on the way. To change your language for the current session, select here. Language can also be set for the whole school, as well as within your Preferences.
The Gibbon homepage for teachers seeks to give you all the information you need to do your job as an educator, in one place, with quick access to other data from around the system built right in.
Features
The image below highlights some of the main functions you can find on a fully configured homepage. Students see a similar, but slightly reduced set of functionality, allowing them to interact with the lesson plans, homework, and assessed work that you give them access to.
Fast Finder
Introduction
Gibbon’s Fast Finder, located in the header bar, allows you to quickly access the following information within the system (depending on your permissions):
Actions - these represent the system’s functions, such as Edit Markbook.
Classes - these are academic groupings, such as Year 8 Science, class 1.
Staff
Students
Getting Started
To use the Fast Finder, which is located at the top right of the screen, start typing into its text box.
An autocomplete dropdown will appear, from which you can select the item you are searching for.
Press Go to be redirected to the desired information.
Notifications
Introduction
A range of events across Gibbon lead to a notification being created for the people involved (e.g. when a student comments on a lesson plan, teachers and students in that class are sent an alert). These notifications are highlighted in the Minor Links bar in the Gibbon interface (in the new theme, it’s a little hard to see unless you have a notification):
Notification Actions
Clicking on the Notifications icon (as highlighted above), takes you to the Notifications page, where you can use the icon to action and archive the notification in one go. Archive notifications drop down to the second part of the page. All notifications can be deleted in one go by using the icon above the New Notifications table.
Email Notifications
In order to make notifications more obvious, you can enable email notifications via the Preferences page
Preferences
Introduction
Your Gibbon account has a number of settings, which you can control. These are located on the Preferences page, which you can access via the Minor Links section of the Gibbon interface:
Options
Password - reset your password to keep your Gibbon account, and your school’s private data, secure.
Personal Background - override the current theme’s background image with one of your own choosing. Simply enter the URL to an image somewhere on the web.
Personal Theme - override the school’s current theme with your own choice, to change the appearance of your Gibbon. Only themes installed by your school are available here.
Personal Language - override the school’s default language, customising the interface to your language needs. This will be overridden, if you select a language at login.
Receive Email Notifications - choose to be alerted by email when you receive a system notification in Gibbon.
Assess
Markbook
Introduction
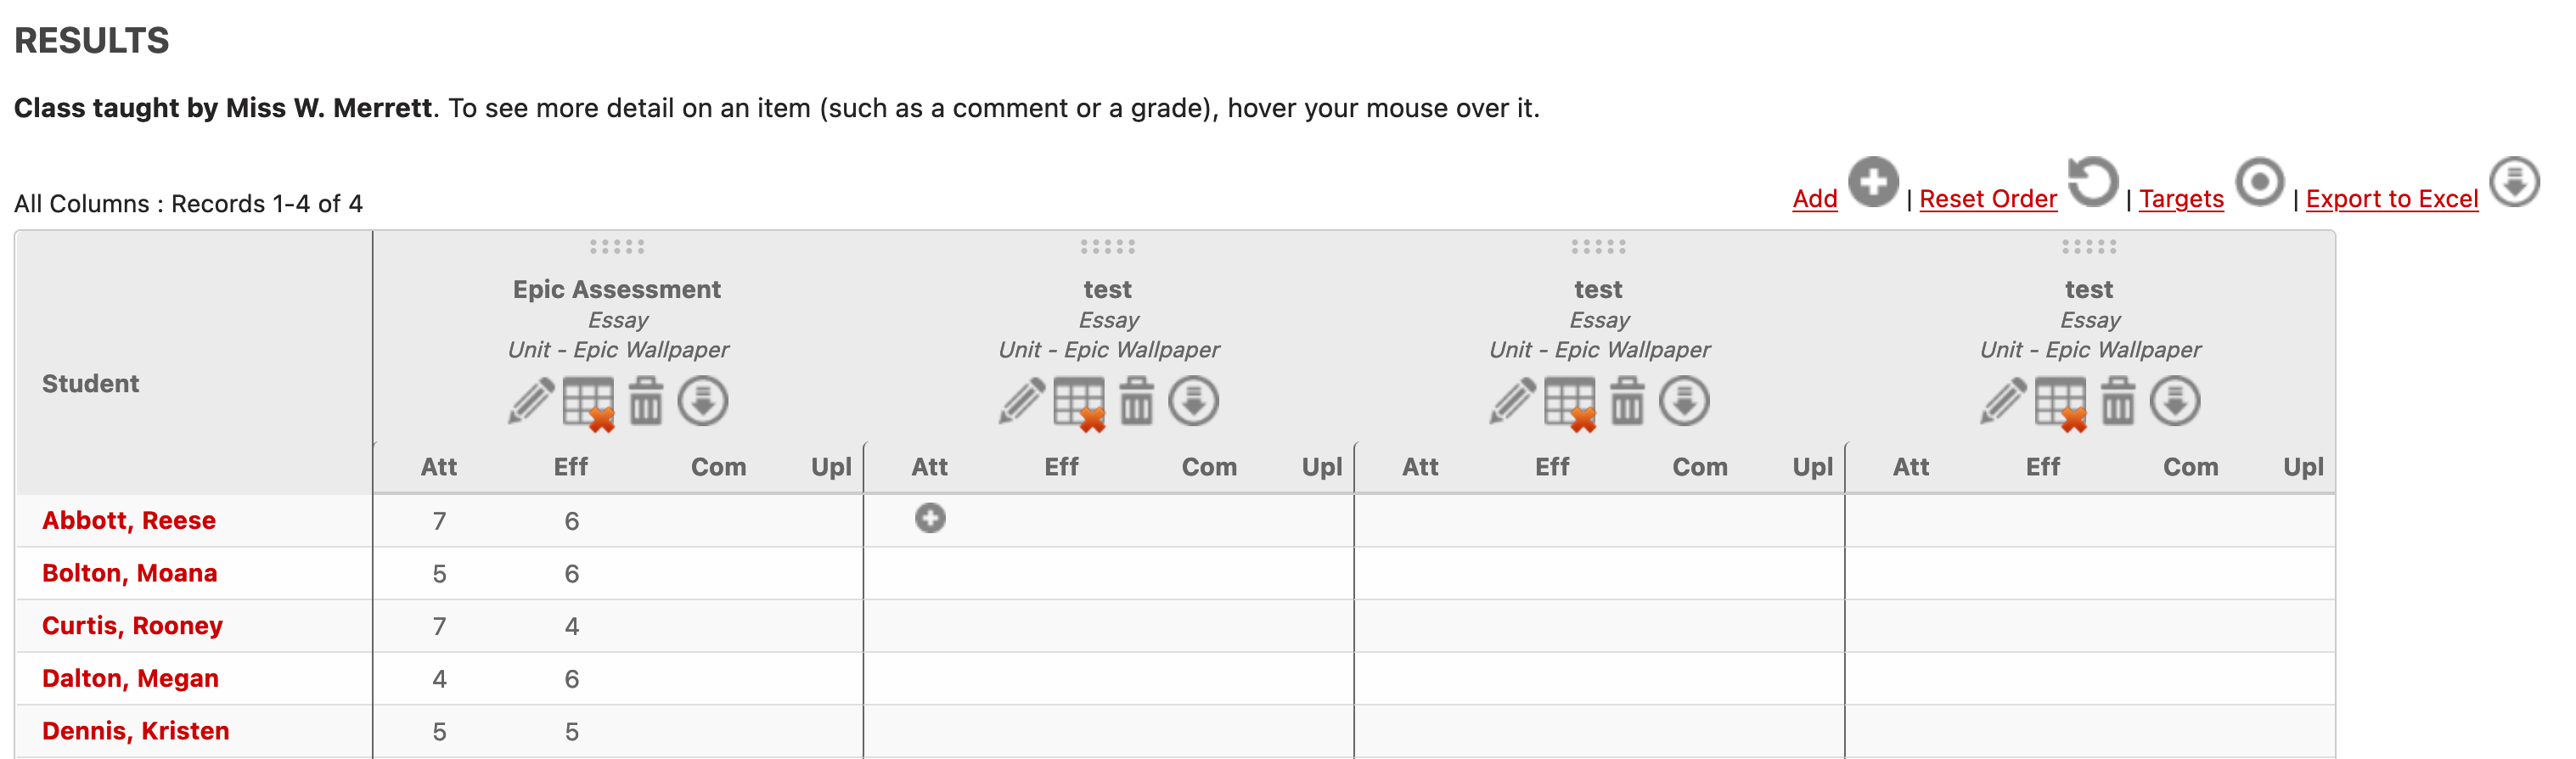
The Markbook is designed to support teachers in ongoing Assessment Recording & Reporting (ARR). It supports the ability to create Markbook columns (either individually or in bulk) and then to enter various data (grades, rubrics, comments and uploads) for each student in a class. In addition, it can be linked to the Planner, such that submitted homework can be viewed during marking. Each Markbook column can optionally be shared with parents and students, allowing for pertinent results to be rapidly disseminated.
Getting Started
Go to Assess > Markbook in the main menu at the top of the page.
Click on the Add Column button on the top right corner of the Markbook.
Choose the parameters of your Markbook.
Process the Submit button at the bottom of the page.
Click on the Enter Data button at the top of the newly created column.
Begin entering data for each student, remember to press the Submit button at the bottom of the page when finished.
Crowd Assessment
Introduction
Crowd Assessment is like peer assessment, but bigger. When students submit work into one of your Lesson Plans, you can use Crowd Assessment to open the work up to a wider audience, who can respond with likes and comments. Your chosen audience might include class mates, other students, or even parents.
Online Submissions - so students can submit their work into Gibbon
Crowd Assessment - so yourself, your students and a potentially wider audience can access the work.
Once Crowd Assessment is enabled, the work can be accessed by going to Assess > Crowd Assessment in the top menu bar. Each lesson remains visible in the Crowd Assessment listing for 6 weeks after the lesson took place.
Rubrics
Introduction
Rubrics are a tabular way to provide assessment feedback to students. They consist of a grid of grades and outcomes, each cell of which contains some text:
Getting Started
In order to create a rubric, go to Assess > Rubrics and the use the icon to start adding a rubric. Your new rubric can either be school wide, or specific to a department, depending on your permissions with the system. At the bottom of the creation page, you will be promoted to select the size of the rubric. Take care here, as these values cannot be changed once set:
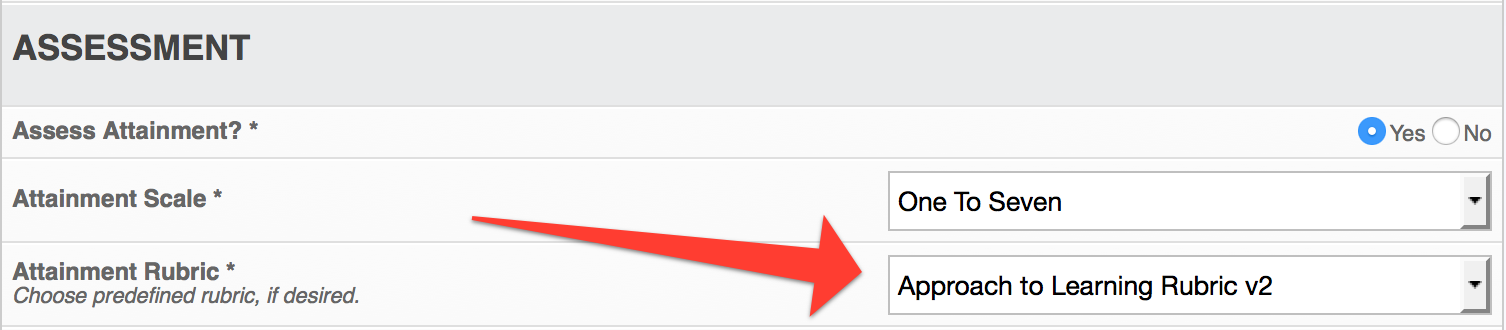
Using Rubrics
Once a rubric has been defined, it can be used in other areas of the system, such as the Markbook or Formal Assessment modules. The screenshot below shows the process of selecting a rubric within the Markbook edit screen:
Once a rubric has been set, it can be called into action, for example, using the icon below in the Markbook data entry screen:
To use the rubric, simply click in the cell you wish to select. There is no need to save the rubric, as this happens automatically.
Learn
Planner
Introduction
The Planner is one of Gibbon’s key tools for teachers and departments. It supports a collaborative planning process that stretches from design through to delivery and then to ongoing improvement. In addition, it provides a key way for teachers to communicate learning content with students, parents and colleagues.
Approaches to Planning
Introduction
When it comes to planning, teachers have an almost infinite number of ways to do things. Gibbon tries to avoid tying you down to a particular approach, but instead seeks to give options. In starting planning you have an incremental range of approaches, each additional level of which represents an increase in upfront investment of time, but each of which saves time in the long run.
Decisions
Before commencing planning, whether it be as an individual, a department or a whole school, it is worth understanding the different approaches available to you.
Just Lessons - when you click on the “Planner” icon anywhere in Gibbon’s interface it takes you to the Lesson Planner, which is the quickest way to get started. In this approach you create lessons for each class (e.g. SC10.1 or Year 10 Science, Class 1). Each lesson is an independent entity, so there is little structure over a course.
Simple Units - as well as the Lesson Planner, Gibbon includes a Unit Planner. The quickest way to get going, is to create a simple unit, and then, when creating lessons, specify that the lesson belongs to the units. Now you have some structure within your course.
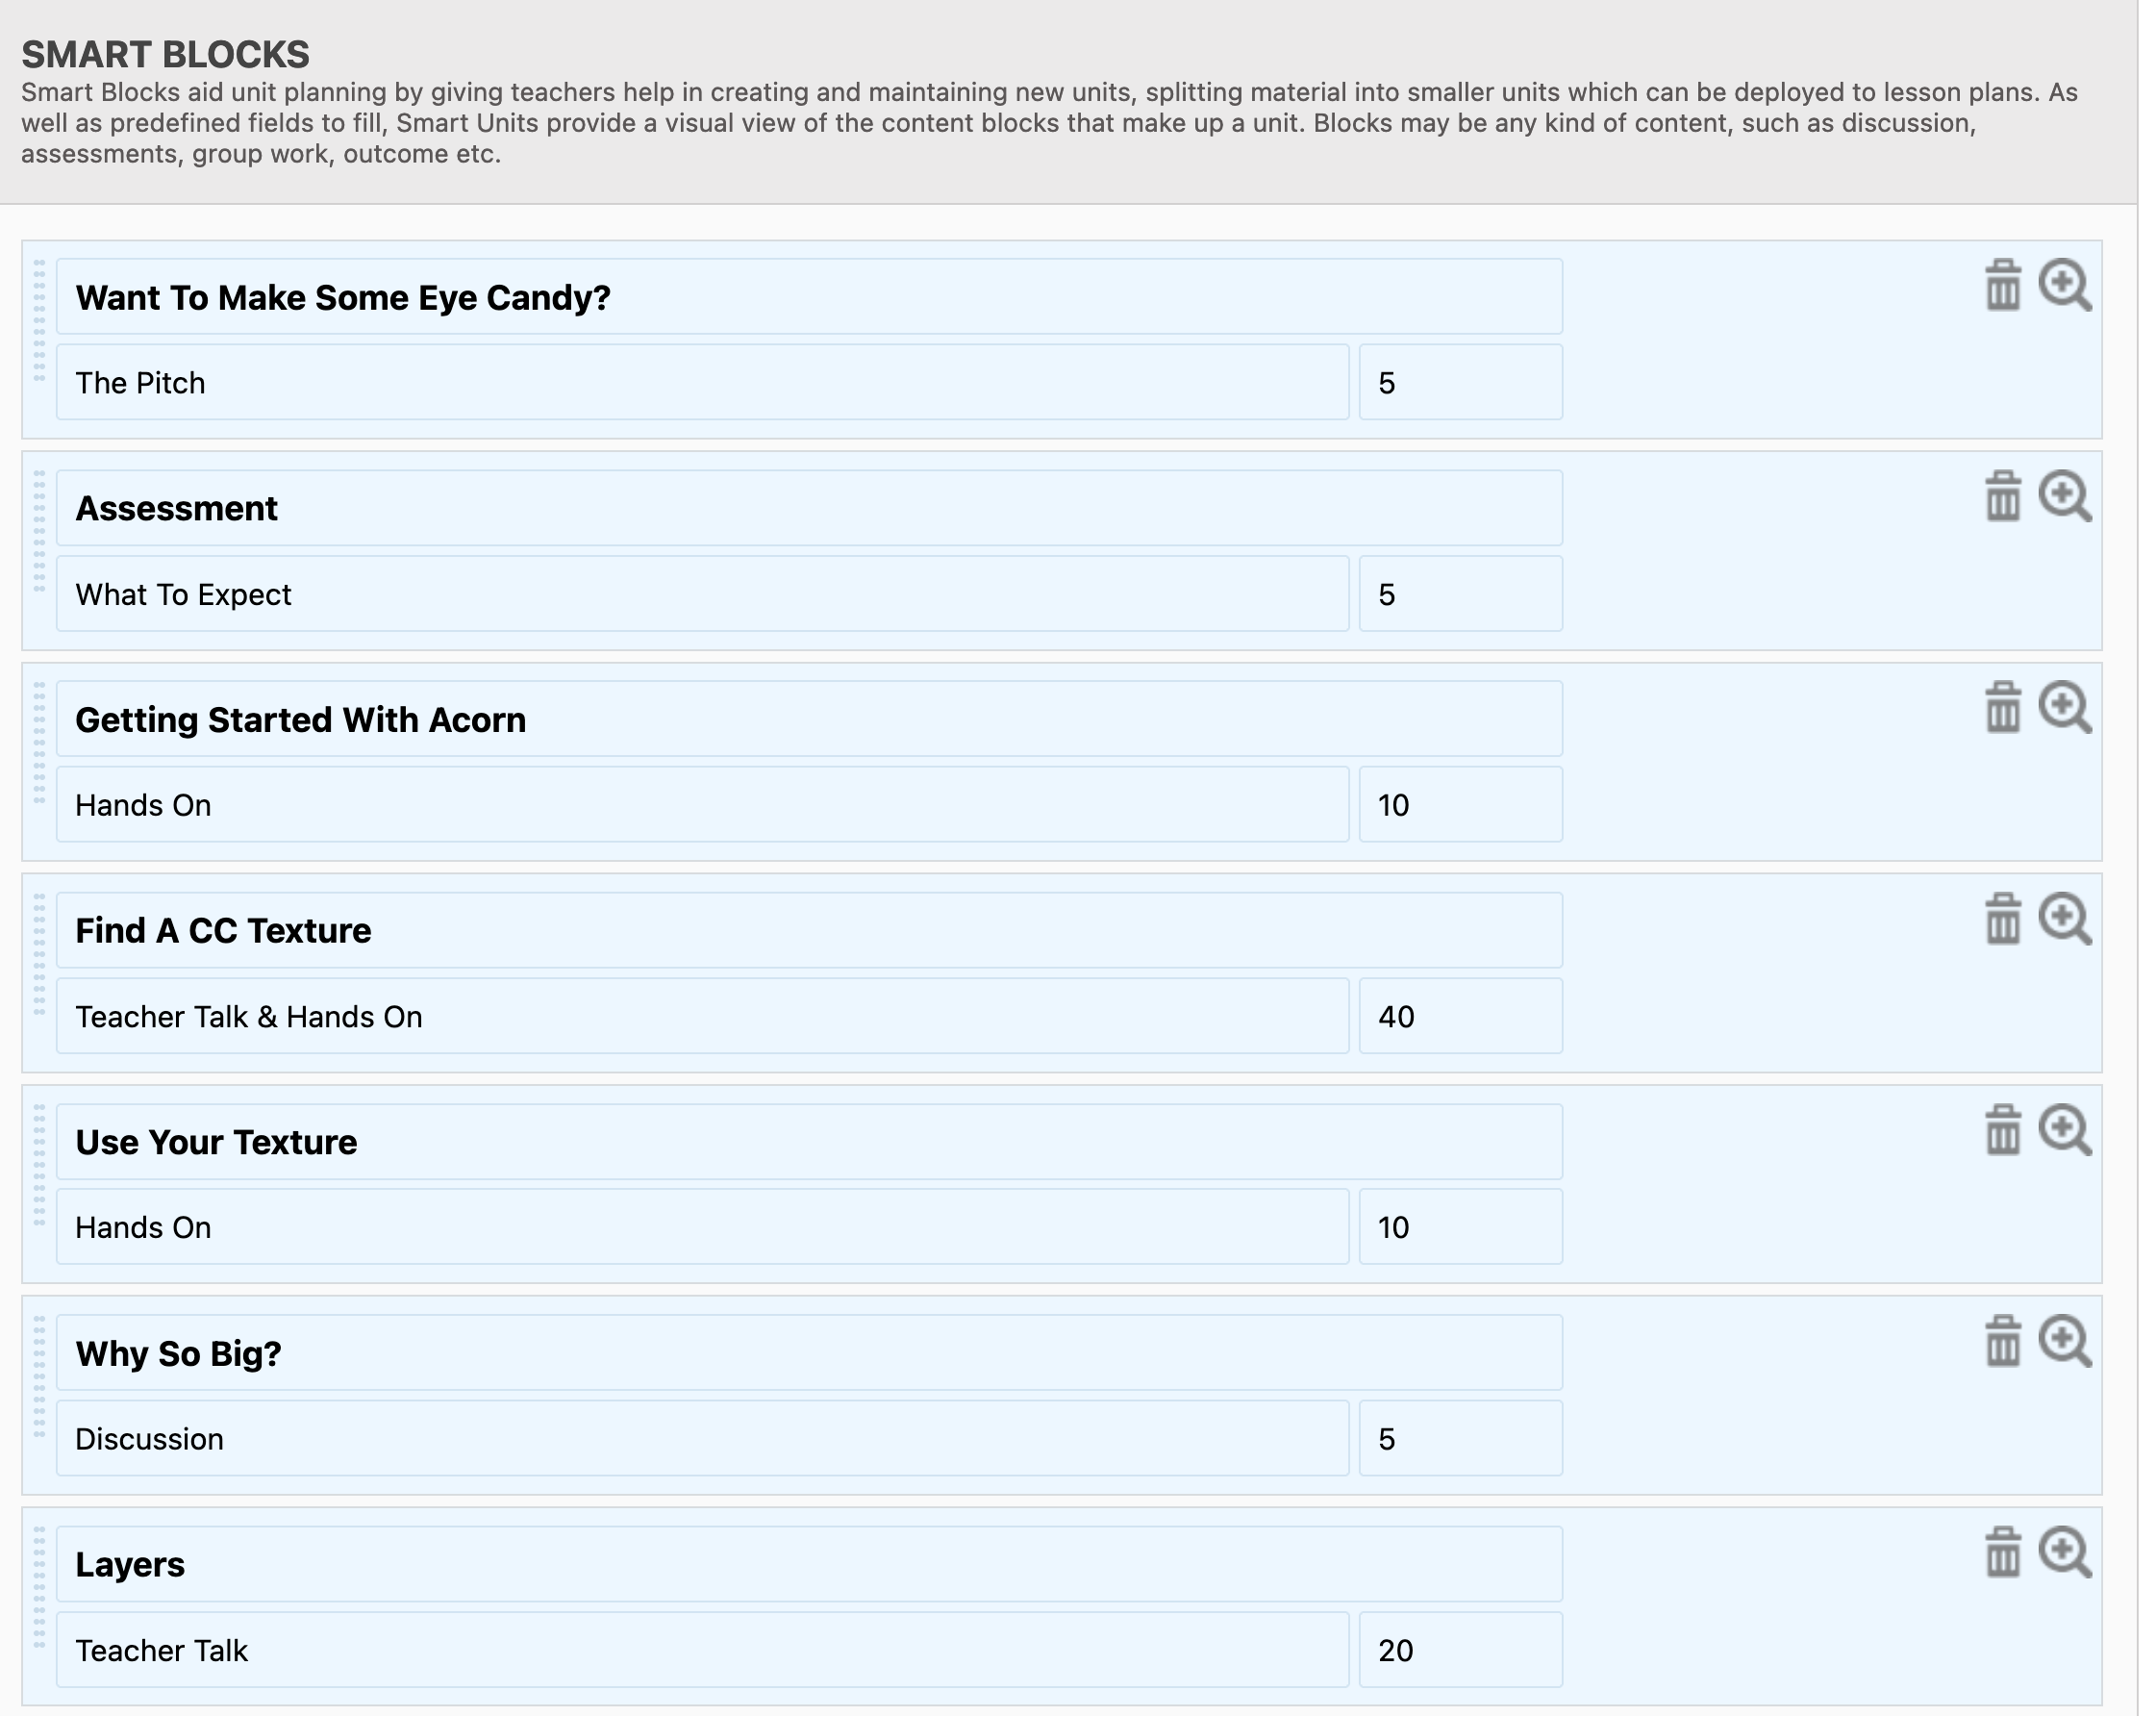
Smart Blocks - the problem with approach 2 is that all your content is stuck in your lessons, making it harder to reuse in different classes, courses and school years. The solution is to store your learning content in Smart Blocks, which exist within the unit. Blocks can be stacked, dragged and drop, and can have their contents shown or hidden. Once blocks are in a unit, they can be deployed to a class very quickly, allowing detailed lesson plans to be produced in a few minutes.
Smart Blocks Pro - most users start by making blocks a single lesson (as this is easy to conceptualise). However, if you can make your smart blocks smaller (e.g. activities, assessments, teacher talk, etc), you have more control over your content. If, for example, you do not finish part of a lesson, you can just drag that content into the next lesson. In addition, if your blocks have times, when you come to deploy a unit, the system will try and place them into lessons automatically, saving time again. The video below gives an overview of how Smart Blocks work:
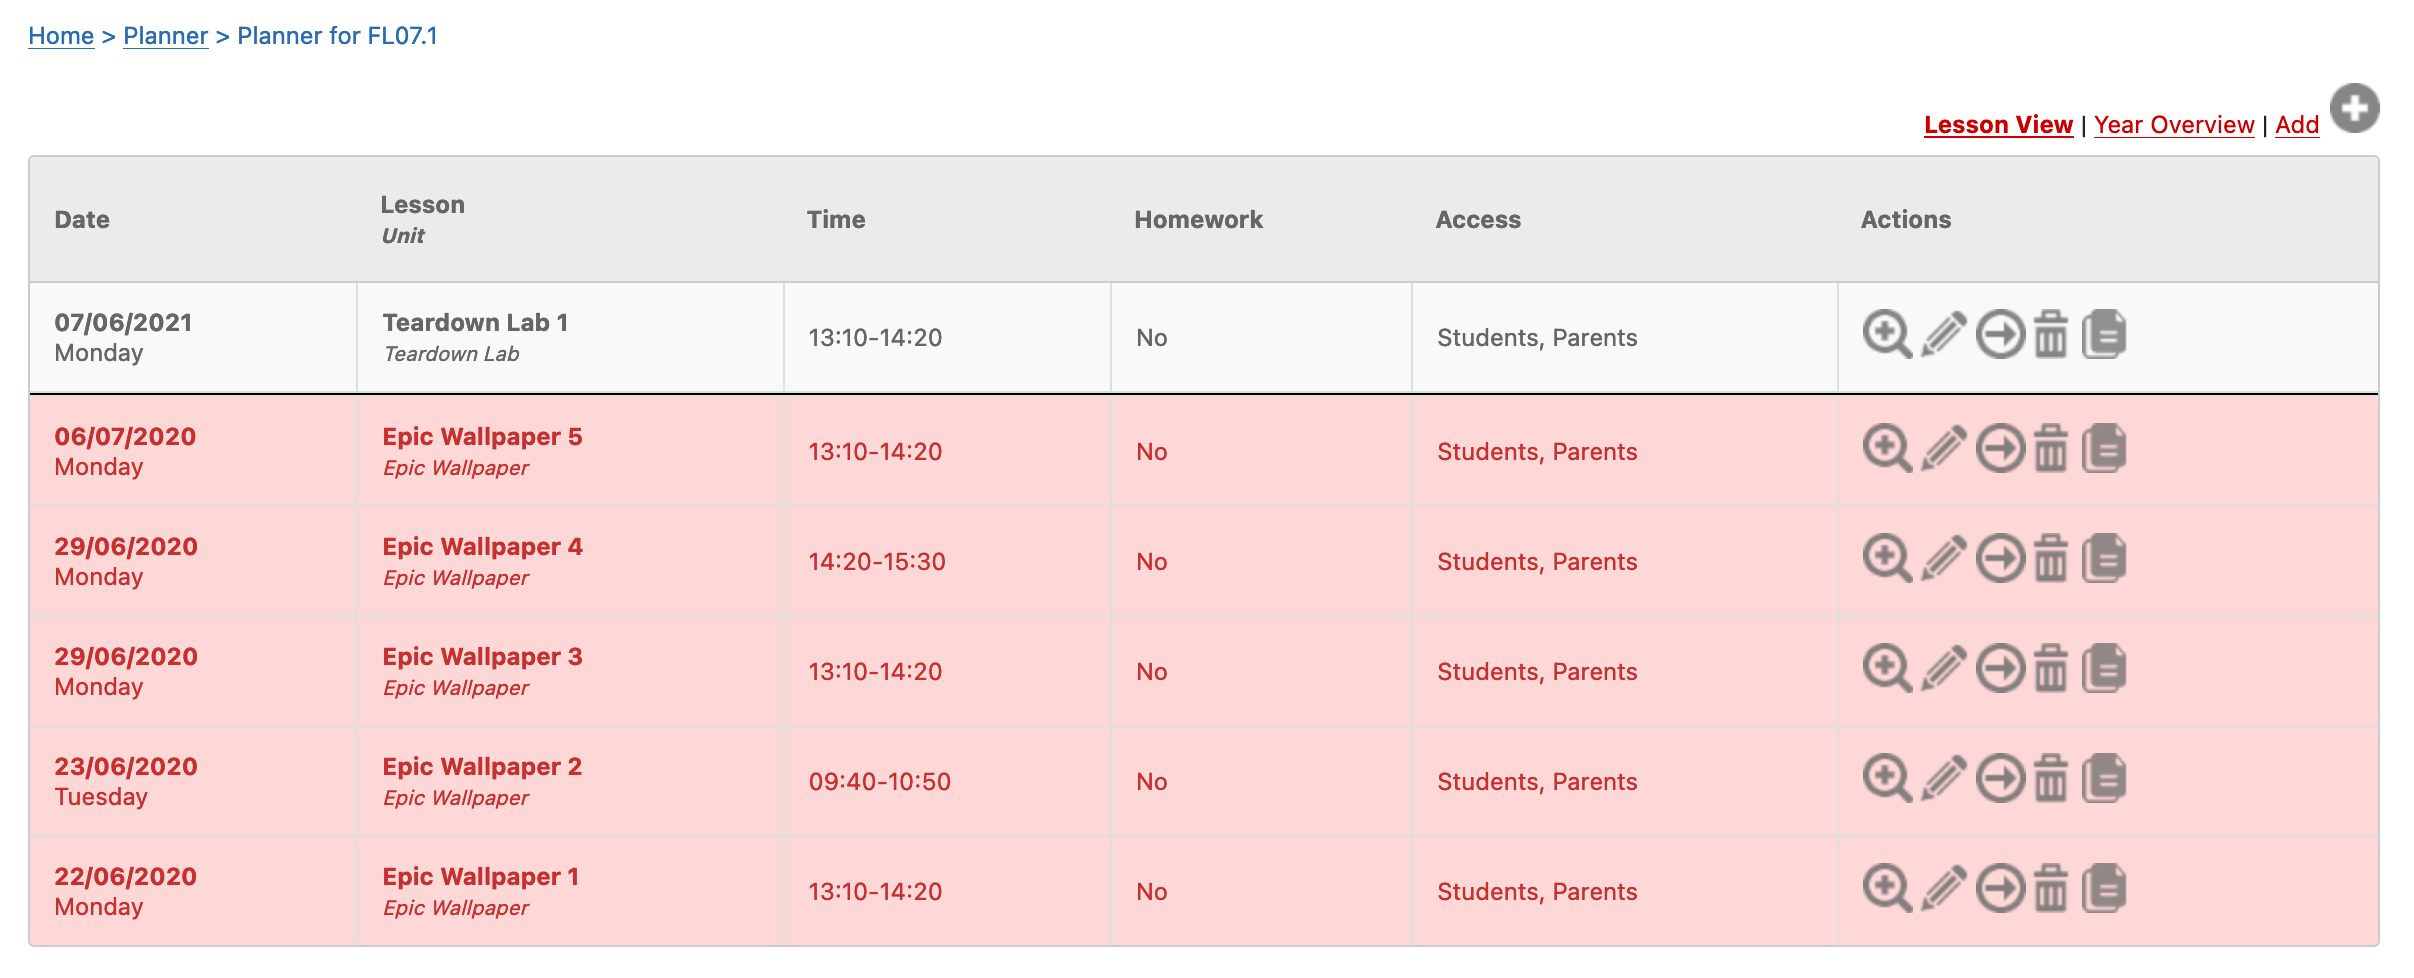
Lesson Planner
Introduction
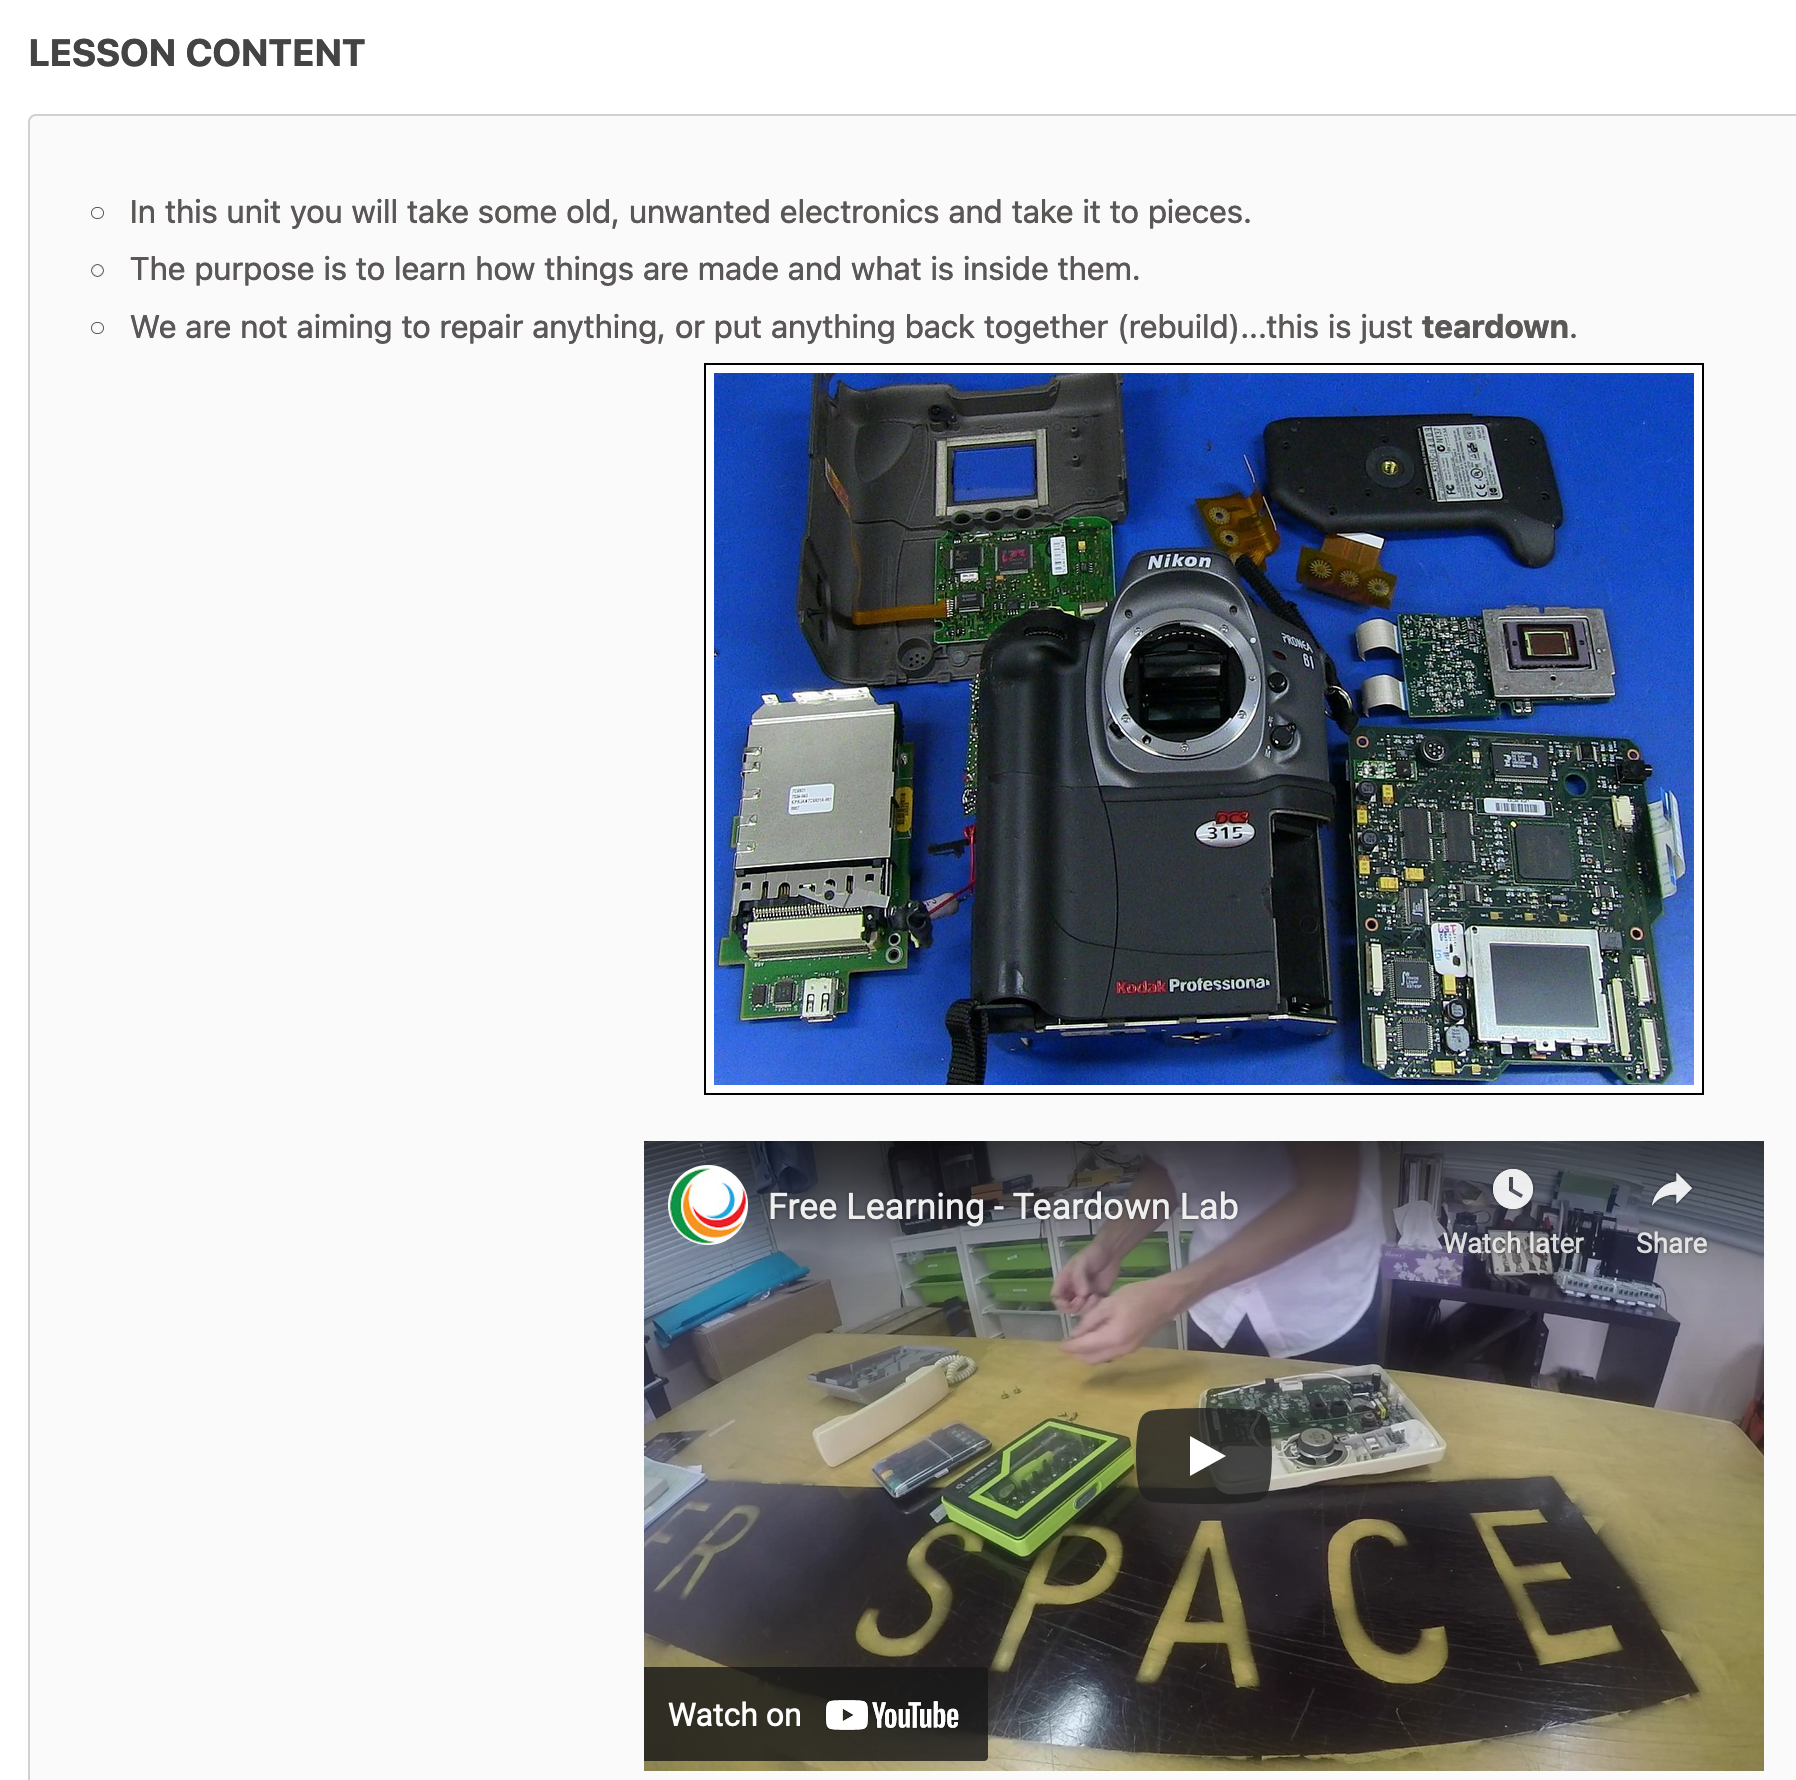
Lesson Planner allows teachers to create, manage and deliver individual lesson, according to the classes you teach and the details of your timetable (if you have a timetable setup for you). In addition, you can manage lessons created automatically through the use of Smart Units. You can choose whether to make lessons available to students and/or parents, and in doing so use Gibbon as a virtual learning environment. The image below shows lessons which have been created for a class, organised by date:
Below you can see the content from an individual lesson plan, including multimedia elements (an image, and an embedded YouTube video):
Features
The Lesson Planner offers the following features:
View/edit lessons by date or class.
View complete year overview for a class (useful for medium-term planning).
Share lessons with students and/or parents.
Embed rich content into your lessons.
Assign, collect and mark homework (via the Markbook).
Manage homework deadlines, and check completed work (for students)
Quickly see summary of students in class, their individual needs, medical conditions and more.
Take class attendance, and compare to school attendance.
Threaded chat to engage teachers, students and parents in discussions.
Getting Started
Go to Learn > Planner in the main menu at the top of the page.
Use the Choose A Date or Choose A Class menus on the right-hand side module menu.
Use the Add button to start creating your first lesson plan.
Alternatively, use the link to Manage Units, create a Smart Unit, and have your lessons created automatically for you.
Homework & Online Submission
One of Gibbon’s aims is to save teacher time by offering a system of smart workflows. Part of this process is arguably one of Gibbon’s most time-saving features: the ability for students to submit work online. The result of using this feature is an organised collection of work, attached to a lesson, rather than a disparate set of emails or Google Docs.
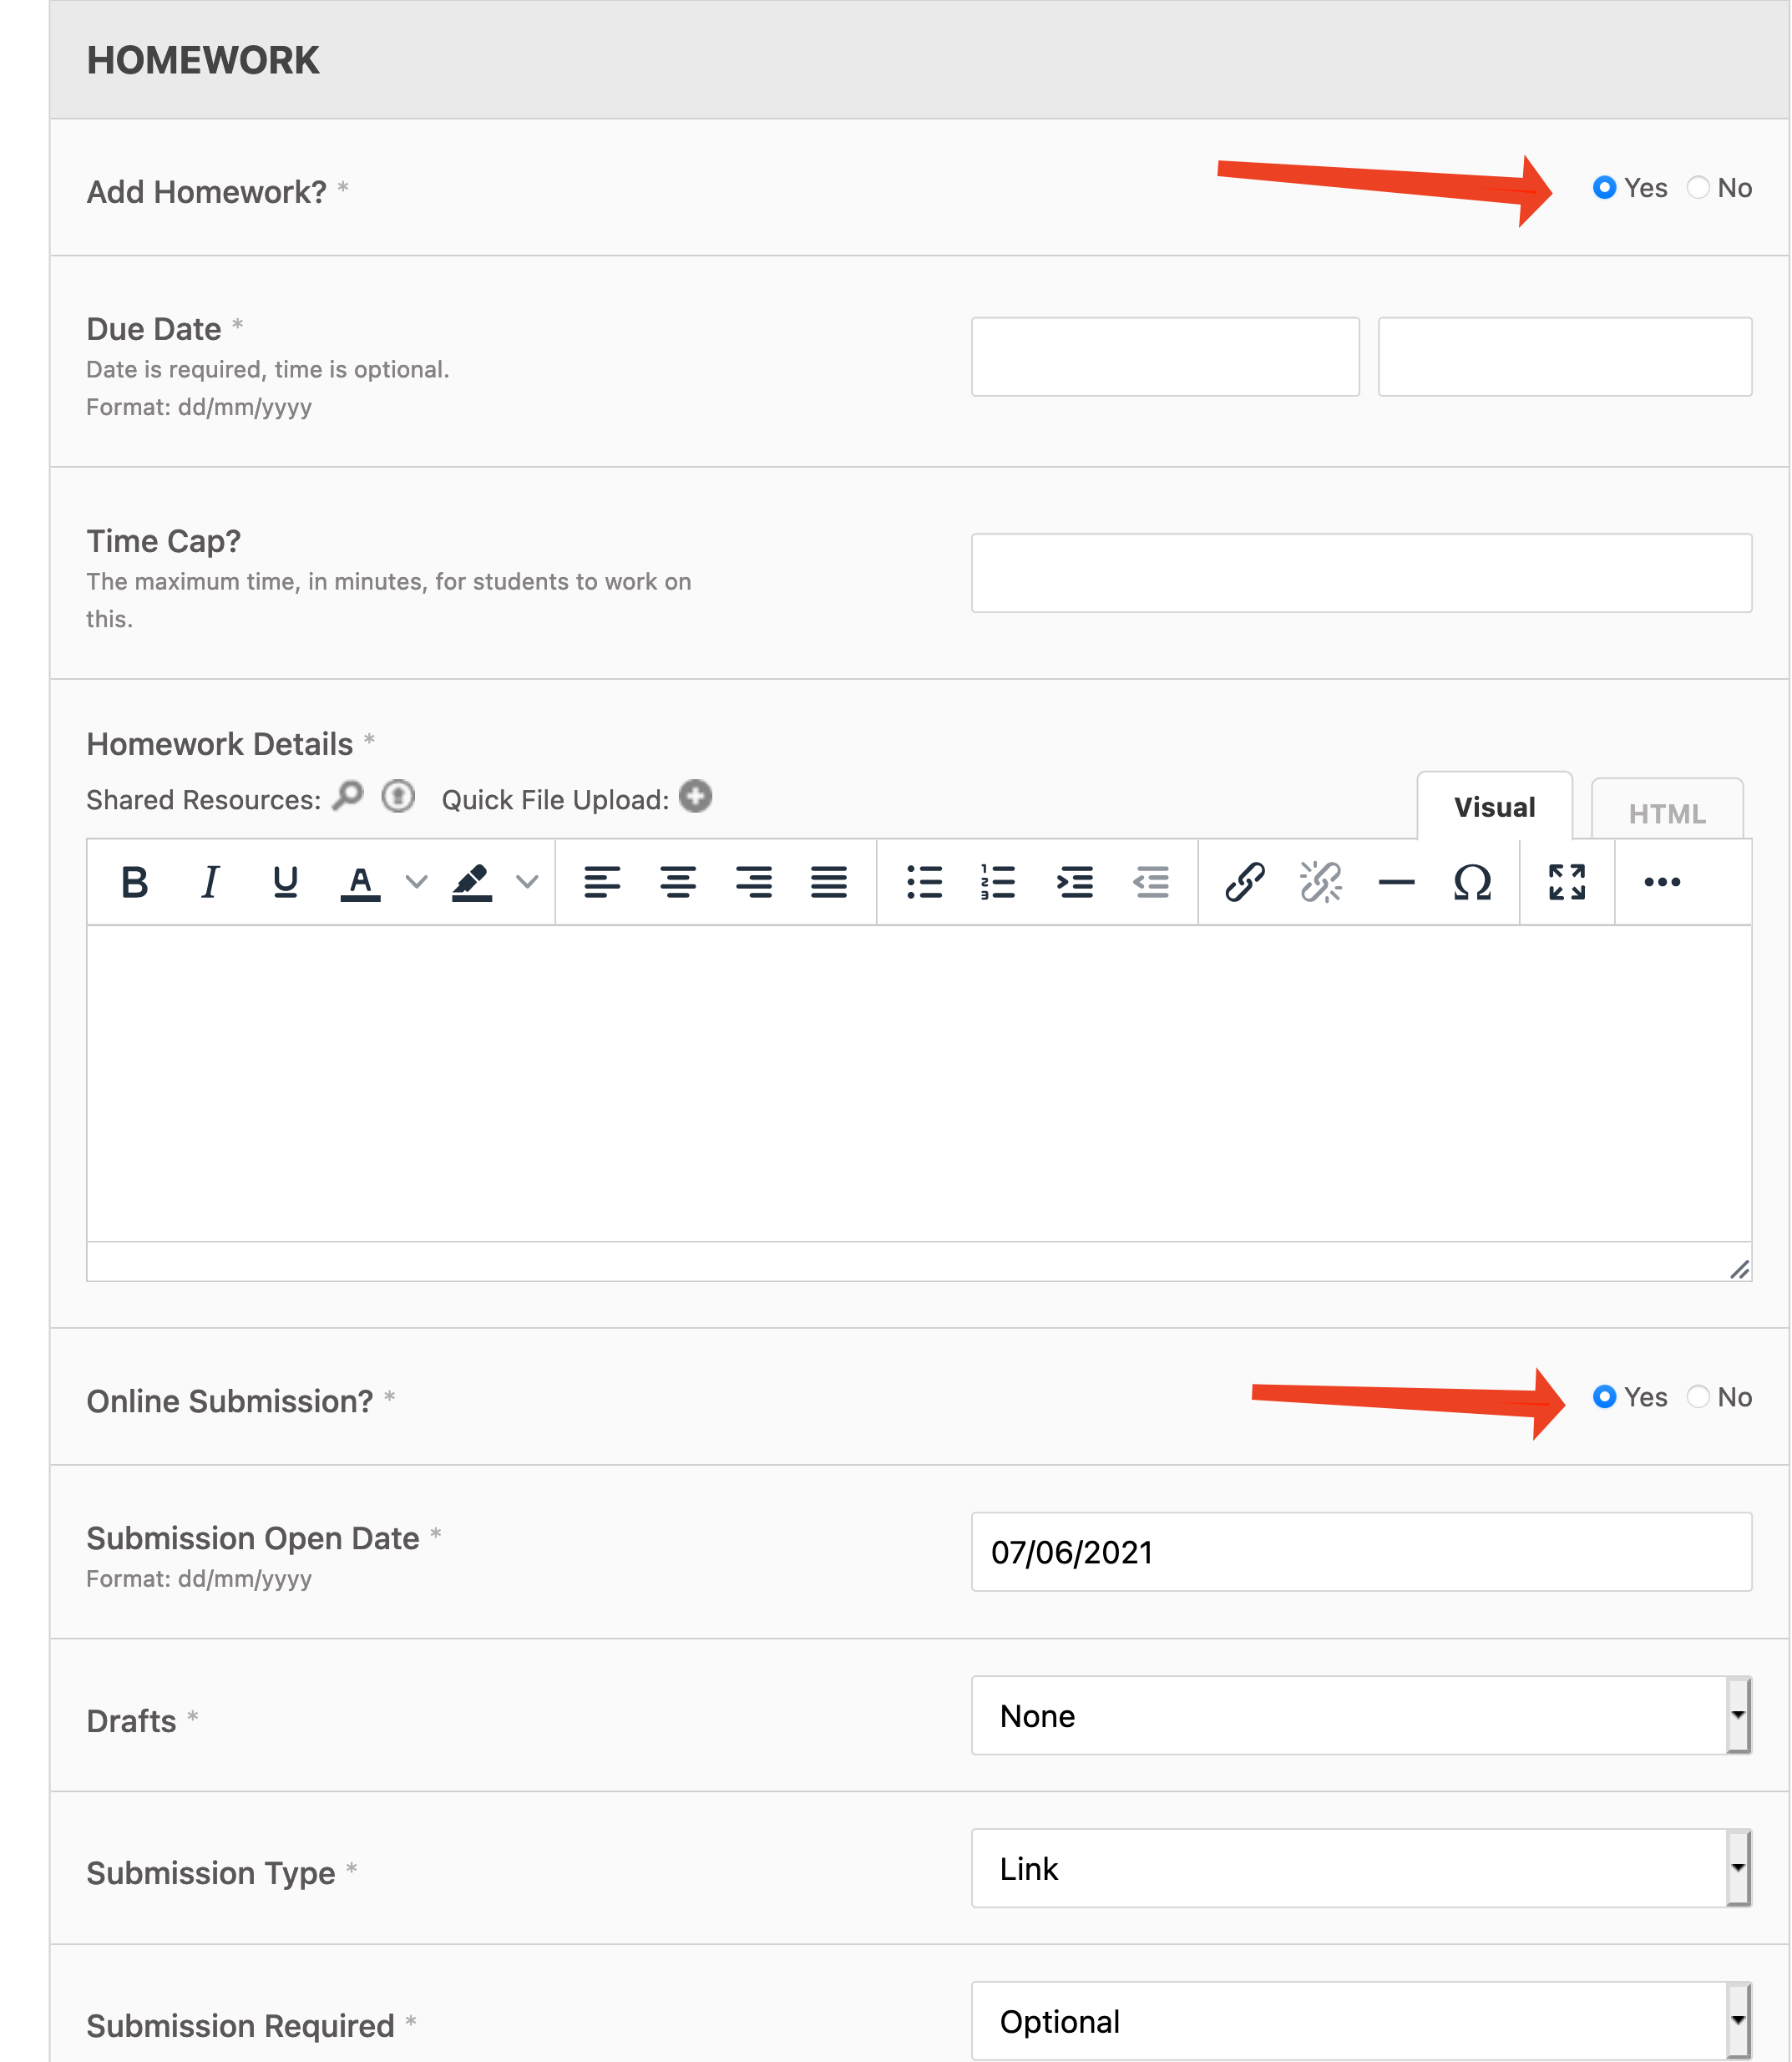
If you are interested in using this feature, you can enable it in the Lesson Planner edit view. Once editing a lesson, scroll down the to Homework section, and turn homework on, entering deadline and other details.
Next, enable the Online Submission option, which is at the bottom of the Homework section:
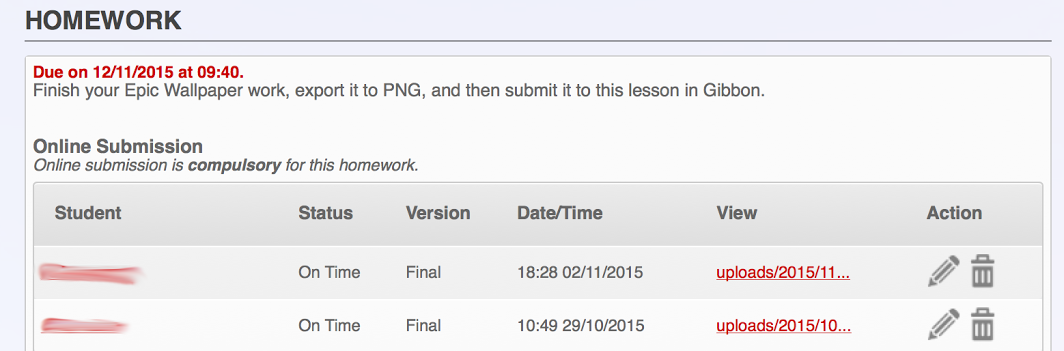
If you save the lesson plan, and then view it, you will see a list of students. Students can submit from right in the lesson plan. Your student list will fill up with submissions, with late submissions being highlighted automatically (and flagged for action by tutors), as shown below:
Taking this further, you can also show the submitted work in the Markbook, and thus view and mark in one place. It also allows parents to see the work that has been assessed.
Outcomes
Introduction
Outcomes allow a school to record and organise the learning objectives that are taught across the curriculum. Setting outcomes can be a fundamental first step in using Gibbon to manage teaching and learning within a school.
Uses
Tracking school-wide outcomes
Tracking department-specific outcomes
Tracking which units cover which outcomes (through the Unit Planner)
Tracking how students are performing across outcomes (through Rubrics and Markbook)
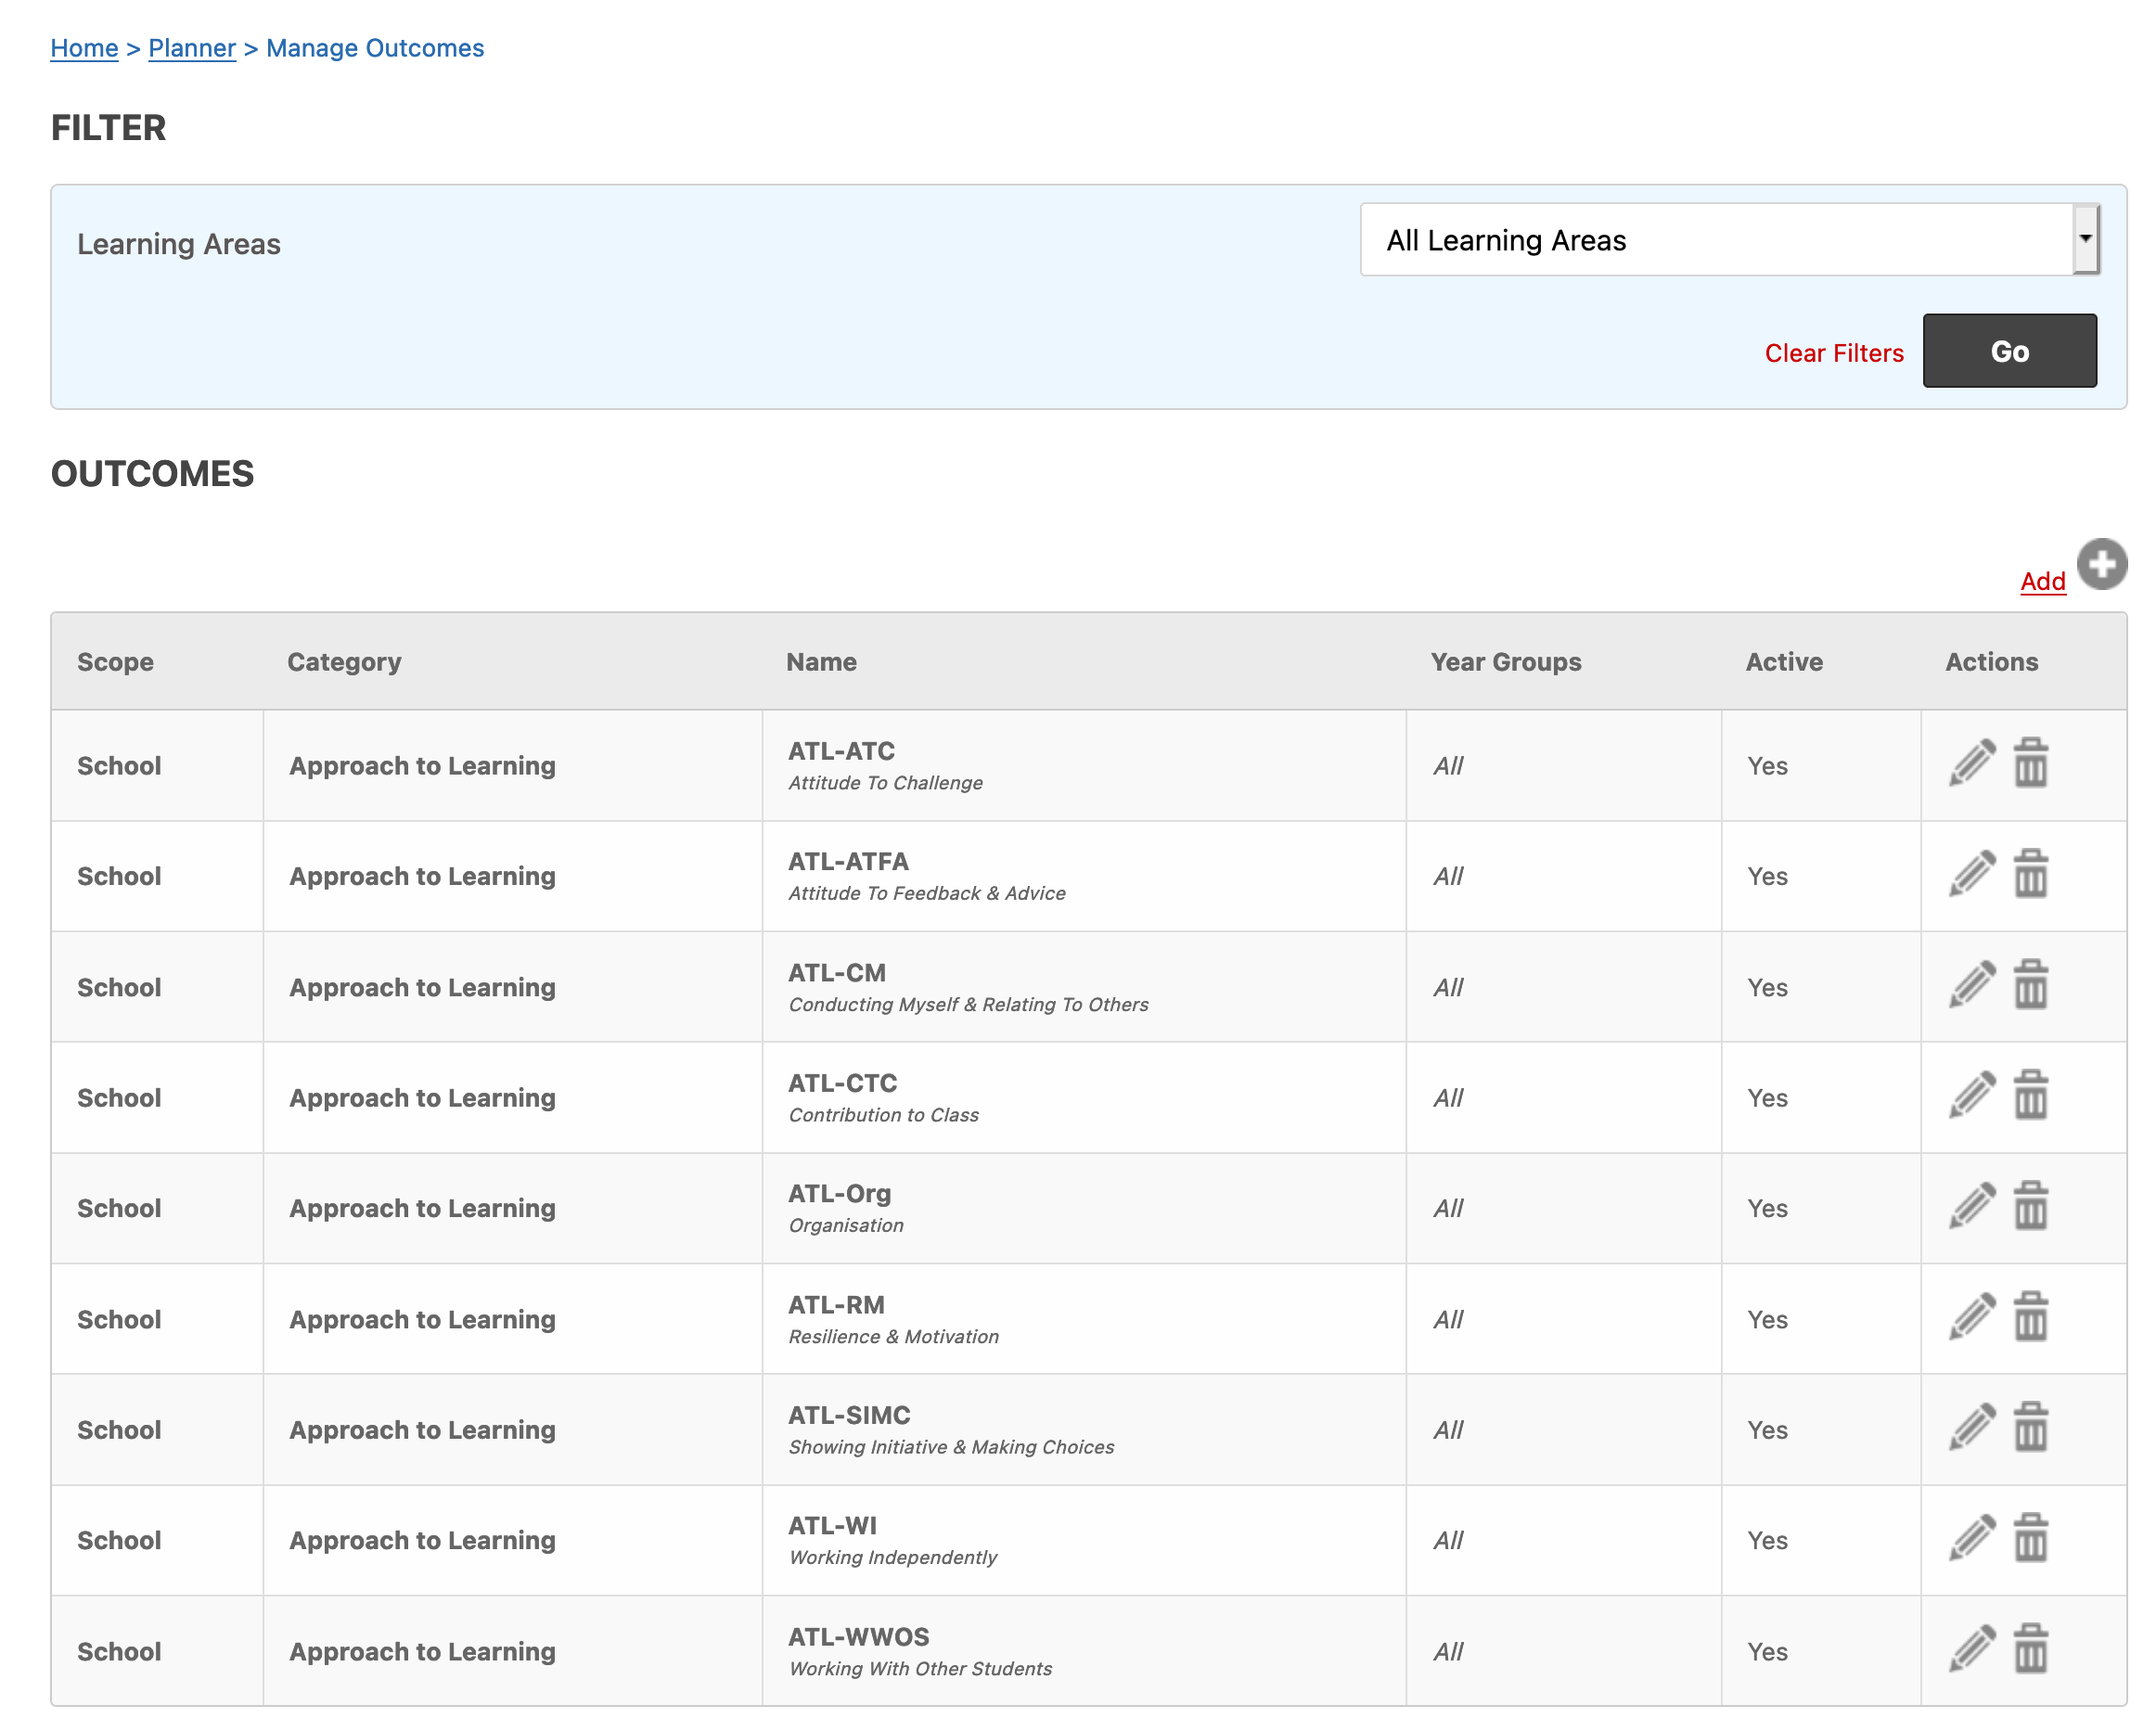
Getting Started
Go to Learn > Planner in the main menu at the top of the page.
Select Manage Outcomes link in the right-hand side module menu.
Use the Add button to start creating your first outcome.
Units
Introduction
Units provide a way to group lessons into logical groups, and so help keep curriculum details organised and easy to access. In addition, units can store unit outline information, with the option of school-wide templates to allow for some standards in planning (see screenshot below).
Departments, Courses, Classes, Units
Organisationally, Gibbon uses a hierarchical structure to keep content, people and workflow organised: Departments, Courses, Classes, Units.
Departments - used to group staff together, and assign them roles which determine ability to edit and view curriculum content.
Courses - the largest unit of learning, and are designed to contain a number of classes.
Classes - different groups studying within one course, classes split users into different roles (Teacher, Student, Assistant, etc).
Units - units are attached to courses, and can be used at the class level to organise content. Units can be copied between courses and between years.
Smart Blocks
Smarts Blocks are a part of Gibbon’s units and are designed to ease the planning burden that all teachers face. Units are reconceived as a set of individual content blocks, each of which might represent an activity, outcome, resources or discussion point. Blocks are assigned times, and can then be quickly deployed into a class, across a number of lessons. Once deployed, blocks can be easily edited, dragged between lessons and removed. The result is an intuitive, time saving planner, which promotes collaboration, reuse and continuous improvement.
Getting Started
Go to Learn > Planner in the main menu at the top of the page.
Select Manage Units link in the right-hand side module menu.
Use the Add button to start creating your first unit.
Whilst working on your first unit, decide whether you wish to create a Smart Unit or a Basic Unit.
Deploying a Unit
Introduction
Units that contain Smart Block content can rapidly be deployed to create a set of lesson plans. The content of these plans can be amended or added to quickly at any time, with new lessons being added as needed.
Getting Started
In order to deploy a unit with Smart Blocks, do the following:
Go to Learn > Planner in the main menu.
Click on Unit Planner in the module menu (in the sidebar).
Use the Choose A Course drop down menu in sidebar to select the course containing your unit.
Click on the Edit icon against the unit you would like to deploy.
Once the unit loads up, scroll down to the Classes section, and set those classes you want to deploy to Yes in the Running column.
The icons under the Actions column will appear once you press the Submit button, and the page reloads.
Now click on the Edit icon against the class you would like to deploy to.
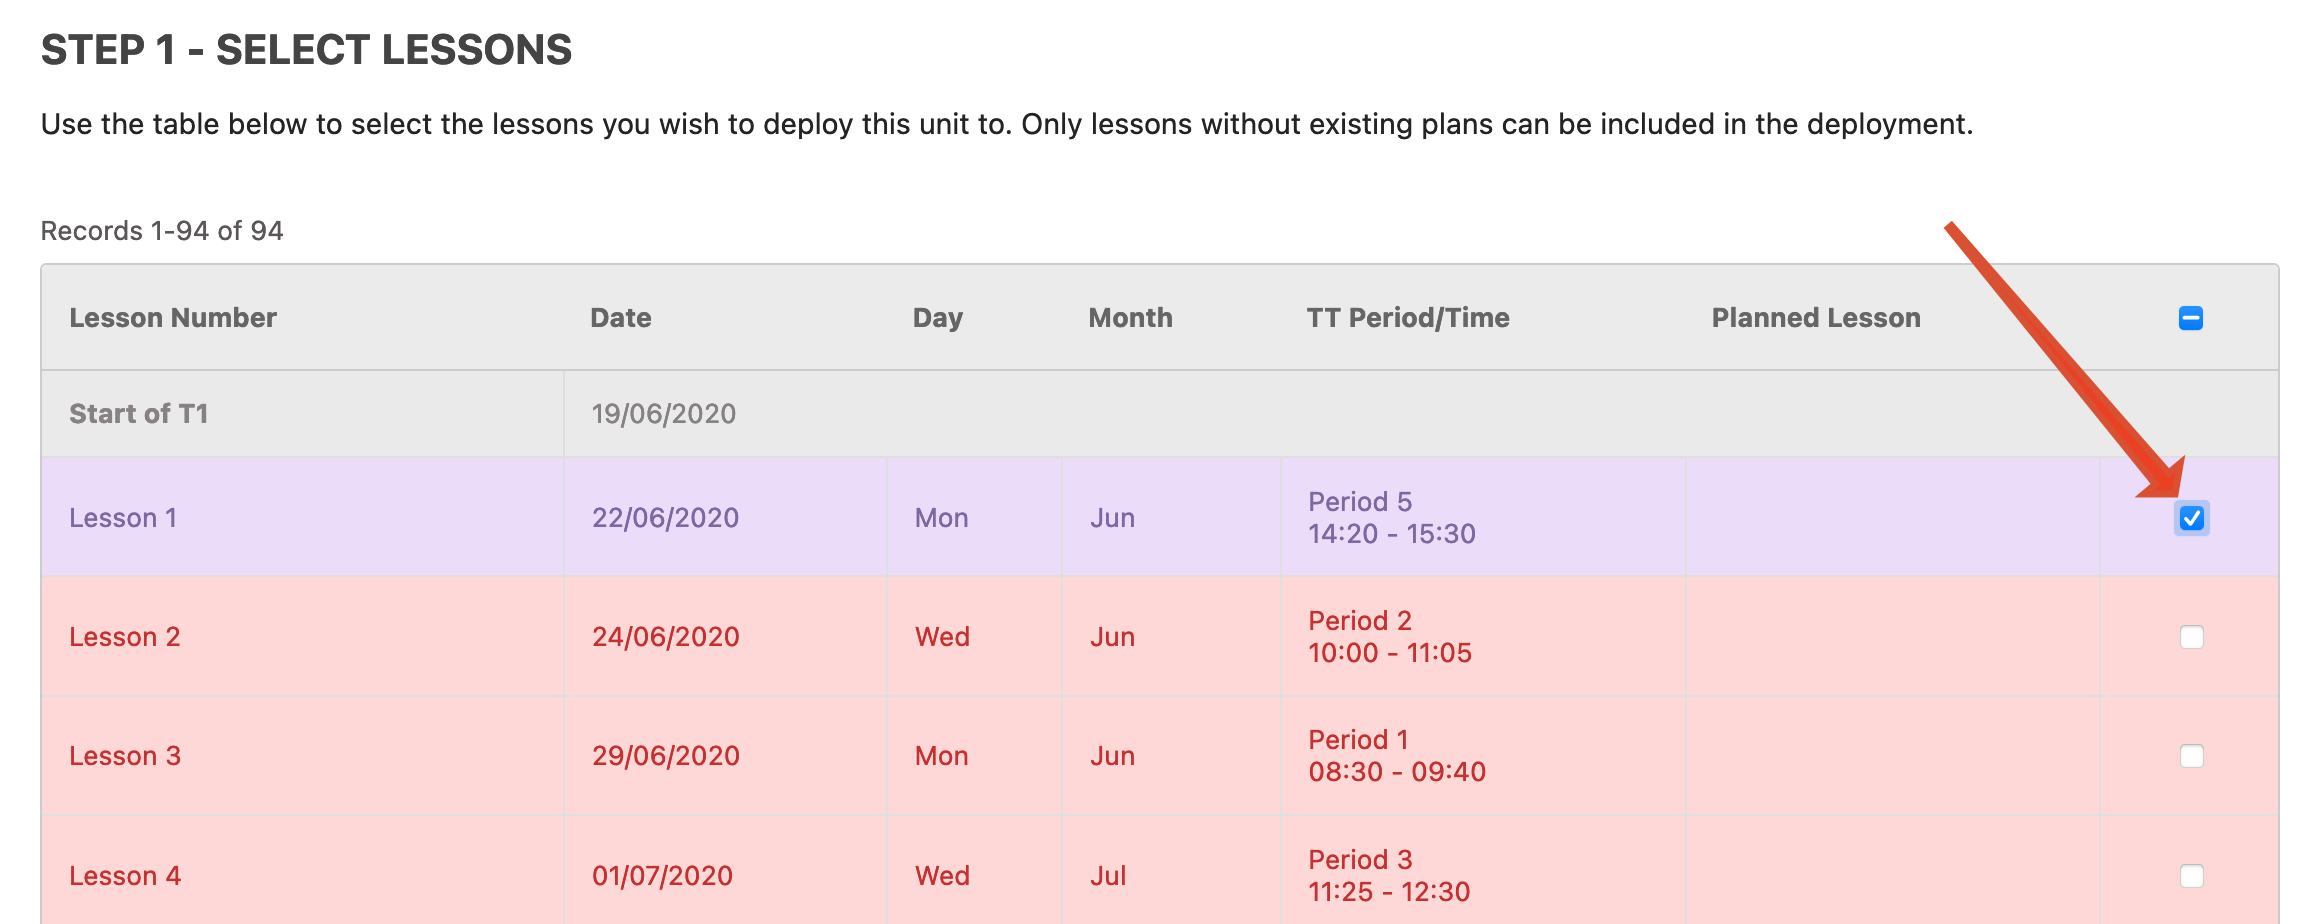
You will see a list of all lessons in the year (according to the timetable), from which you can select the lessons you wish to deploy to. Select classes by checking the boxes in the Include column:
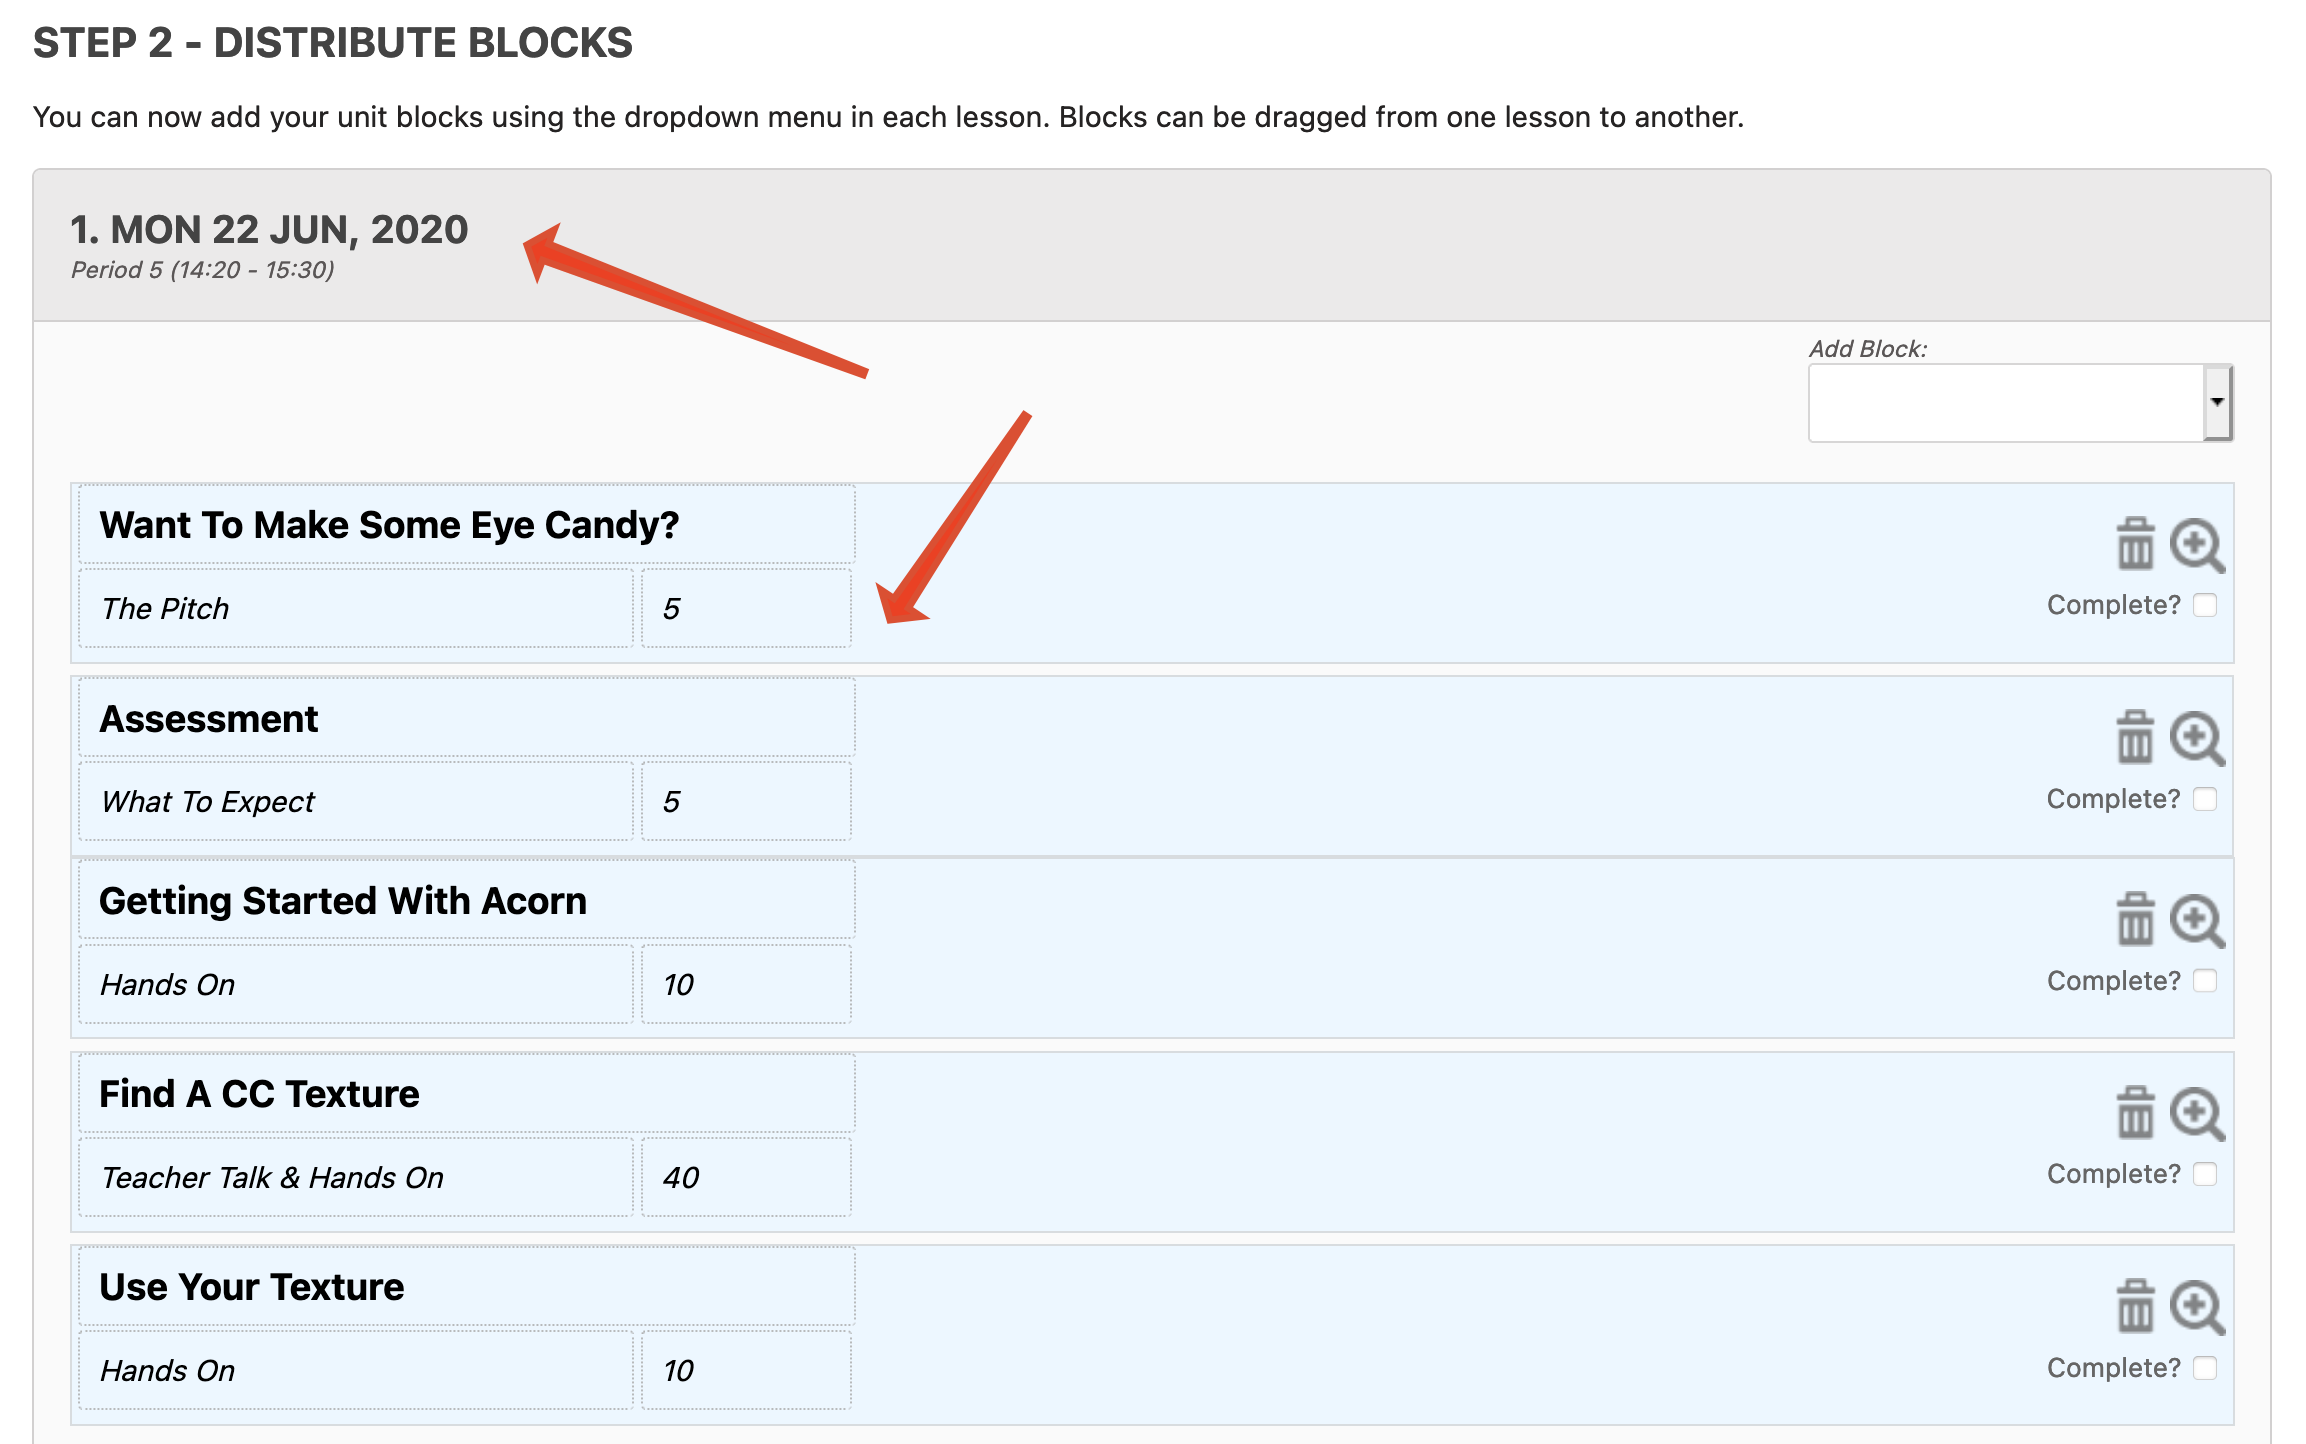
In the final step, you will see slots for the new lessons, and, if your blocks have timings, they should be prefilled with content.
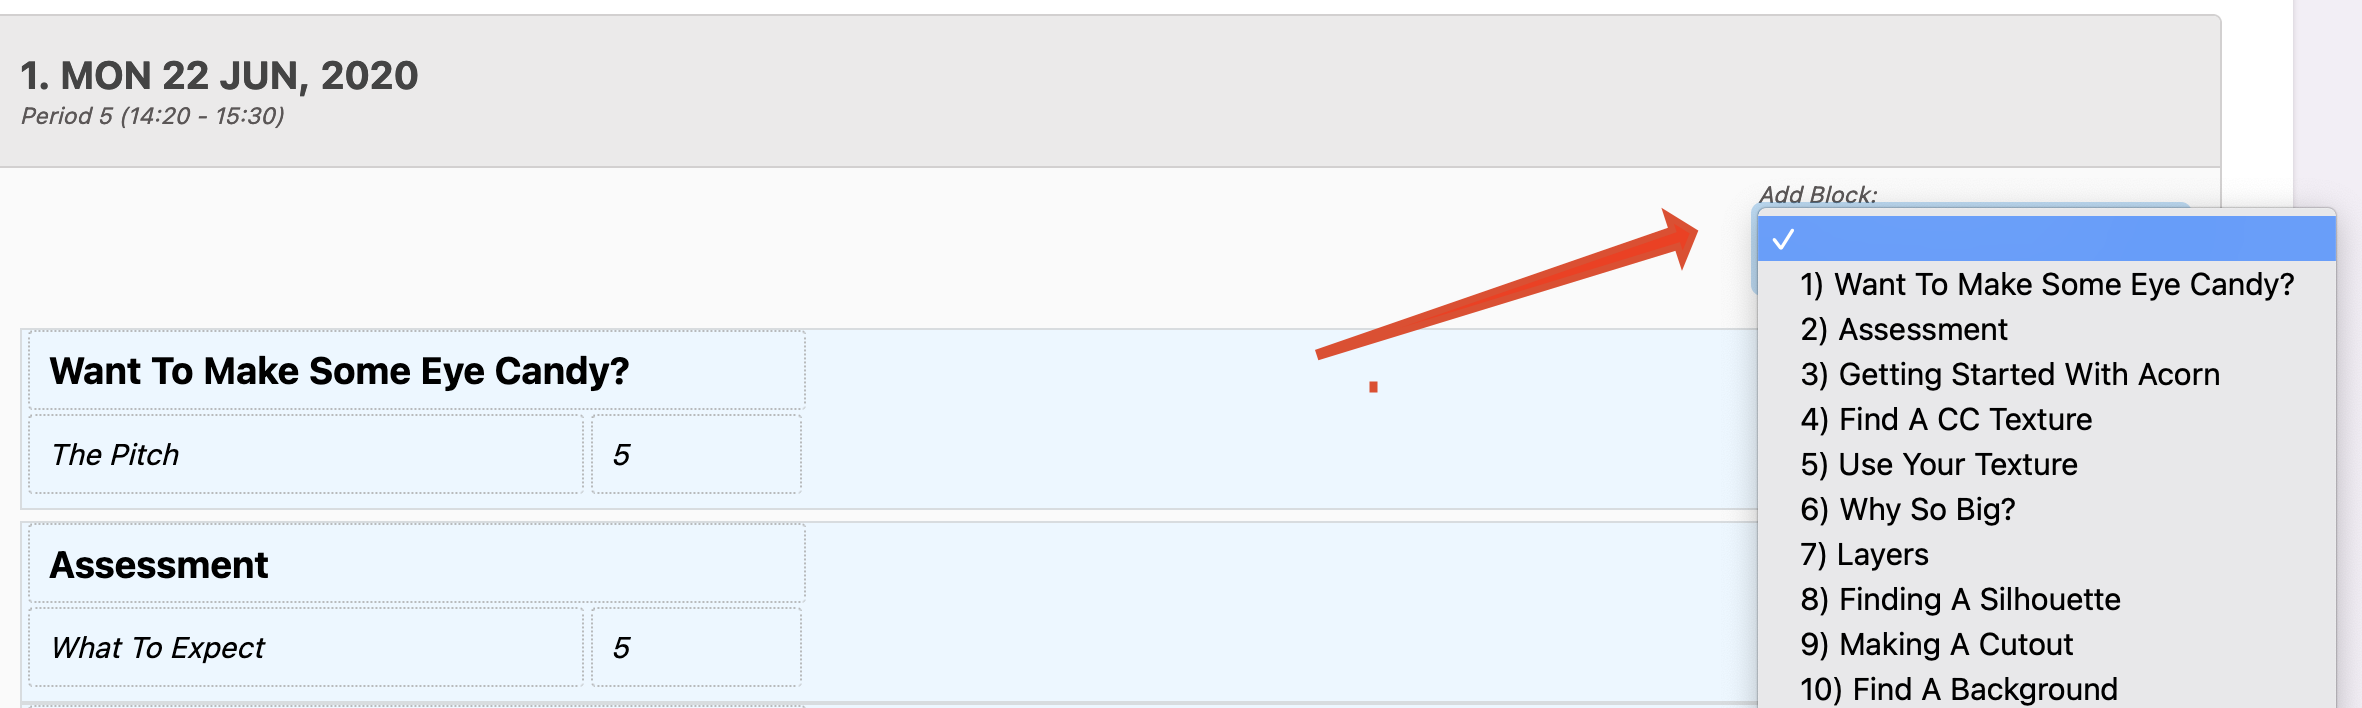
If your blocks don’t have timings, or you want to add new blocks, you can use the Add Block drop down in the relevant lesson:
Remember, you can reorder blocks within a lesson, or move them to other lessons, by dragging and dropping them.
Once finished, press the Submit button to create your lesson plans.
Exporting Units
Introduction
If you are leaving your current school, which uses Gibbon, and wish to take your units with you, you can use the Export feature to output your unit onto the screen. From here, you can save the HTML using your browser, or copy and paste the content into a document of some kind.
Exporting
Go to Learn > Planner in the main menu at the top of the page.
Use the Unit Planner link on the right-hand side module menu to enter the units section.
Use the Choose A Course drop down menu on the right-hand side to select the course in which your unit lives.
Use the Export button for the unit you wish to export:
Finally, either use your browser to save the page as HTML (recommended), or copy and paste your work to a document (e.g. Word, Pages, Google Drive).
Timetable
Introduction
The Timetable provides teachers with an easy way to find staff and students during the school day. Your own calendar can be integrated with Google Calendar, to give you an all in one display of your day, right on your home page.
Getting Started
You should see your own timetable on your home page.
To view timetables for staff or students, go to Learn > Timetable in the main menu.
Select or search for the person you are interested in.
The desired timetable will display on screen:
Use the controls at the top to change dates
The magnifying class shows that there is a lesson plan attached to this class: click on it to view the lesson.
People
Behaviour
Introduction
The text below gives a brief description of how the Behaviour module functions to support pastoral care in school.
Getting Started
To get started, go to People > Behaviour in the main menu.
Overview
The behaviour modules maintains a set of behaviour records for students, where each record is one event or behaviour.
Events can be either positive (x helped y) or negative (x hit y).
When a positive comment is recorded, the student gets a “like” (e.g. gold star, merit, etc)
When a negative event is recorded, the students’ form tutor will be notified.
Events have descriptors, which are like main categories (e.g. Being Nice, Helping Others, Working Together for positive, or Hitting, Fighting, Swearing for negative).
These descriptors can be easily customised (or turned off all together) under Admin > School Admin > Manage Behaviour Settings.
Events have levels, which say how severe something is (e.g. Level 1, Level 2, Level 3).
These levels can be easily customised (or turned off all together) under Admin > School Admin > Manage Behaviour Settings.
The teacher adding the record can do so for one student, or a group of students together.
When adding the record, an initial comment on the incident can be made. This can be added later, or follow up information can be placed in an individual box.
Form tutors see a summary of recent behaviour for their form on the home page.
A behaviour summer of each student is given in the behaviour module, and in the student profile.
There is a pattern spotter, for seeking particular types of behaviour.
Student Profiles
Introduction
Gibbon, being a combined school information management system (SIM/SIS) and virtual learning environment (VLE) collects and collates a lot of information on each student. As one of its key aims, Gibbon seeks to make this information available in an easily accessibly and clear fashion. This is achieved via Student Profiles, which are accessed via the Students module.
Getting Started
There are three ways to access a student’s profile in Gibbon:
Go to People > Students in the main menu, then search and then select the desired student.
Use the Fast Finder in the page header, and start typing the students’ name. Select the desired student from the drop down menu, and press Go.
Click on a student name almost anywhere in the system: most instances of student names are links direct to the relevant part of their profile (e.g. clicking on a student name in a class markbook, will take you to that students’ academic results.
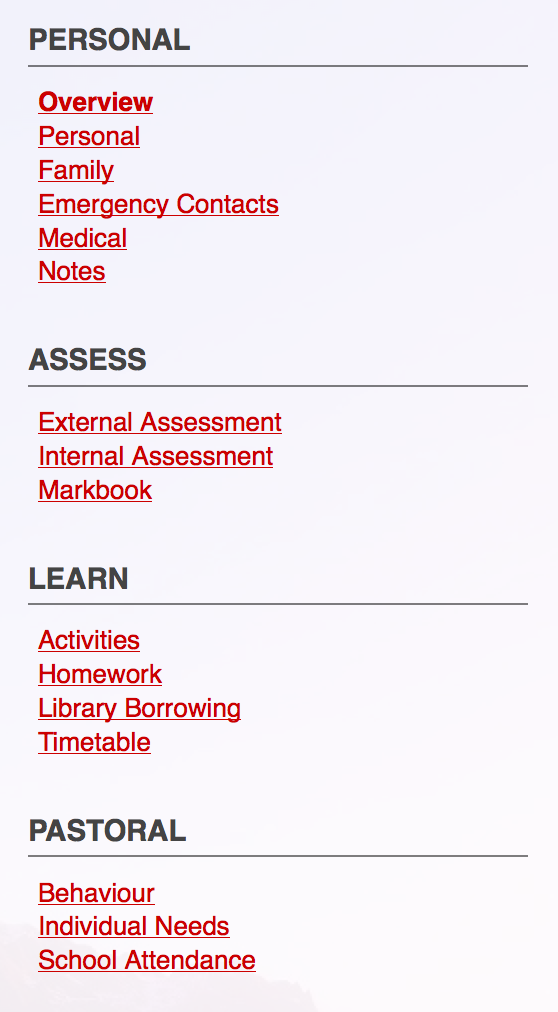
FeaturesFeatures The list below is taken from the sidebar menu of the Student Profile, and shows the range of information available to teachers:
Other
Finance
Introduction
Gibbon currently offers two sets of finance-related functionality:
Billing - allows for the creation, sharing and tracking of invoices for student-related fees.
Expenses - allows for expense requests, approval and tracking.
Expenses
Introduction
Gibbon’s expenses functionality currently facilitates expense requests, approval and tracking. Use the links below to learn more about this area of the system:
Budgets allow the division and annual re-stocking, of financial resources, against which expense requests can be made. The following three concepts are useful in understanding how Gibbon’s budgets work:
Budgets - these are generally departments or school functions (e.g. Maths, ICT, Activities), and are responsible for financial resource allocation. Budgets have staff members who can have the following types of access:
Full (approve requests)
Write (make requests)
Read (view requests)
Budget Cycles - these are generally school or financial years or quarters, and are used to divide spending into time frames.
Budget Allocation - these are sums of money that are allocated to a budget in a given budget cycle.
Getting Started
Go to Other > Finance in the main menu at the top of the page.
Select Manage Budgets in the module menu
Use the Add button to create new budget areas.
Ensure that new budget areas have the correct staff, with the correct permissions, allocated to them.
Select Manage Budget Cycles in the module menu
Use the Add button to create new budget cycles.
For each new budget cycle, allocate funds to appropriate budgets.
Expenses require approval before they can be made against a budget. Approval takes place at the school and budget levels, and can take different forms, and involve different people, depending on the needs of the school, as described by the settings below
Budget Level Expense Approval - determines whether there is budget-level approval. If enabled, one of the staff members with Full budget access is required to approve a request, before school-level approval occurs.
Expense Approval Type:
One Of - only one of a group of school-level approvers need to approve an expense at the school level.
Two Of - two of a group of school-level approvers need to approve an expense at the school level.
Chain Of All - all school-level approvers need to approve an expense, in a certain order.
Once final approval has been given for an expense request, the originating user is notified of its approval, and the purchase can be made. Depending on options selected along the way, a purchase officer or reimbursement officer might also be notified during or after this process.
Getting Started
Go to Admin > School Admin in the main menu at the top of the page.
Select Manage Finance Settings in the module menu.
Scroll to the Expenses section, and set the required options for your school, to get the approval process of your liking.
Go to Other > Finance in the main menu at the top of the page.
Select Manage Expense Approvers in the module menu
Use the add button to specify those users who have school level approval rights.
Expenses require approval before they can be made against a budget. Use the introductions below to make a request against a budget you have access rights to, and you will receive notifications as your request makes its way through the approval process.
Getting Started
Go to Other > Finance in the main menu at the top of the page.
Select My Expense Requests in the module menu
Use the add button to create a new request, filling in all required fields.
Important Notes:
You can only make requests from budgets that you have access rights to.
If you set Purchase By to “School”, and your school has nominated a Purchasing Officer, that person will be notified to make the purchase once final approval has been granted.
If you set Purchase By to “Self”, you can claim reimbursement through the system once you have made your purchase
Messenger
Introduction
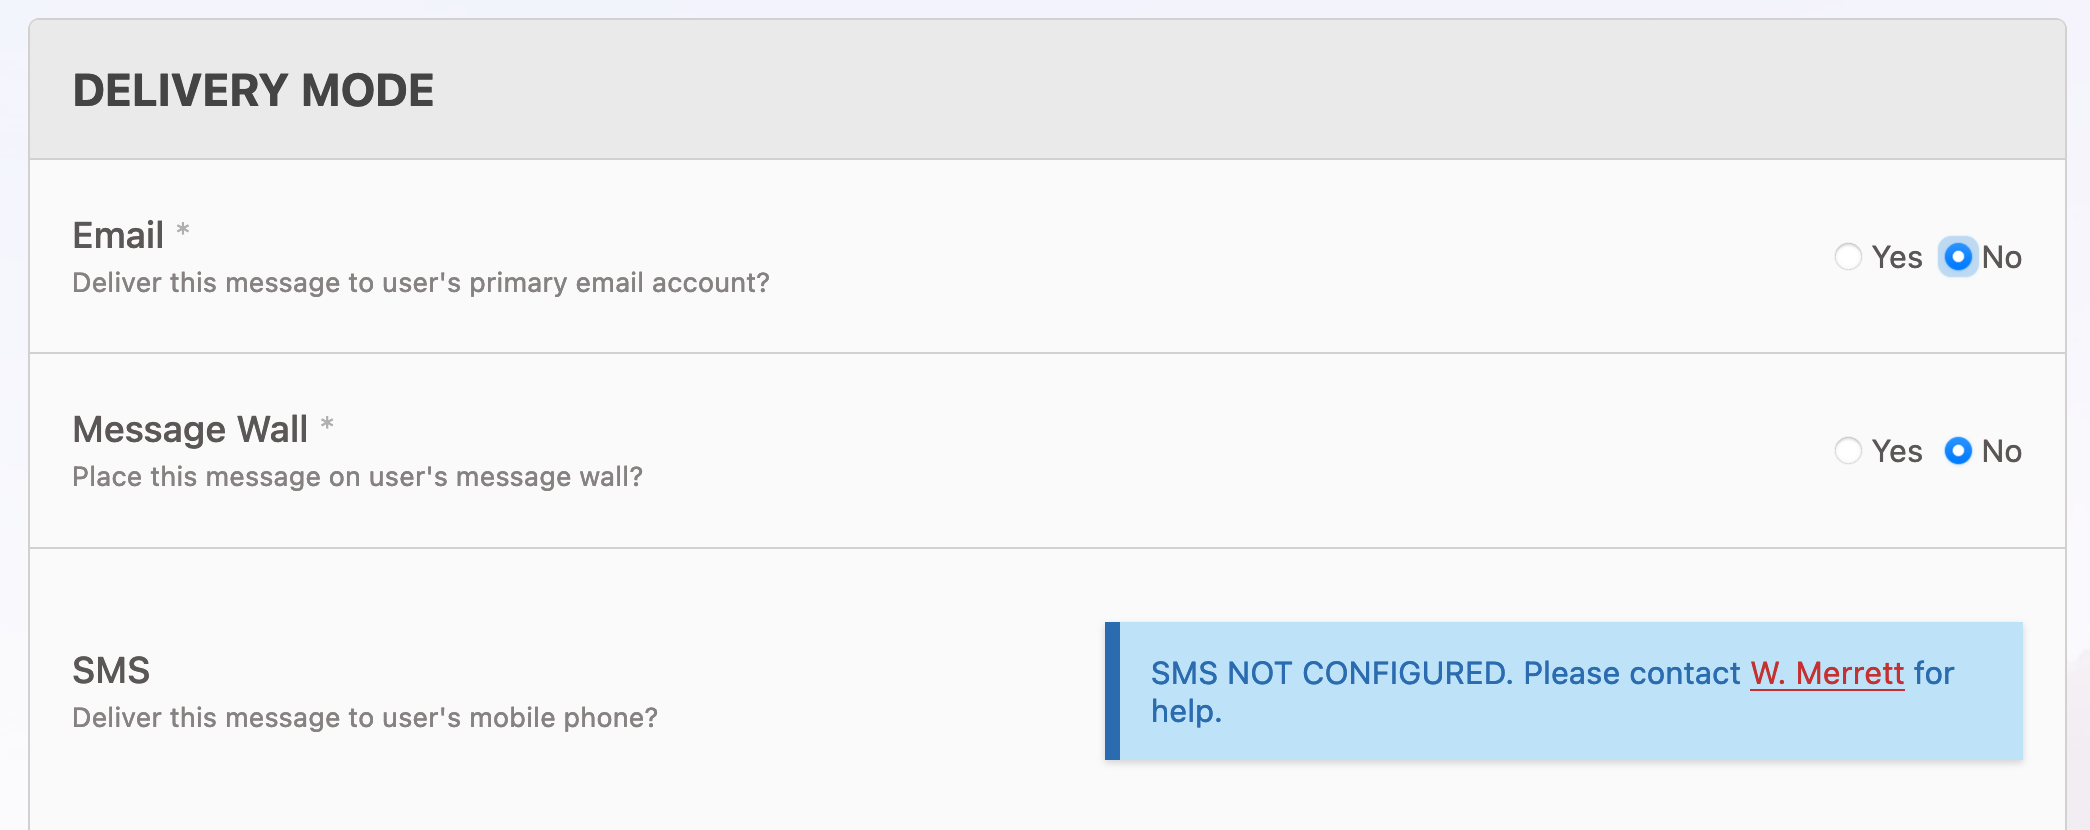
The Gibbon Messenger allows you to send out messages, in bulk, to a range of targets, in one or more of the following three delivery modes:
Email
Message Wall
SMS
Getting Started
Go to Other > Messenger in the main menu at the top of the page.
Use the Add button to start composing a message.
Select the delivery mode(s) that best suit your needs:
Enter a subject and message body.
Choose recipients in the Targets section (see below).
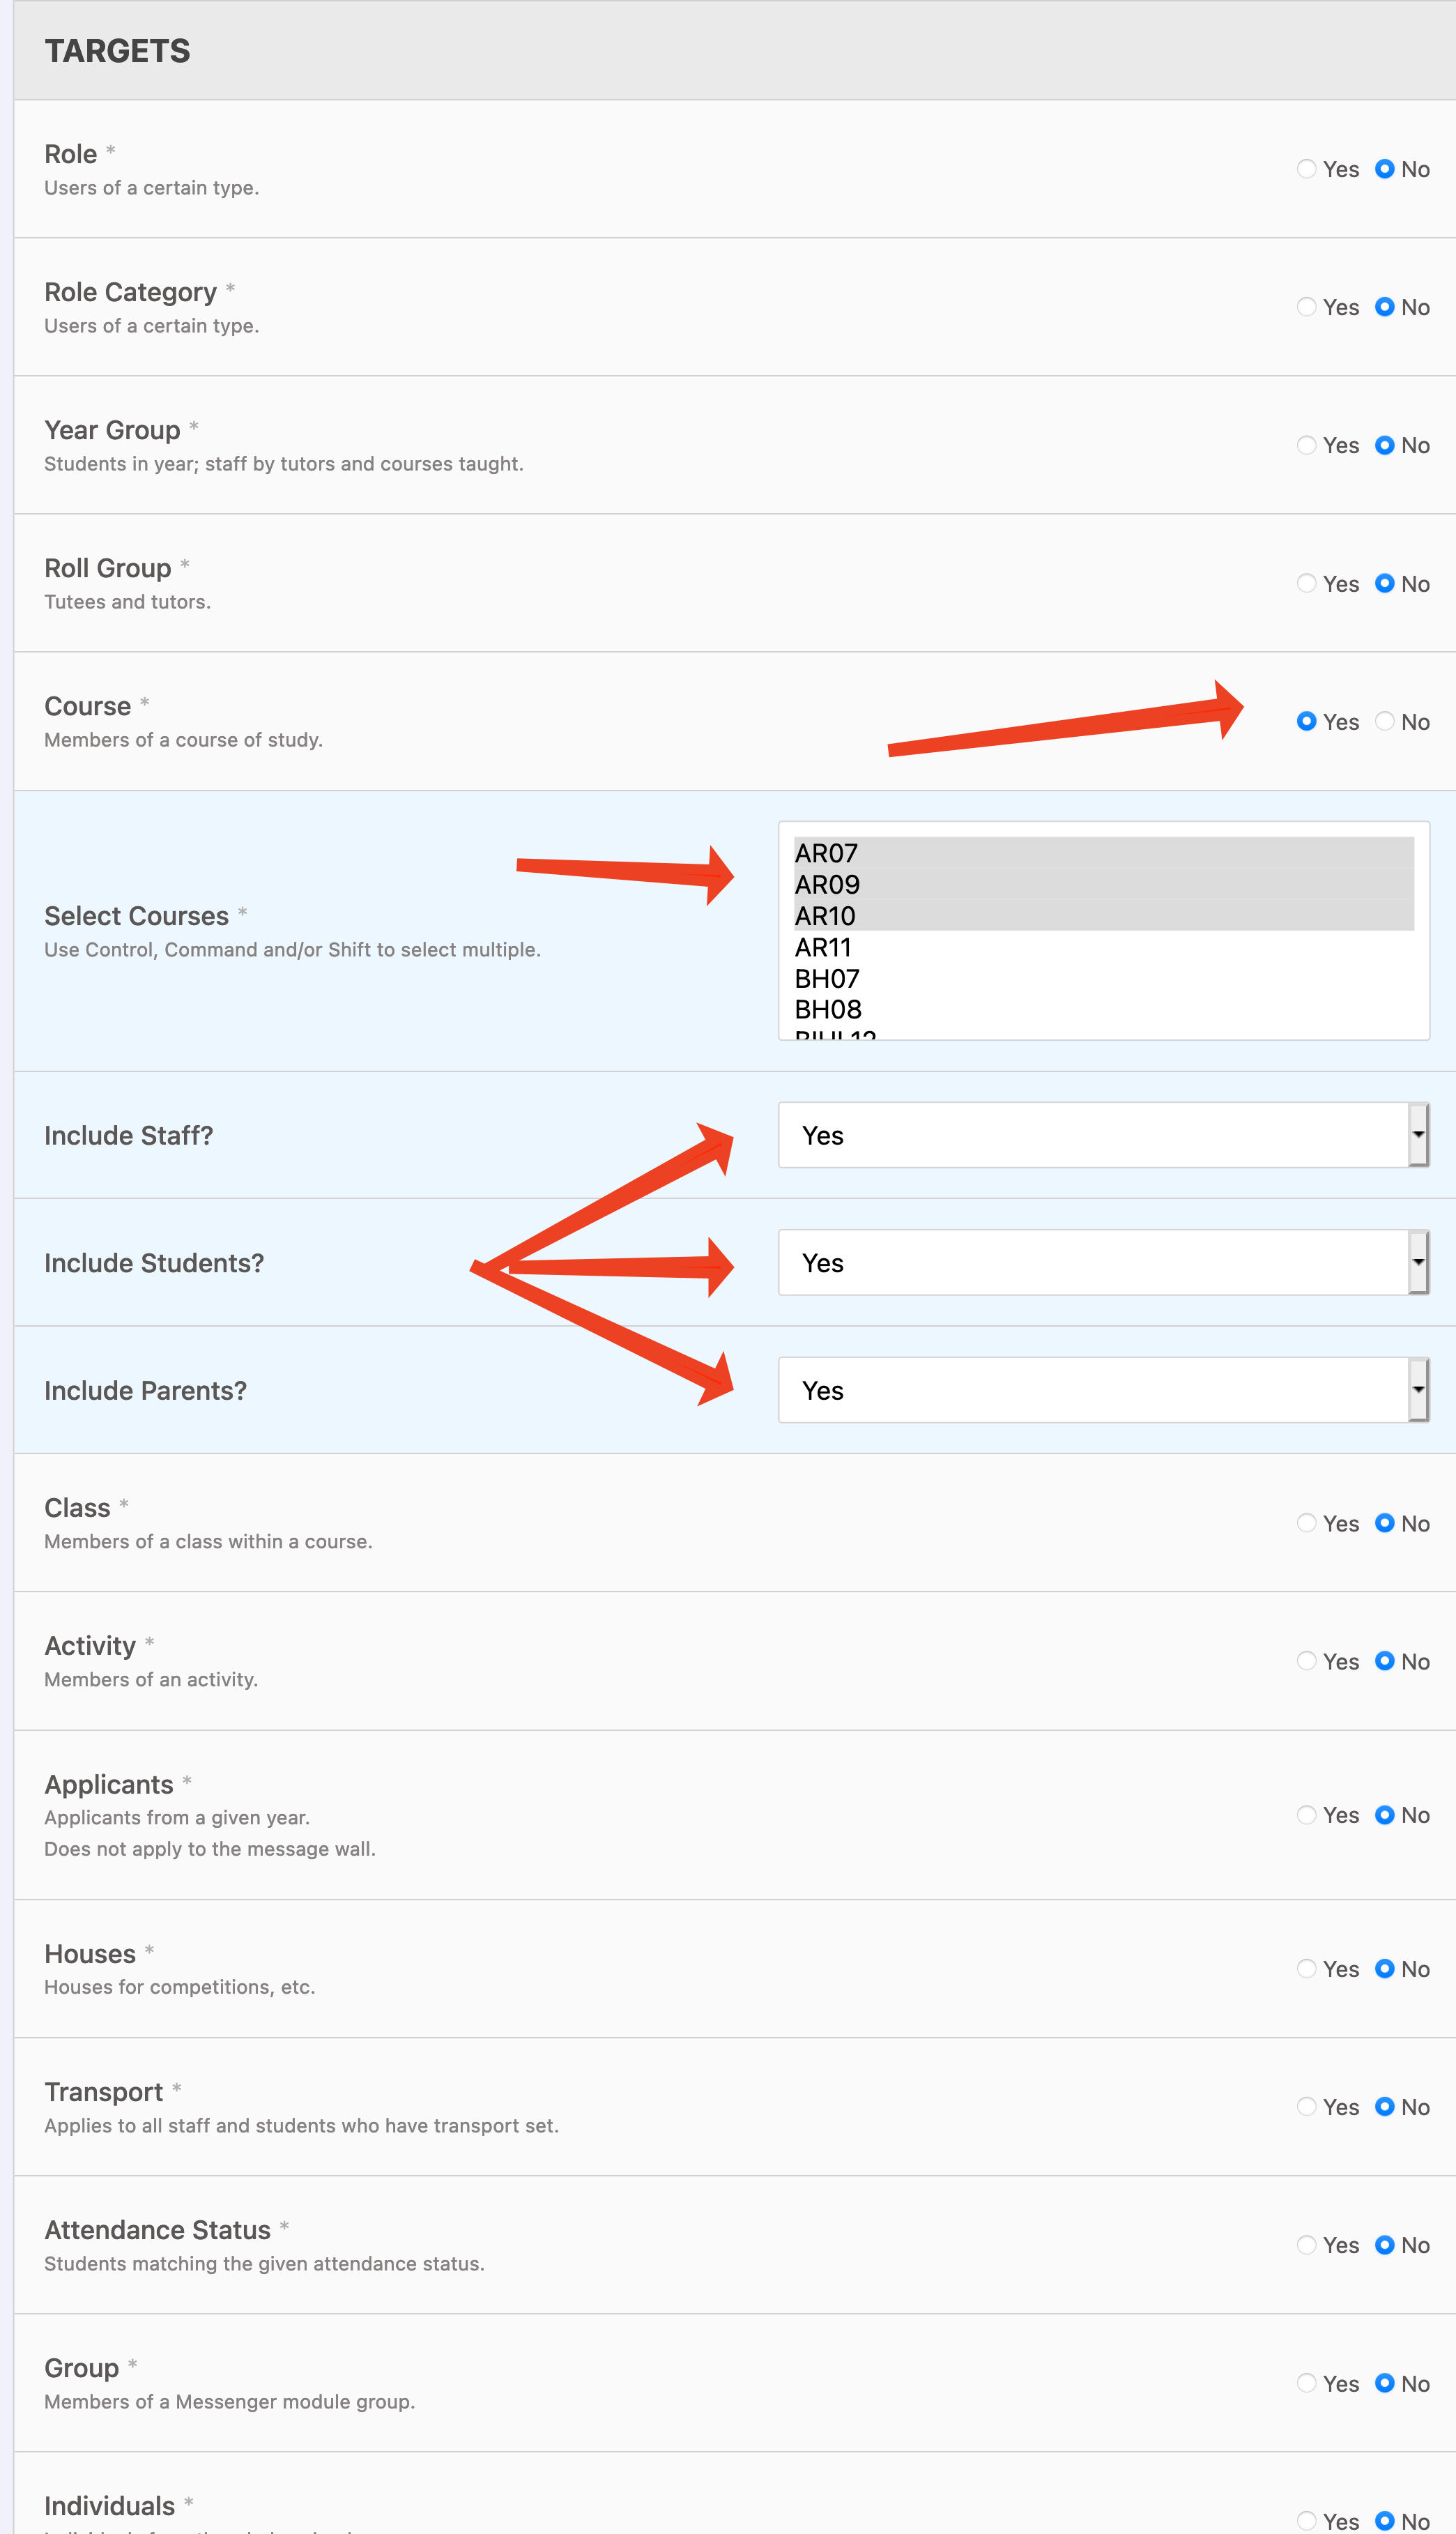
Targets
When properly configured, Gibbon knows a lot about your school, making it possible to send messages out to numerous different targets. In the example below, a message is being sent to all students, staff and parents associated in Years 7-9 ICT. It is always worth double checking your messages before sending, as you are potentially sending the same message our many times over.
Read Receipts
As of v13 (due for release January 20th 2017), Gibbon supports read receipts for messenger emails. Click here to learn more.
Read Receipts
Introduction
New as of v13, Messenger’s Read Receipts offer email recipients a unique link that they can click to confirm receipt and reading of an email, without logging in to Gibbon.
Getting Started
To view a enable read receipts, create a new message (Other > Messenger), and make sure to enable Email as one of the delivery modes. Given the correct access rights, you will see a section entitled Read Receipts. In this section you can enable receipts, and add a custom link message:
Reports
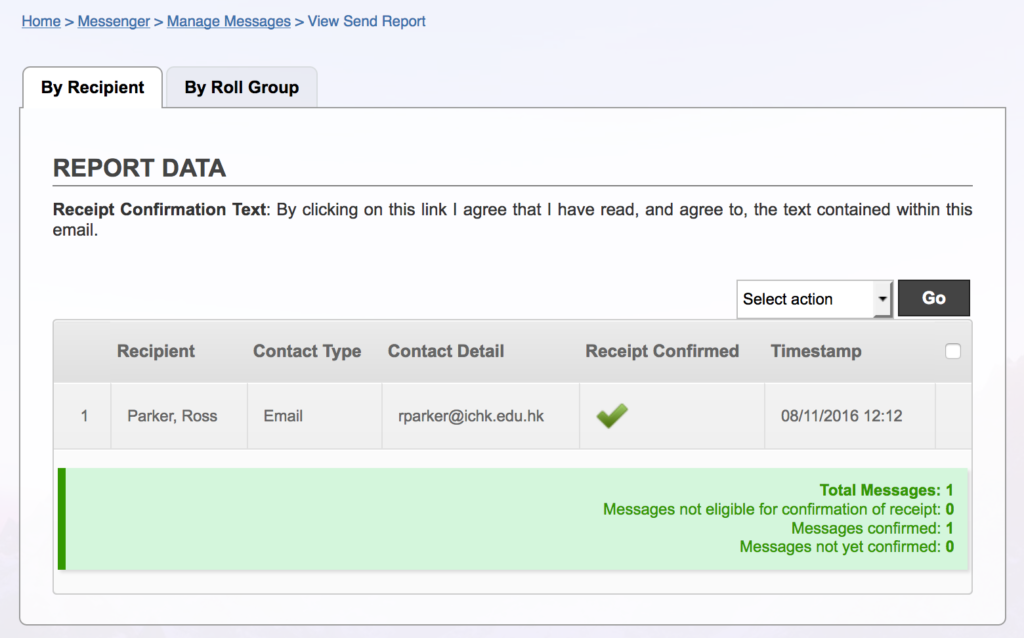
In order to view who has and has not confirmed email receipt, return to Manage Messages (Other > Messenger) and click on the View Send Report icon against the relevant message: When the report loads, you can use the tabs at the top to choose between viewing results By Recipient and By Roll/Form Group:
LaTeX
Introduction
LaTeX is a short hand used to create mathematical and scientific symbols and formulas online. It requires a little study to use, but once mastered is very powerful. Gibbon incorporates LaTeX in its rich text editor, so that teachers can express complex formulas right in their unit and lesson plans, as well as in the form of HTML resources.
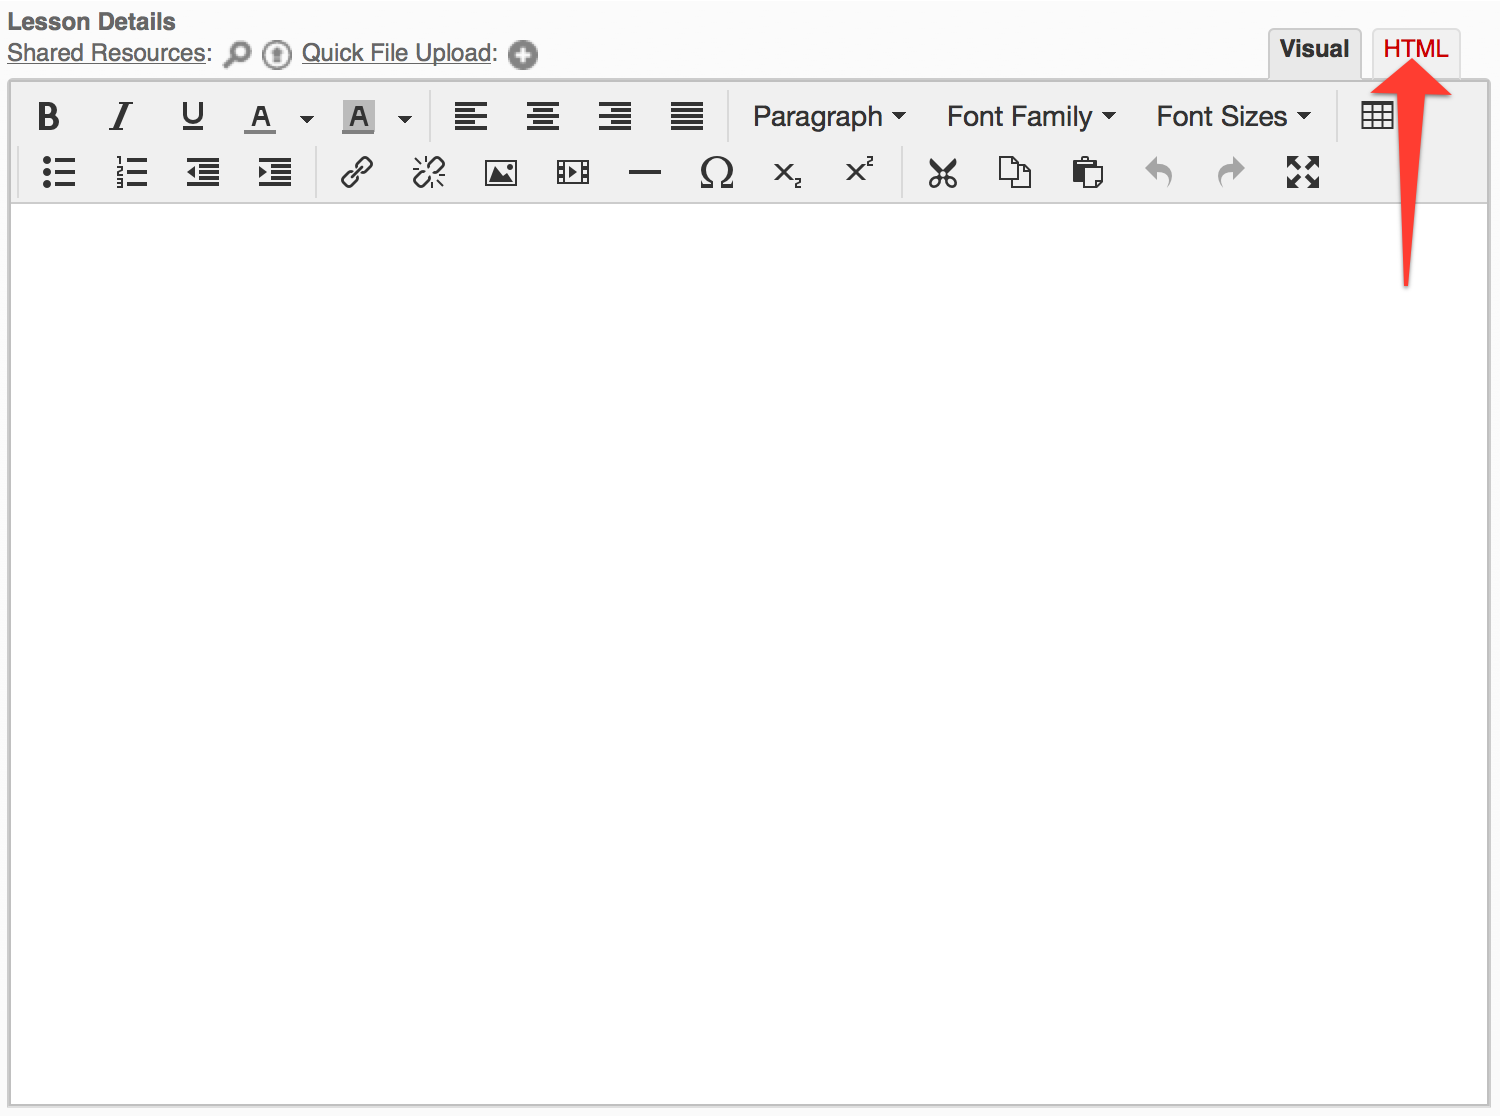
Getting Started
You can use LaTeX anywhere in Gibbon that has a rich text editor. Simply switch from Visual to HTML views to get started: Once in HTML view, wrap your LaTeX code in a div tag, with class set to latex, as shown below: When the content is saved and viewed, the LaTeX will be rendered, as below:
Credits
Thanks to Andreas Grech for his jslatex plugin, and the example and image above.
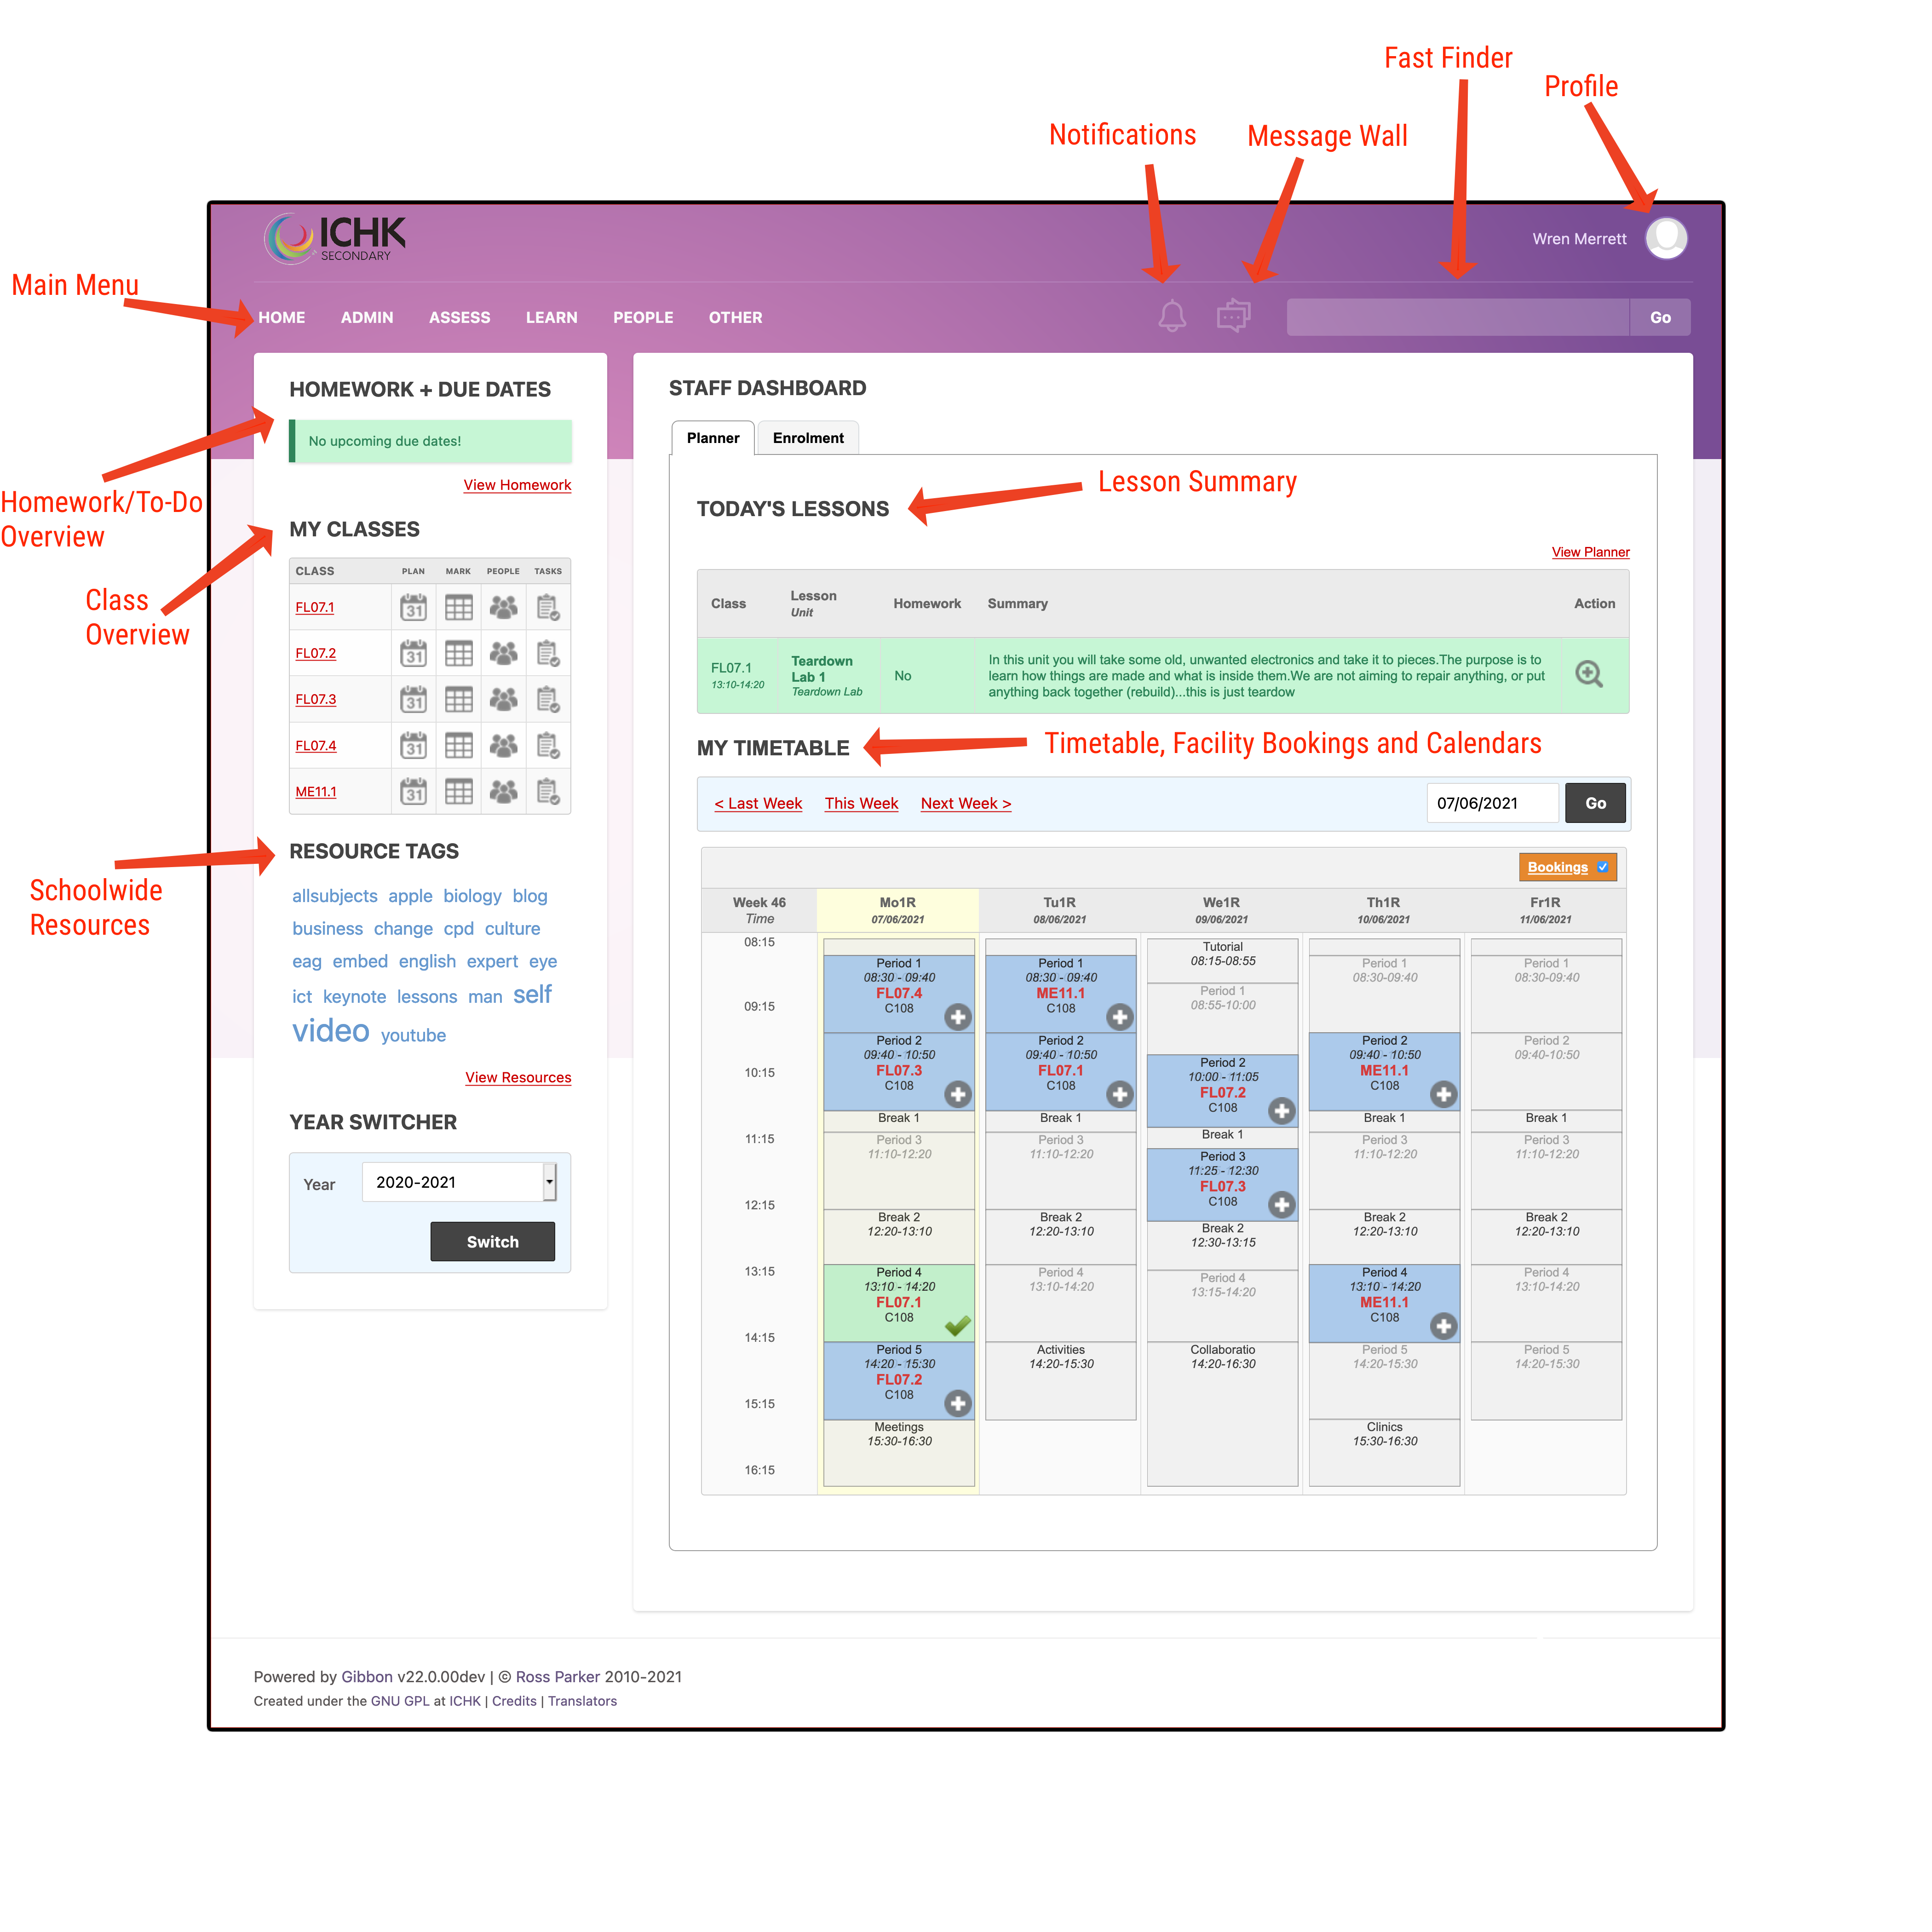 Students see a similar, but slightly reduced set of functionality, allowing them to interact with the lesson plans, homework, and assessed work that you give them access to.
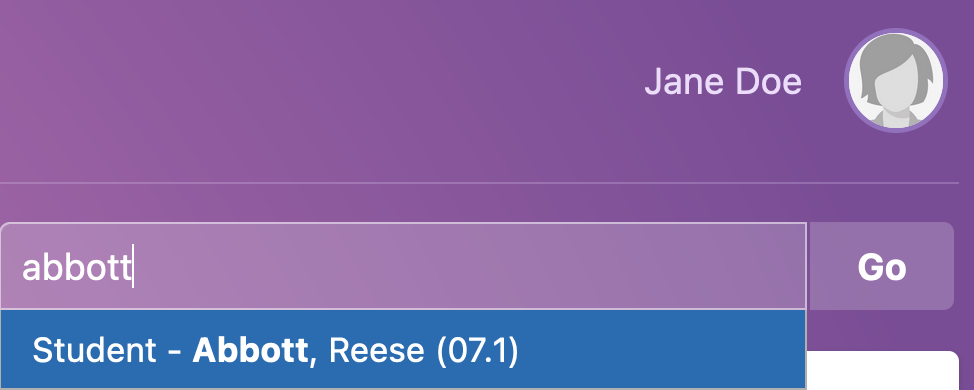

 icon to action and archive the notification in one go. Archive notifications drop down to the second part of the page. All notifications can be deleted in one go by using the
  icon above the New Notifications table.
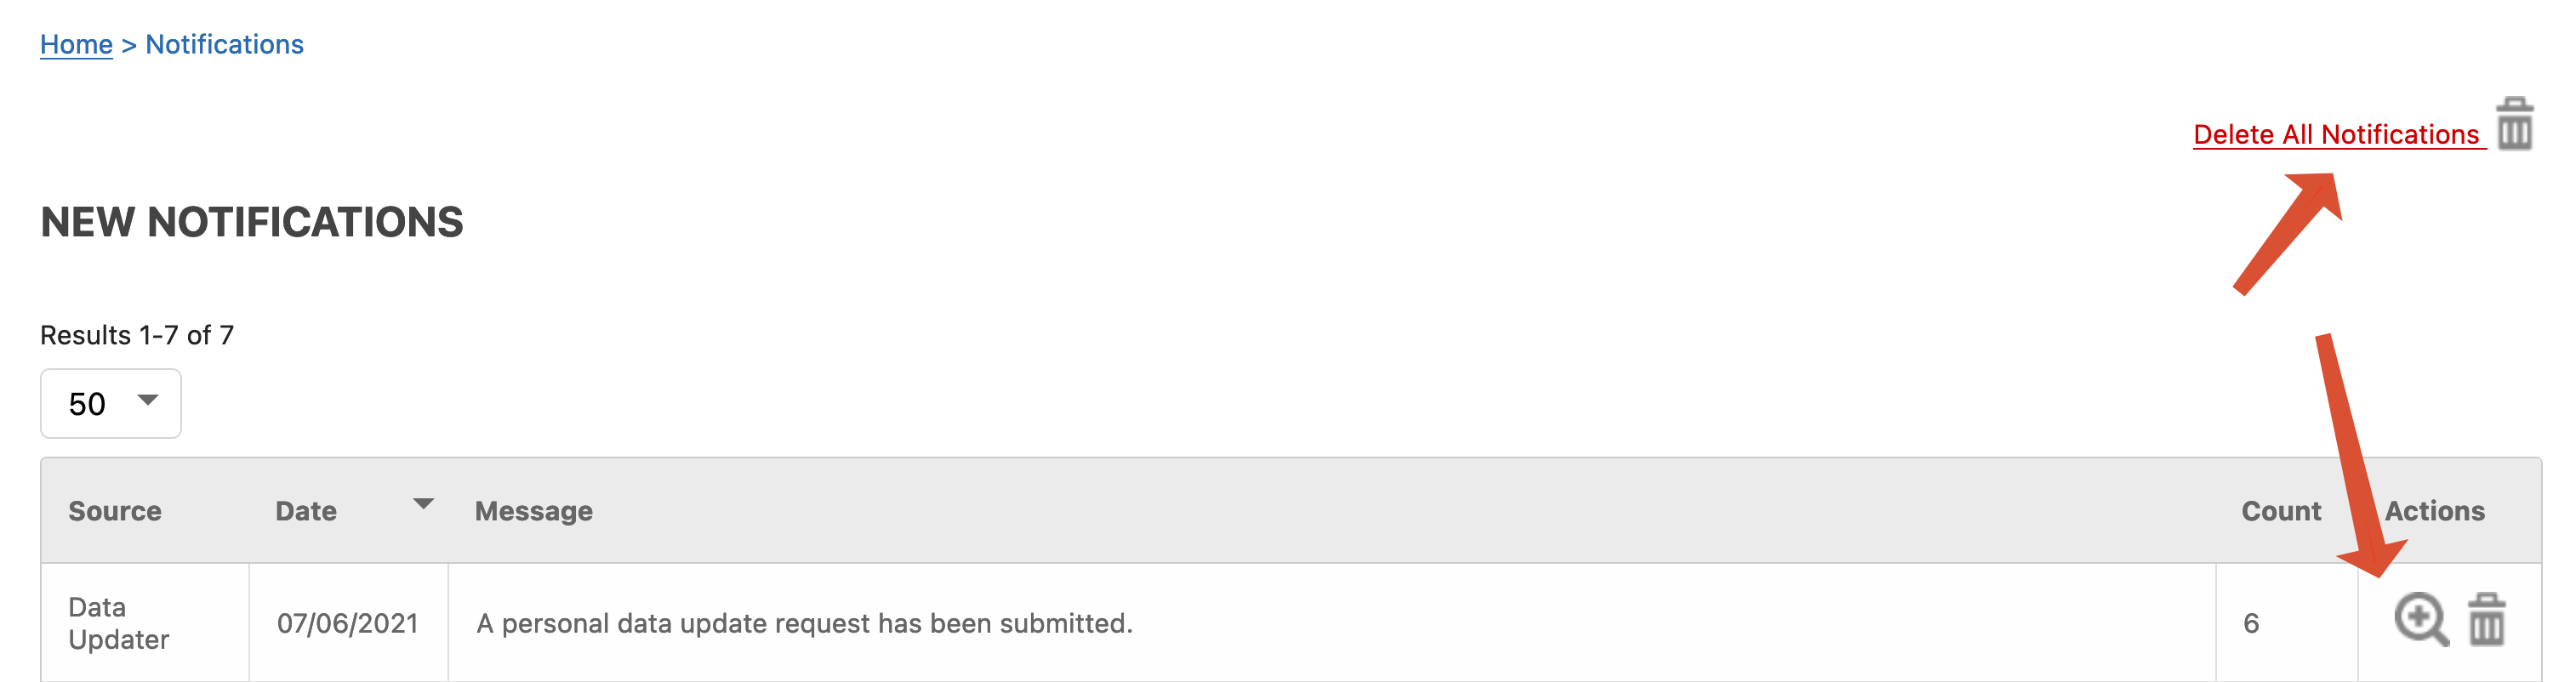

 on the top right corner of the Markbook.
 at the top of the newly created column.
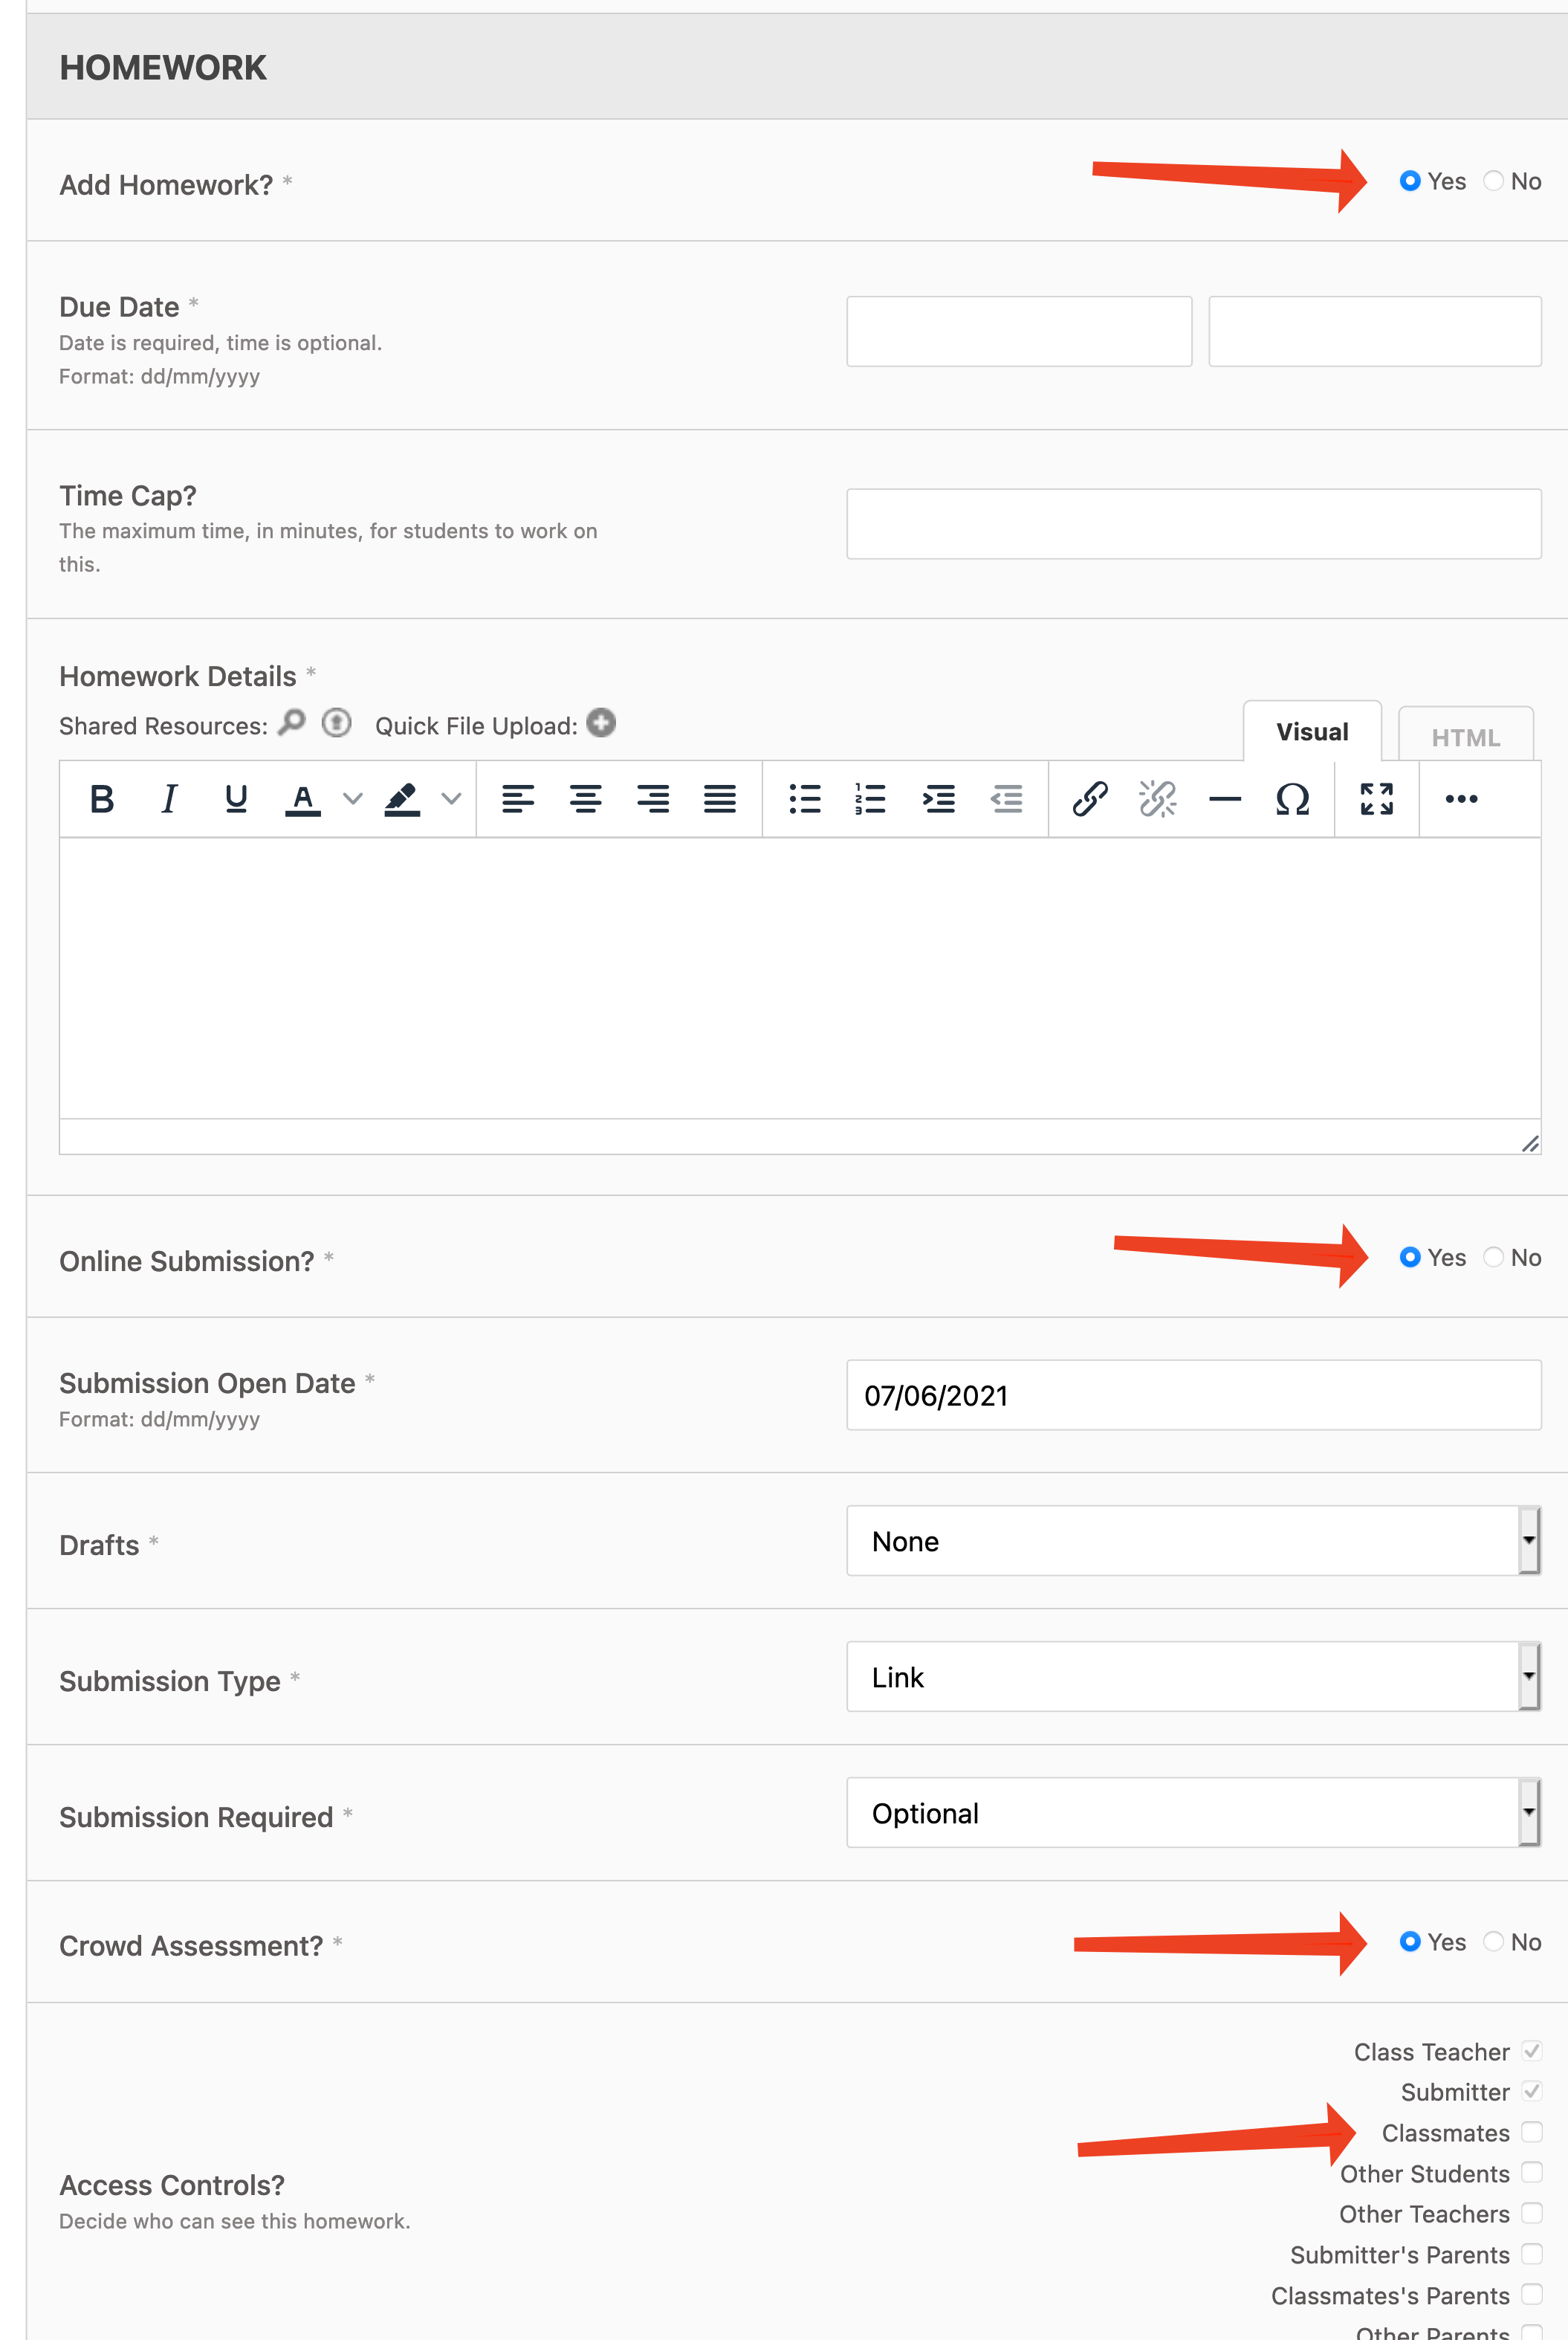 Once Crowd Assessment is enabled, the work can be accessed by going to Assess > Crowd Assessment in the top menu bar. Each lesson remains visible in the Crowd Assessment listing for 6 weeks after the lesson took place.
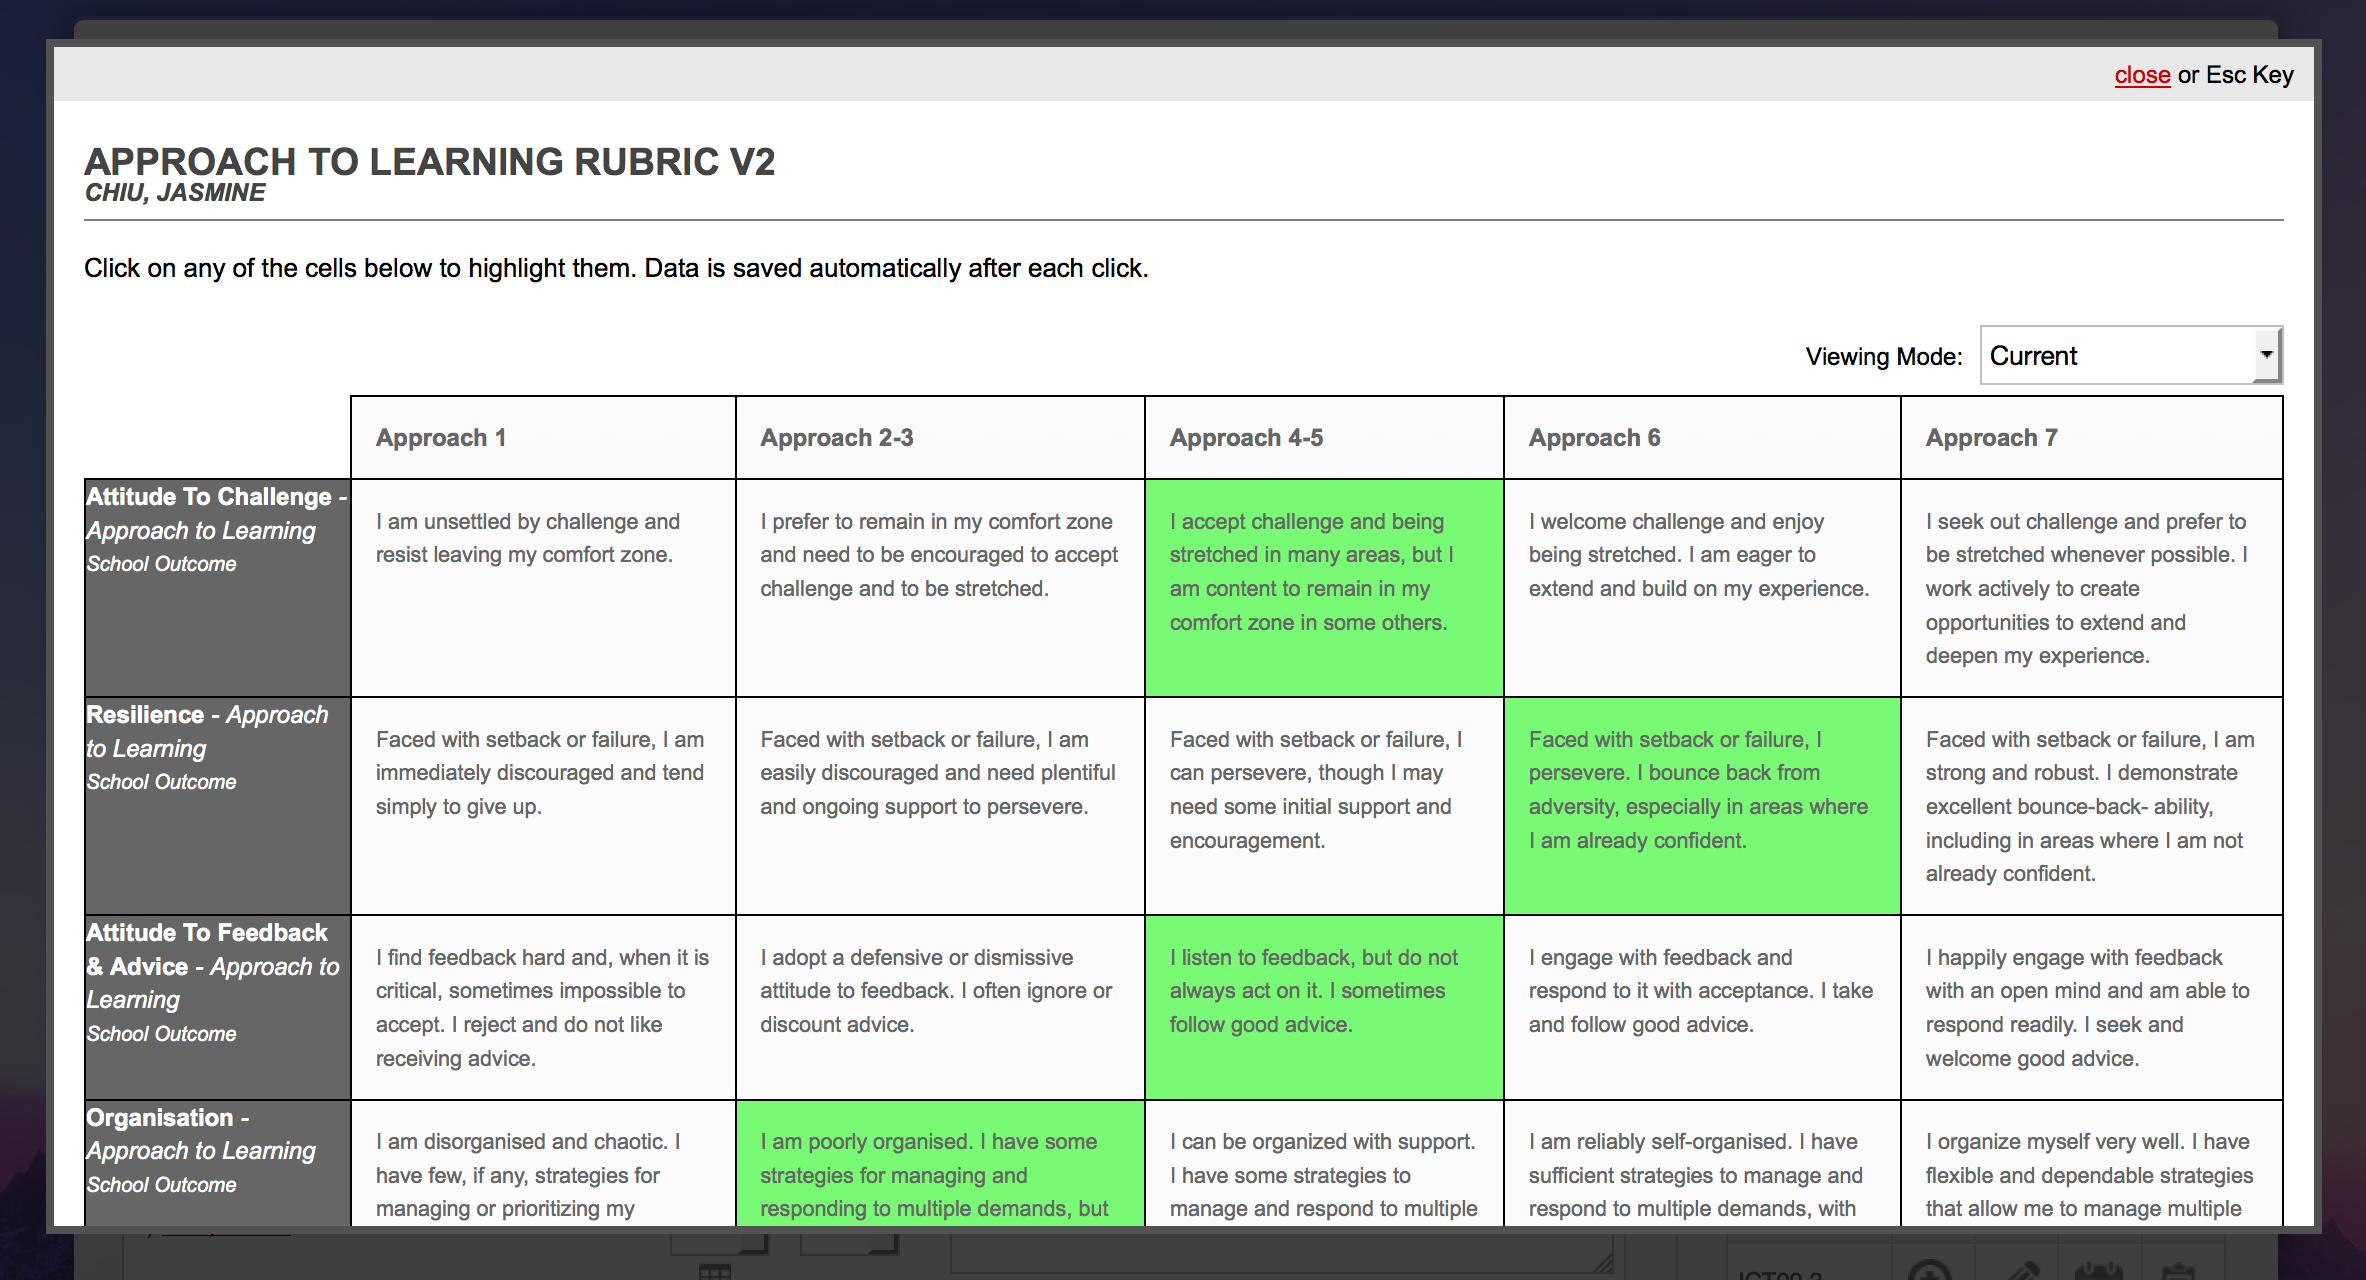


 against the unit you would like to deploy.
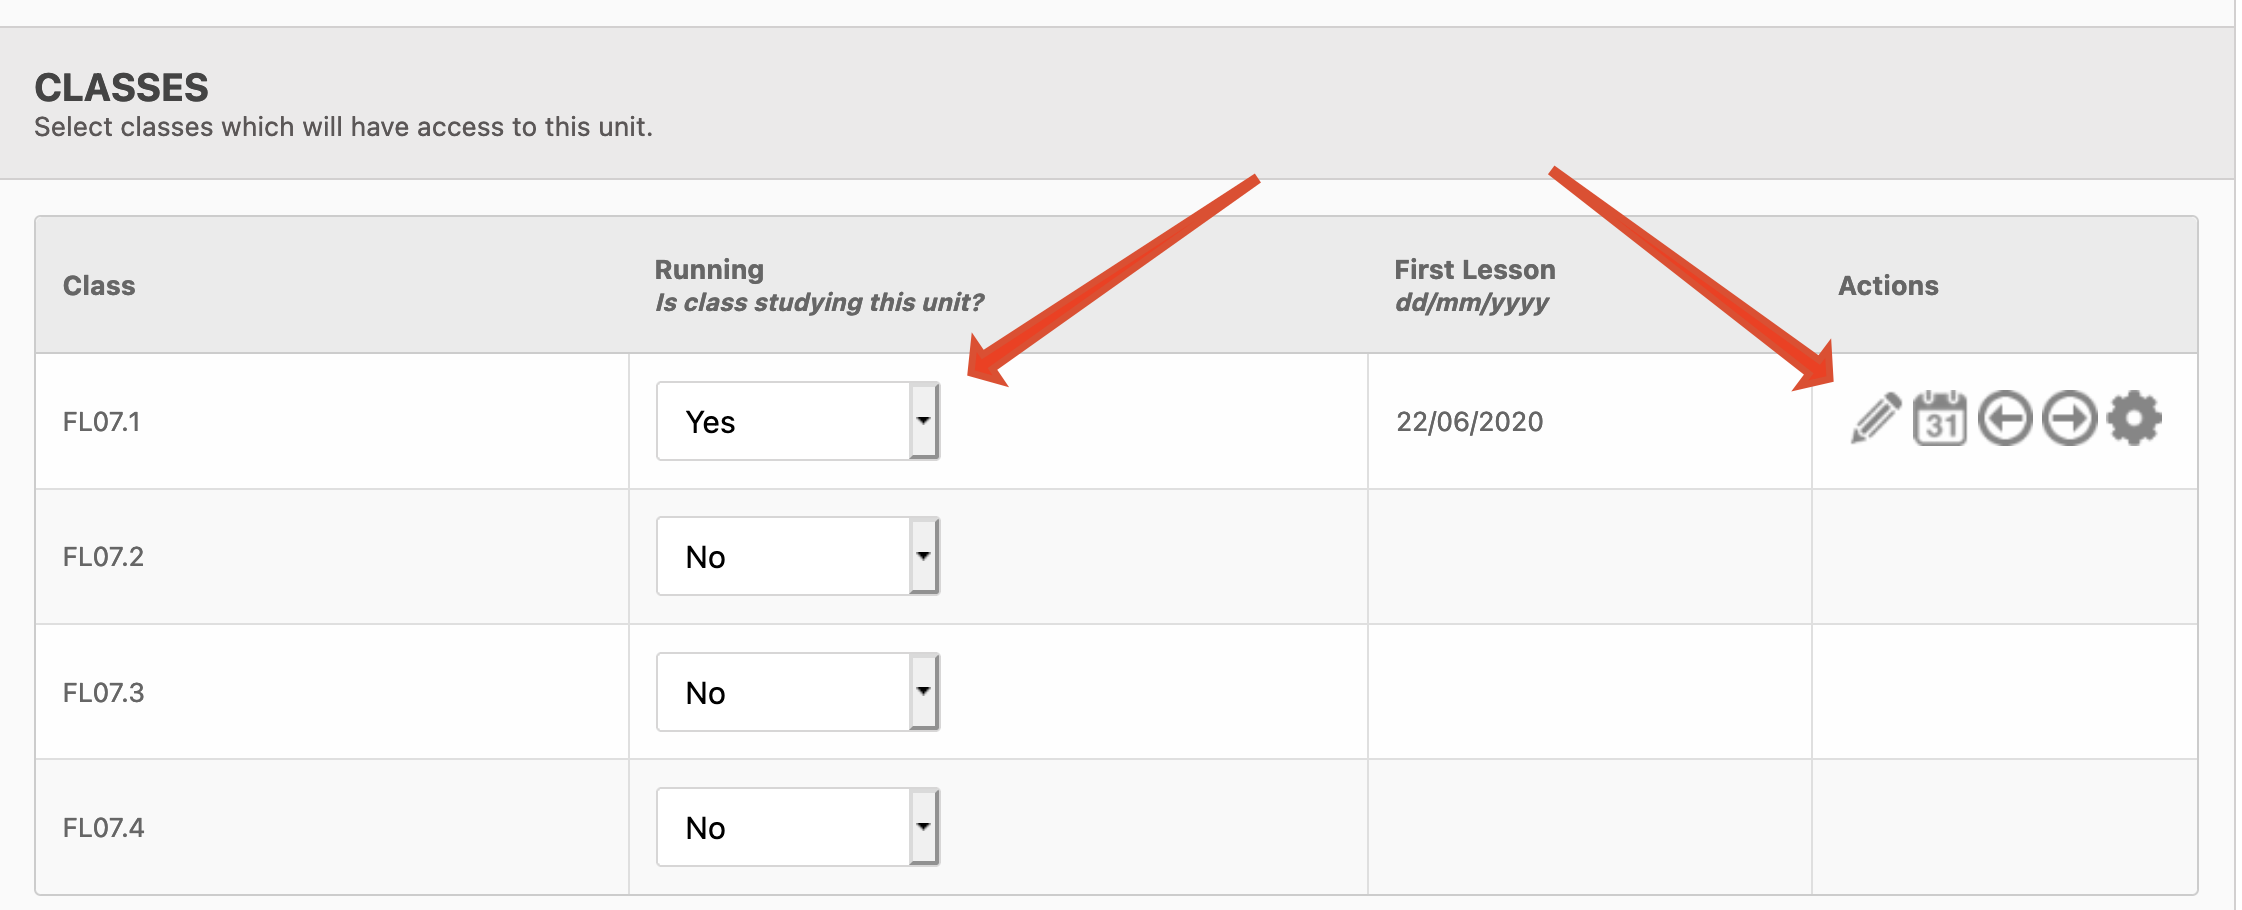

 for the unit you wish to export:
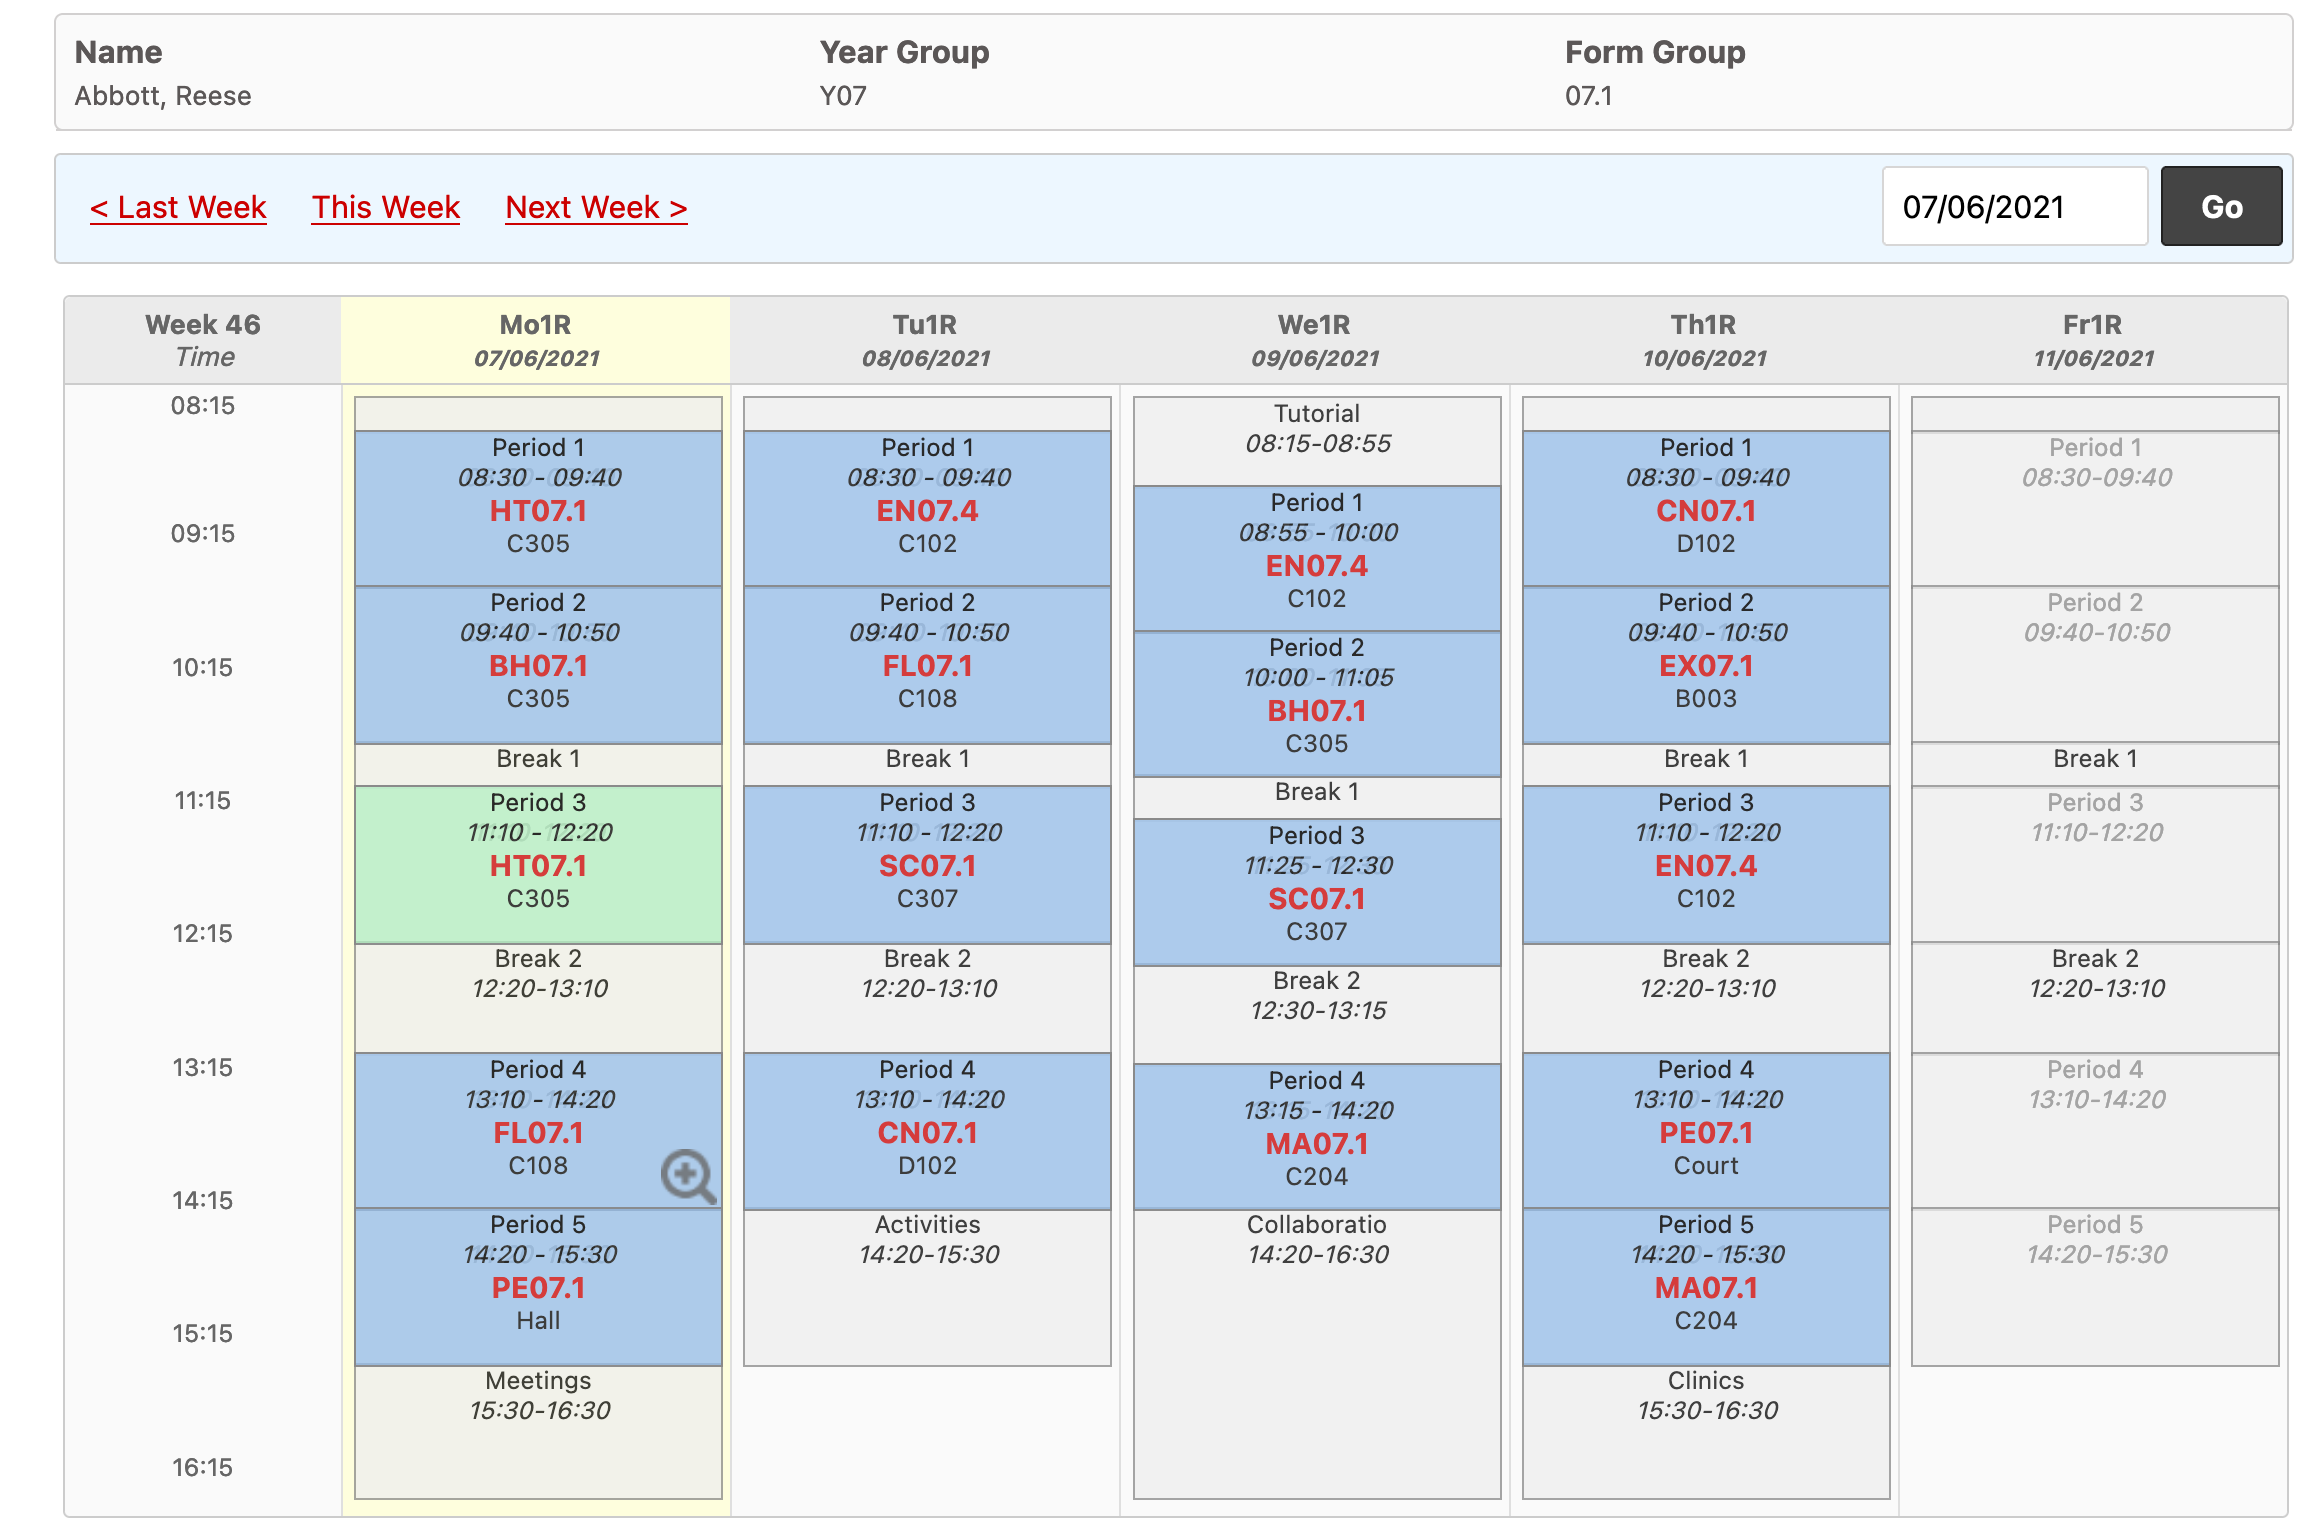
 to create new budget areas.
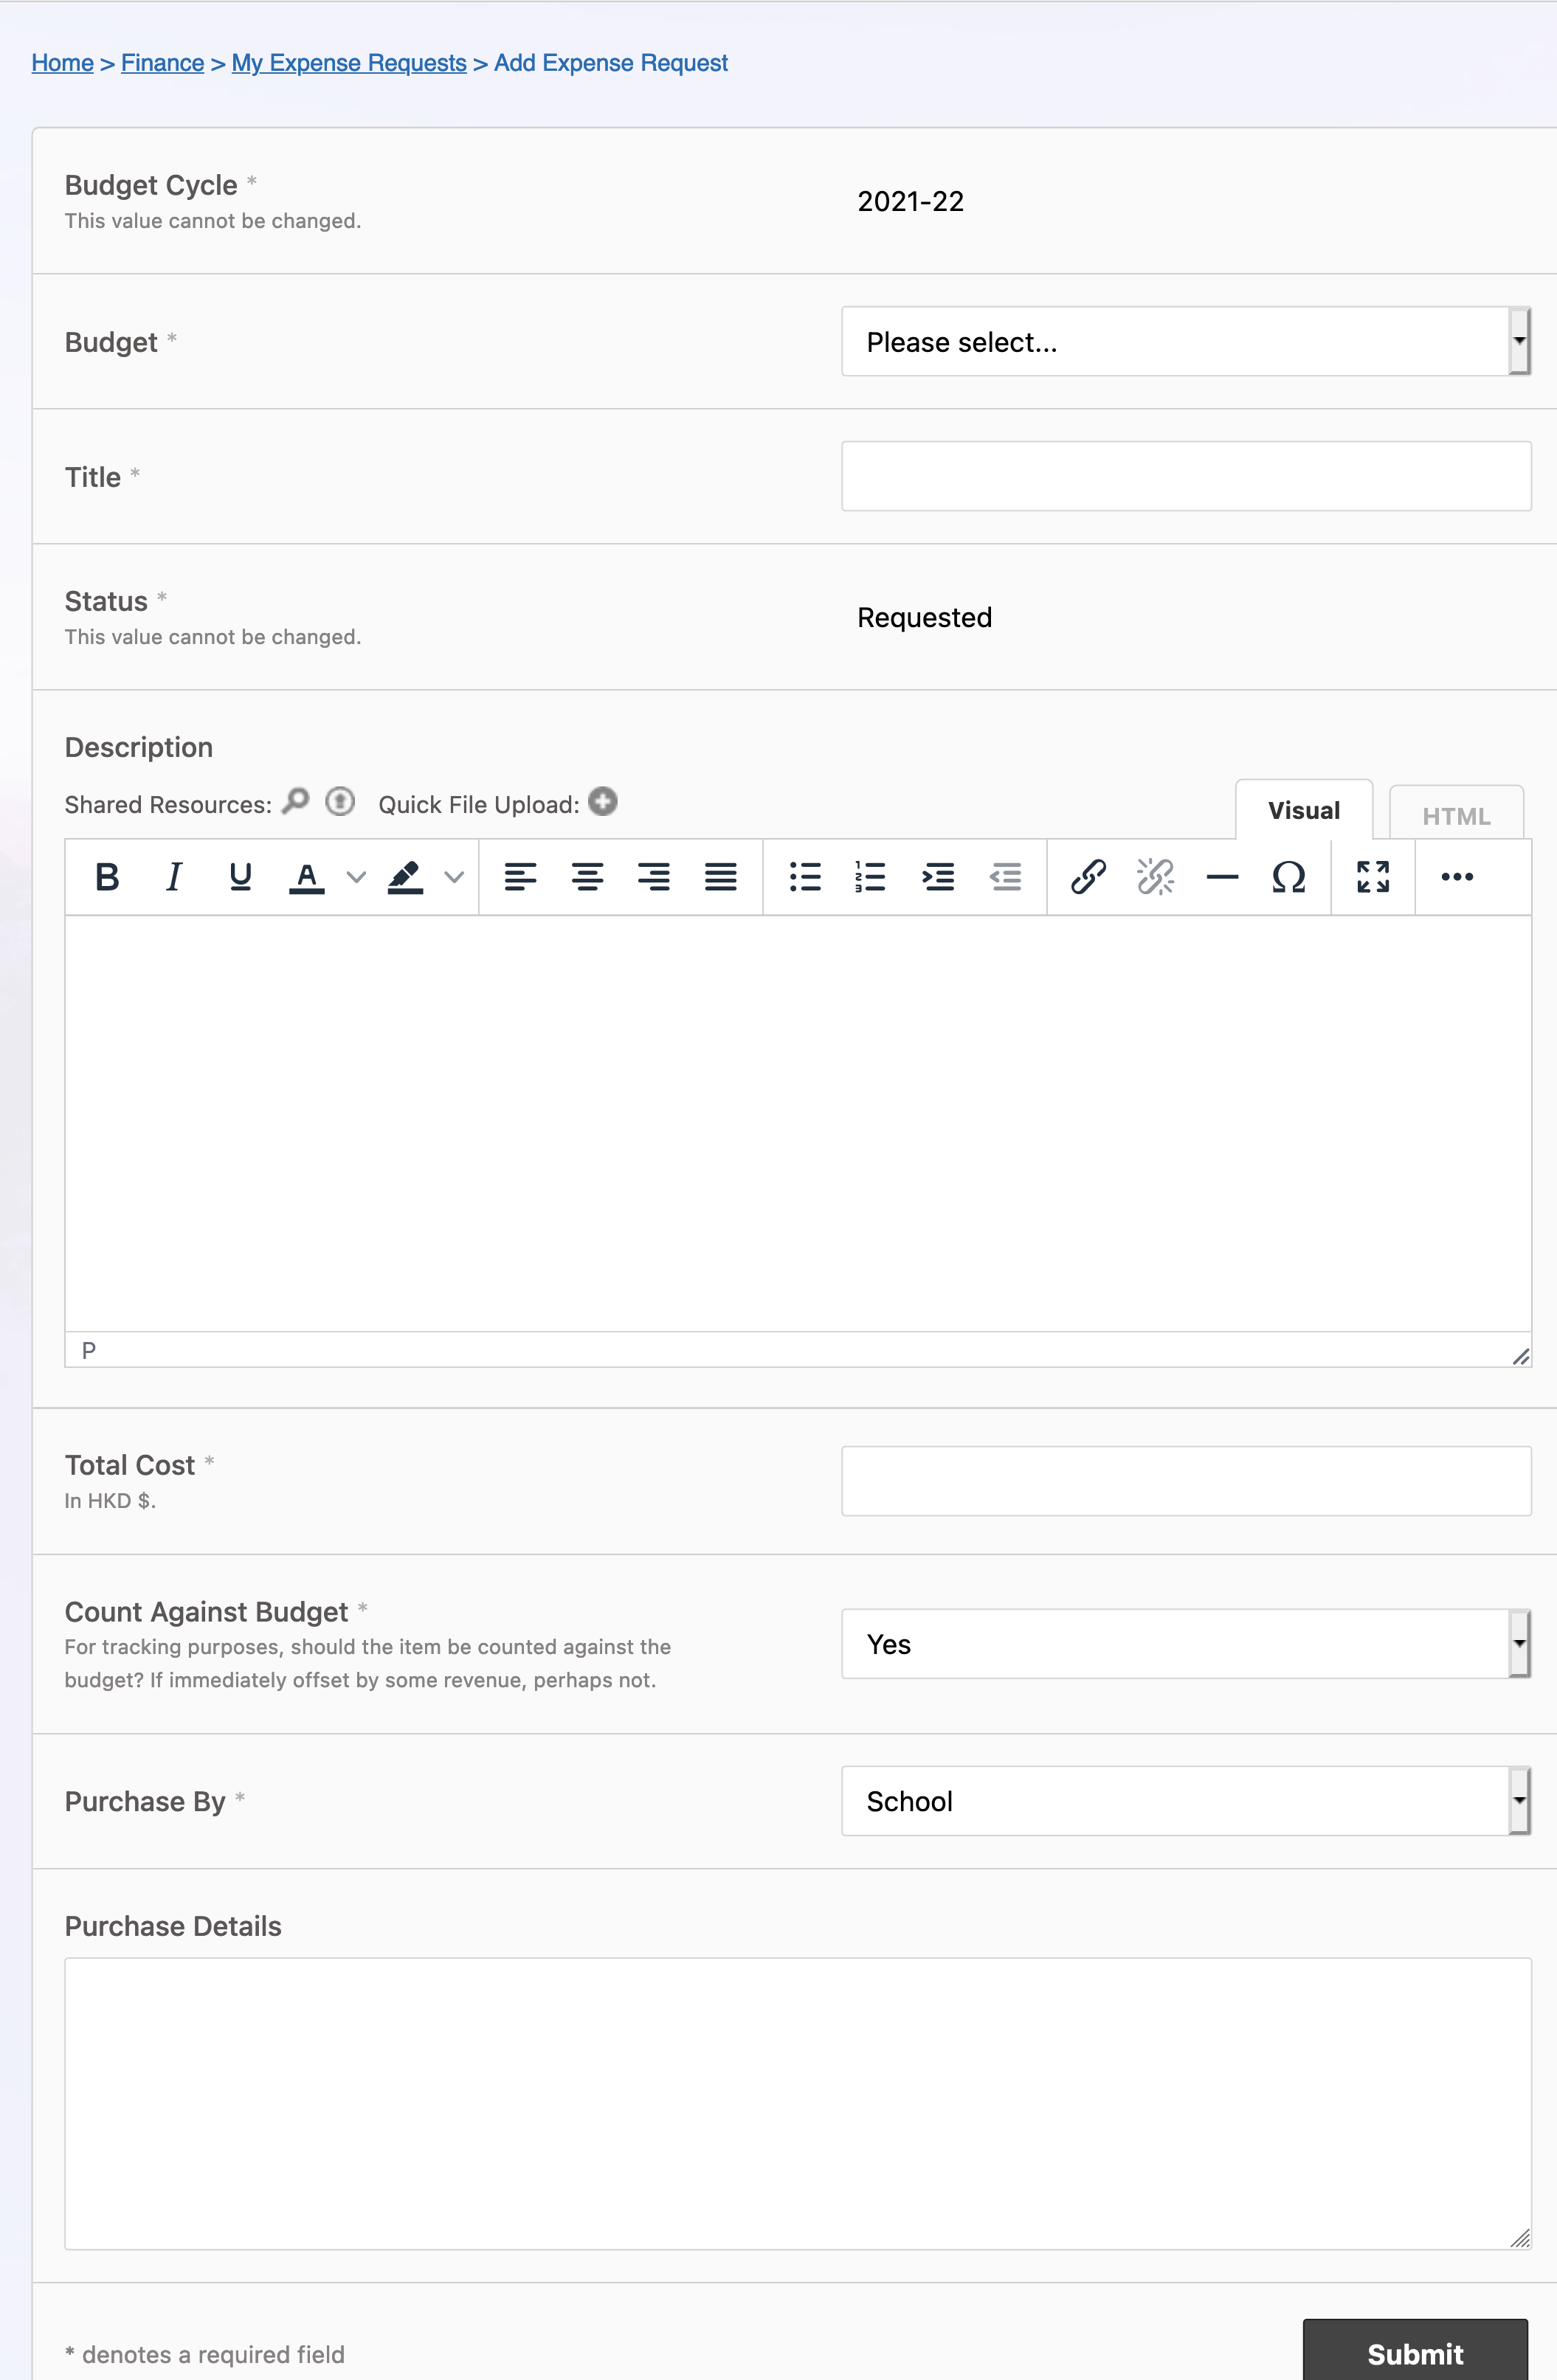
 It is always worth double checking your messages before sending, as you are potentially sending the same message our many times over.
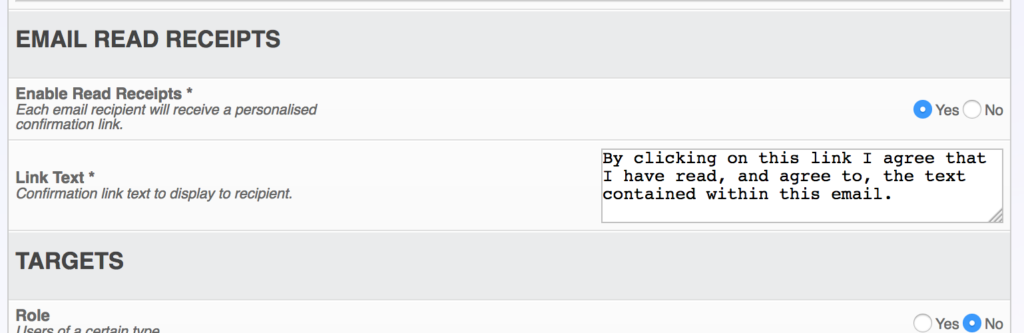
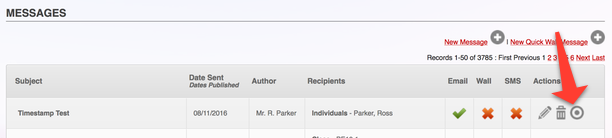 When the report loads, you can use the tabs at the top to choose between viewing results By Recipient and By Roll/Form Group: