Gibbon Docs
v26.0.00


Server Requirements

  1. Apache 2 (with mod_rewrite)
  2. PHP 7.3 or above (with PDO, gettext, CURL, GD, ZIP. Recommended to turn display_errors off.)
  3. MySQL 5.6 (collation set to utf8_general_ci)

Manual Installation

After download and unzipping:

  1. Copy all files to your server, choosing either the root directory or a sub-folder within it.
  2. Navigate your browser to the folder on your server where Gibbon has been located.
  3. Follow the on-screen instructions in Gibbon’s new installer.
  4. Check out the Getting Started With Gibbon page for more information.

Note: If you want to help test and develop Gibbon, you can select the Cutting Edge Code option in the installer. This allows you to run the latest code from our GitHub repo. This is not recommended for production environments.

The video below gives an overview of the installation process:

Looking for a quick install? Download Gibbon via Softaculous.

Installing from scratch on an Apache server? Check out the How to Install Gibbon thread by @dardiv on the forums.

Softaculous Installation

If you are using a web hosting company that provides Softaculous via CPanel, you can follow the instructions in the video below to install Gibbon:

Post-Install & Server Config

  1. Set permissions of all Gibbon files so they are not publicly writeable (e.g. chmod -Rv 755).
  2. Set file permissions for the /uploads folder (created by the installer) to allow writing by web server (avoid chmod 777 for security reasons).
  3. Turn PHP register_globals off. On shared host, use .htaccess php_flag register_globals off to do this.
  4. Turn folder browsing off. On shared host, use .htaccess Options -Indexes
  5. Set PHP’s max_file_uploads to at least the number of students in a class.
  6. Set PHP’s max_input_vars setting to 5,000 (otherwise Manage Permissions breaks).
  7. Set PHP’s error to be error_reporting = E_ALL & ~E_NOTICE or less aggressive.
  8. Set PHP to allow URLs as files with allow_url_fopen=On (otherwise Calendar overlay in TT will not work).
  9. On systems that use selinux make sure to run setsebool -P httpd_can_sendmail 1 to enable Gibbon to send mail.

Securing your Uploads Folder

Files uploaded to Gibbon are stored in the uploads folder. It’s essential for your school’s security to ensure that this folder cannot be browsed and accessed by random people. The steps to do this depend on your server setup. Some instructions for Apache servers is included below.

Apache:

  1. Edit your apache2 config file, often located at /etc/apache2/apache2.conf
  2. Look for the directory config, which often looks like <Directory /var/www/></Directory>
  3. Inside the config, if you see Options Indexes FollowSymLinks change this to Options FollowSymLinks removing the Indexes config
  4. Reload your updated config, on Ubuntu use the command sudo service apache2 reload
  5. Check to see that your /uploads folder returns a 403 Forbidden or 404 Not Found result

MySQL Database Privileges

For additional security, it’s recommended to setup a MySQL user that has the minimum required database privileges. This is a common practice for web-based apps, to ensure that, should the credentials be compromised, the MySQL user cannot escalate their access in the system.

The minimum GRANTS required for Gibbon are:

SELECT, INSERT, UPDATE, DELETE, CREATE, DROP, INDEX, ALTER, LOCK TABLES

You can view your current grants with the command: SHOW GRANTS FOR yourusername

You can reset the grants for a user with the following commands. See the MySQL docs for more info.

REVOKE ALL PRIVILEGES ON *.* FROM 'yourusername'@'%';
GRANT SELECT, INSERT, UPDATE, DELETE, CREATE, DROP, INDEX, ALTER, LOCK TABLES ON `yourdatabase`.* TO 'yourusername'@'%';

Introduction

Gibbon is released in two different ways, according to our release cycle and road map:

  • Stable Code - these are official releases, published through our mailing list. They may be major releases (e.g. v10.0.0) or minor releases (e.g. v10.0.01), depending on a variety of circumstances. Stable releases are available via our Download page. Stable code enforces a much slower update cycle.
  • Cutting Edge Code - these are our latest code cuts, and so are not as well tested or refined as stable releases. They are not recommended for production, but do give access to the latest features, via an update cycle that is as fast as you like (or as we commit). Cutting edge code can be downloaded via the dev branches on our GitHub repo.

Installation

During installation, your Gibbon code will check its version against our servers, and determine whether it is stable or cutting edge code. You cannot change this choice through the interface (and it is not recommended to change it via Inspect Element or some other means).

If you are using Cutting Edge code, before installing Gibbon you will need to first install PHP’s dependency manager, Composer, on your server. Follow the Getting Started guides on the Composer website for more instructions about how to do this.

Using composer, navigate to your root Gibbon folder and run the composer install command once to install all required libraries. You can also run composer install --no-dev to exclude any libraries that are used solely for development and testing.

Updating

The update procedure for stable and cutting edge code is nearly the same: the only variable is where you download the software from. Composer Update After updating a Cutting Edge code installation, you may see a message that composer needs to be updated. To do this, navigate to your root Gibbon folder and run the composer install command once to install or update the libraries in your vendor folder.


Foreword

An installation of Pop!_OS was used to write this documentation, however, installation will be the same on most popular versions. Bear in mind that this guide will refer to the generic pacakages for each requirement. This will generally be fine as popular Linux distros such as Ubuntu and Debian will ship with stable versions of these packages, however it does help to be aware of the implications of this.

General Package Installation/Setup

Firstly, be aware these will need to be run as root so sudo/su - appropriately!

apt install apache2 php mysql-server php-gd php-mysql php-zip php-curl php-gettext php-pdo

For PHP 8, this may look a bit different:

apt install php8.0-mysql php8.0-gd php8.0-zip php8.0-curl php8.0-gettext php8.0-pdo php8.0-xml php8.0-mbstring

The relevant packages will be installed, however, you still need to enable mod_rewrite on Apache.

a2enmod rewrite

You may also need to edit your php.ini file to enable extensions under Dynamic Extensions, especially php_mysql.

Next, restart Apache!

systemctl restart apache2

HTTPS

Check out certbot for automatic LetsEncrypt SSL cert setup and renewal. https://certbot.eff.org/

Configuration

  1. Copy the default configuration from /etc/apache2/sites-available/000-default.conf to /etc/apache2/sites-available/gibbon.local.conf. Symlink /etc/apache2/sites-enabled/gibbon.local.conf to the copied file so it’s enabled.

    cp /etc/apache2/sites-available/000-default.conf /etc/apache2/sites-available/gibbon.local.conf
    ln -s ../sites-available/gibbon.local.conf /etc/apache2/sites-enabled/gibbon.local.conf
    
  2. Amend the configuration to your taste. In a VirtualHosts environment, change the ServerName and DocumentRoot at least. I used /var/www/gibbon.local/ as my DocumentRoot. If you’re not sure what to put there, consult the Apache documentation.

  3. Go to the document root and copy the Gibbon files in. The download link can be found at https://gibbonedu.org/download/ . Copy the download URL then wget the URL. Unzip the file (You may need to apt install unzip to do so)

  4. In your /etc/apache2/envvars file, you’ll find the apache user/group. Allow the extracted files to be accessible to this user. In my case, I amended these to be apache and www respectively, therefore:

    chown apache:www -R /var/www/gibbon.local/
    chmod 755 -R /var/www/gibbon.local/
    

    There’s no need to set uploads to anything else in this case.

  5. Next, we need to setup mysql:

    mysql
    create database gibbon;
    create user 'gibbon'@'localhost' identified by '*password*';
    grant all on gibbon.* to 'gibbon'@'localhost';
    flush privileges;
    
  6. A couple of PHP variables need to be set. All of the below are found in /etc/php/version/apache2/php.ini . Firstly, the max_file_uploads variable must be higher than the number of students in a class. magic_quotes_gpc and register_globals should be off short_open_tag and allow_url_fopen should be on. max_input_vars should be more than 5000 to allow manage permissions to work. You may wish to edit the error reporting value to make this less aggressive in production.

  7. Go to your Gibbon URL, as configured in step 2. If you are using an invalid URL like I was, you may need to add a reference to your /etc/hosts file. If you are using Chrome to view the page, you’ll also need to specify the protocol otherwise Chrome will search for the URL. You should see the Gibbon installation page and if you followed the steps before correctly, all requirements should be satisfied.


Installation on Windows

To install XAMPP, follow the instructions here: Install Xampp

After installing the necessary requirements, you will need to download the core module either from i) here or ii) use the cutting edge code.

How to install?

  1. Go to windows command, run as admin.
  2. Navigate to xampp/apache/bin. Here I am using root directory. > cd C:\xampp\apache\bin >
  3. Start your Apache server. Type in httpd.exe. You would see it running as per here. apache1.png
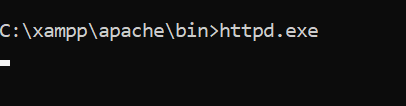
  4. Go to your xampp, click “Start” on the MySQL.
  5. Navigate to your browser, type in localhost:port. You will be able to find the Core module.
  6. Follow the instructions as per installation guide.

How to install requirements for PHP?

  1. Go to Xampp > Apache > config > php.ini.
  2. Refer here for detailed descriptions.

If your school uses GSuite (Formerly Google Apps), you can enable single sign on and calendar integration via Gibbon. This process makes use of Google APIs, including OAuth, and allows a user to access Gibbon without a username and password, provided that their listed email address is a Google account to which they have access

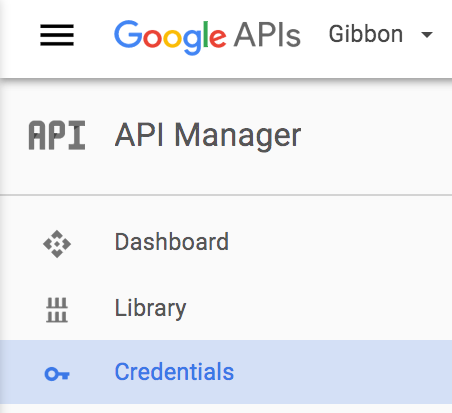
1. Log in to the Google developer console. This requires that you have an account with administrative privileges on your G Suite domain.

2. Once logged in you need to create a new project by clicking the Create Project button:

3. In the new project set-up dialog, give your project a name. Click the Create button:

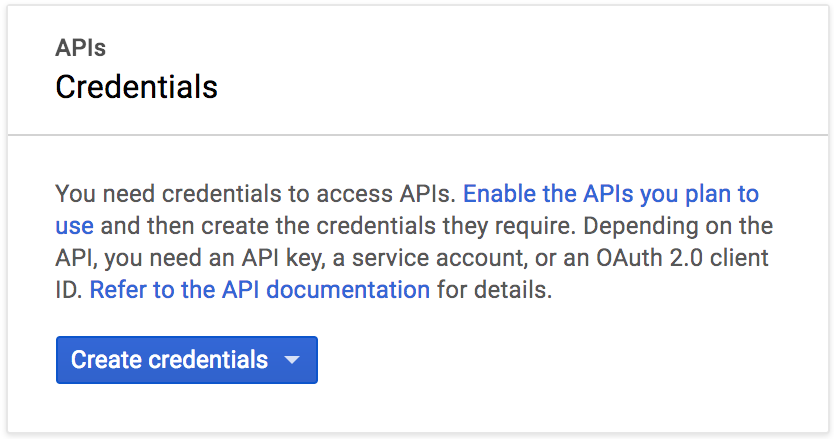
4.Click on the Credentials tab:

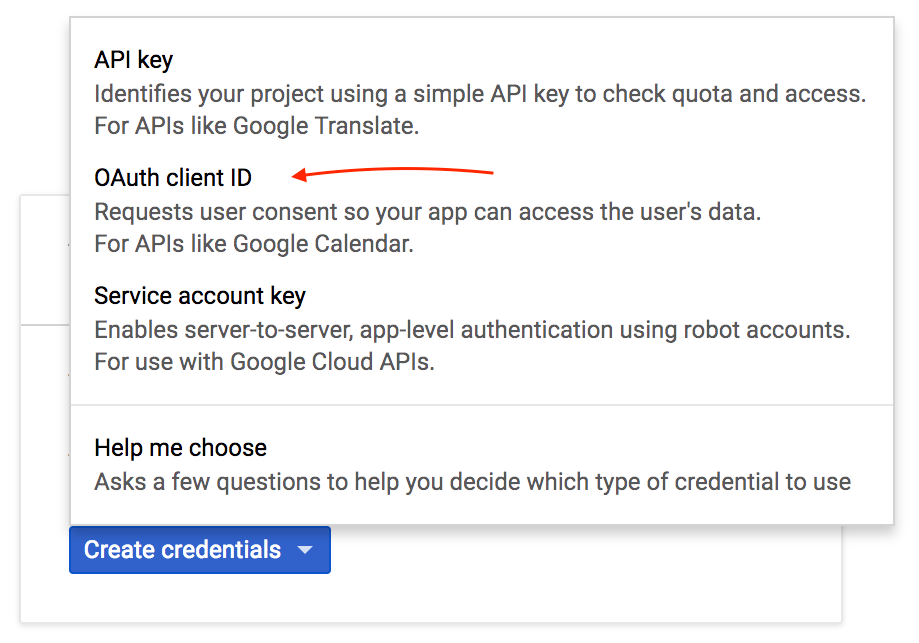
5. Then click Create credentials:

6. Click Choose OAuth2 Client ID:

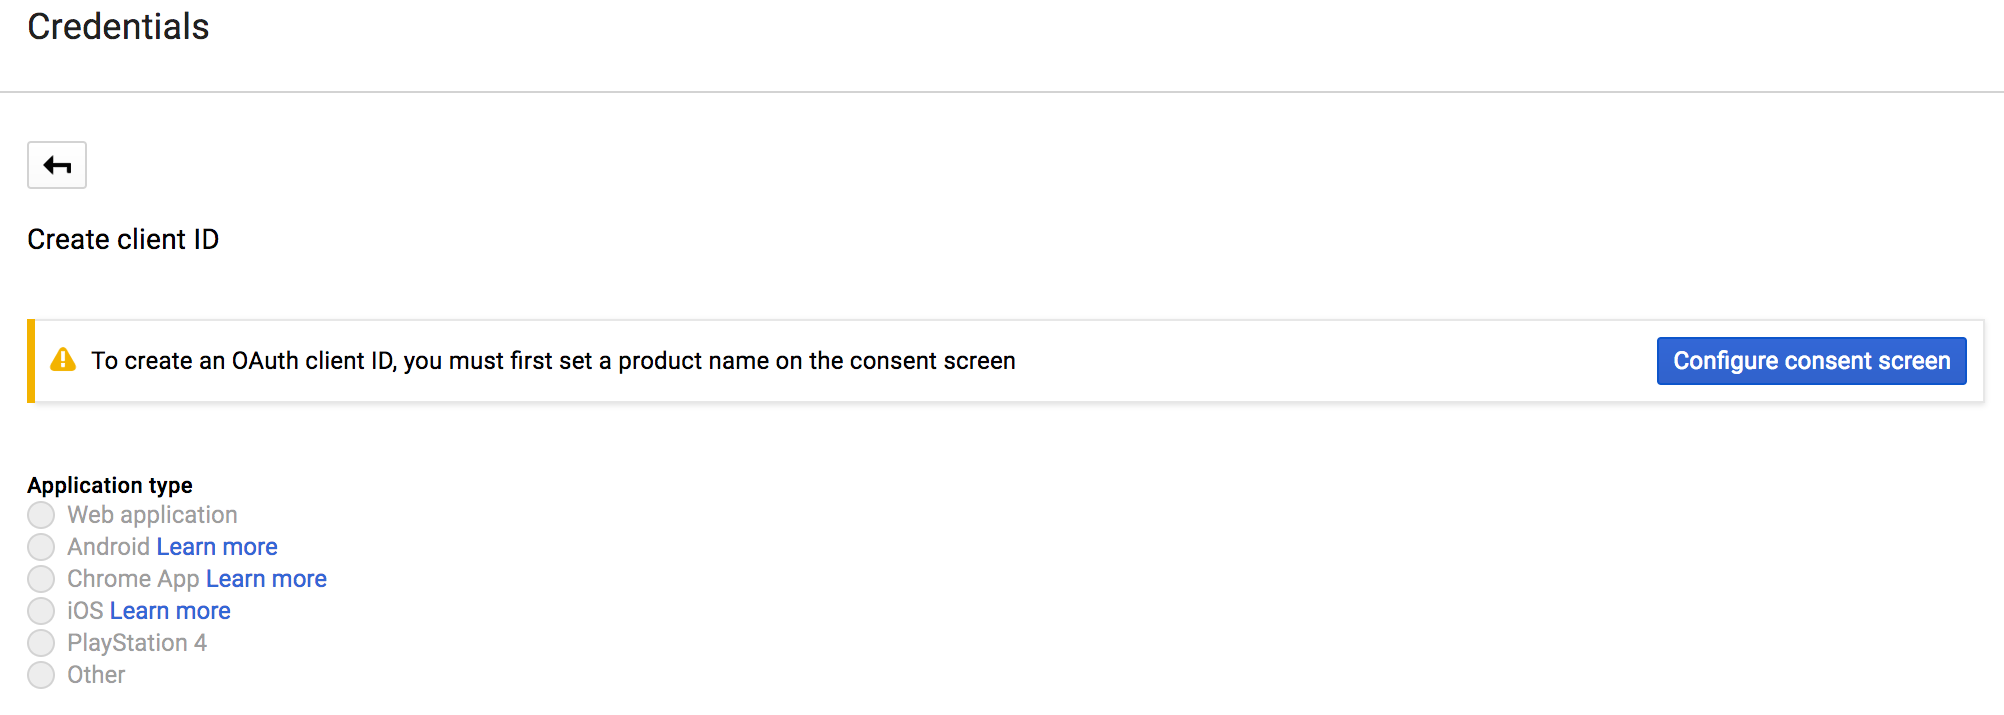
7. If you have not already configured the consent screen, at this point you will be required to do so:

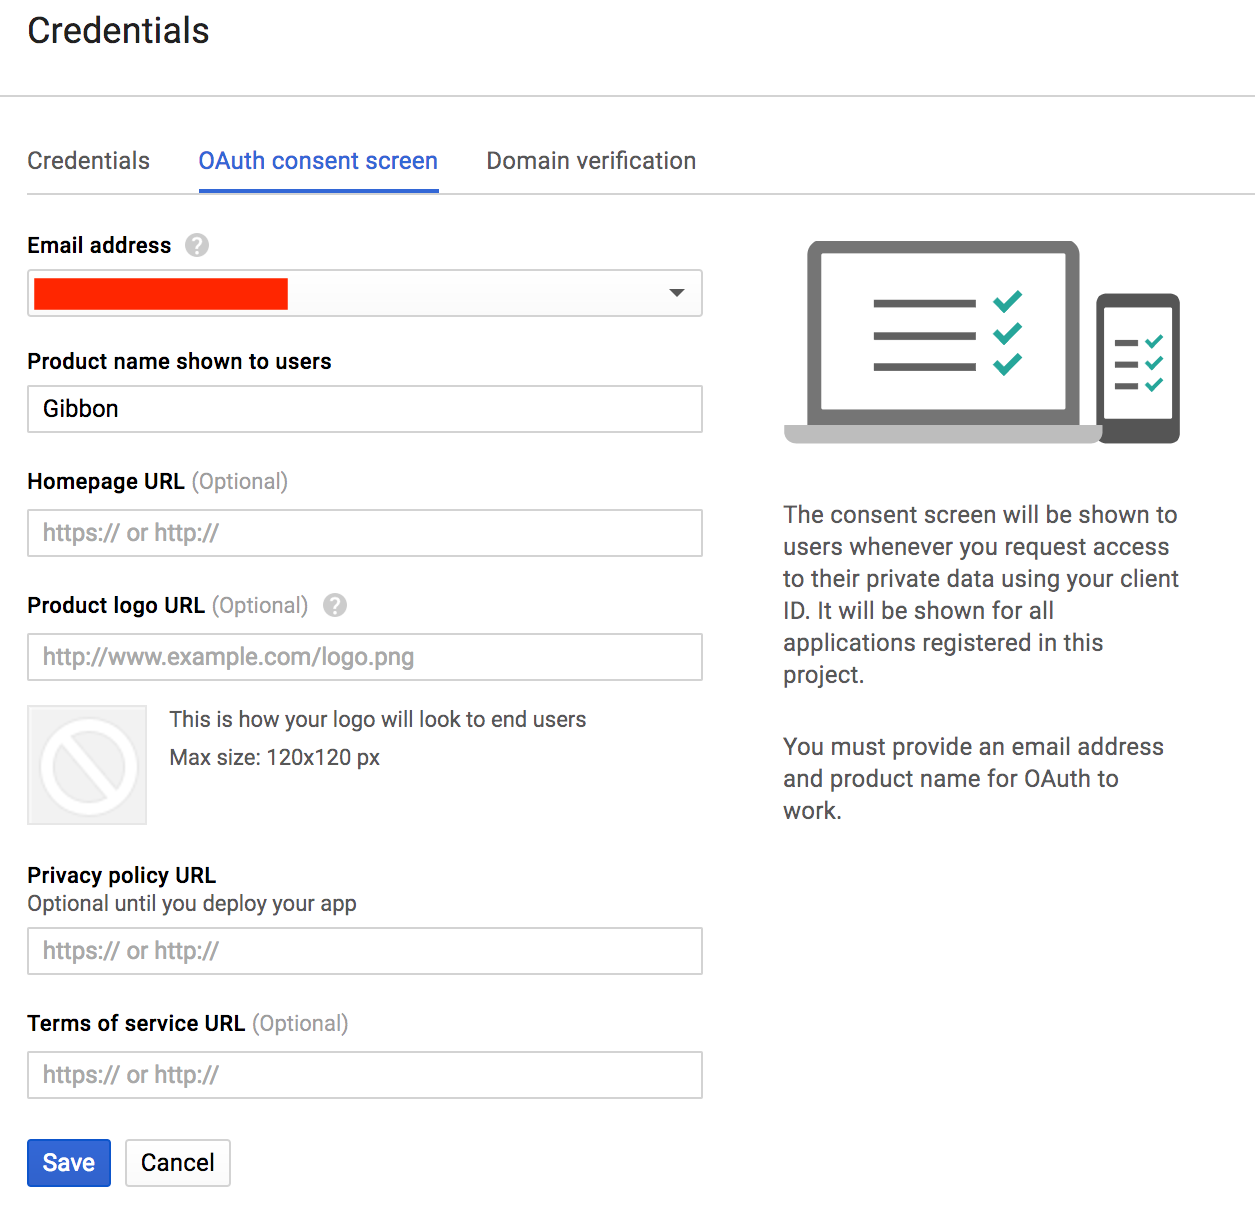
8. Fill in the details for the Product Name and click Save.

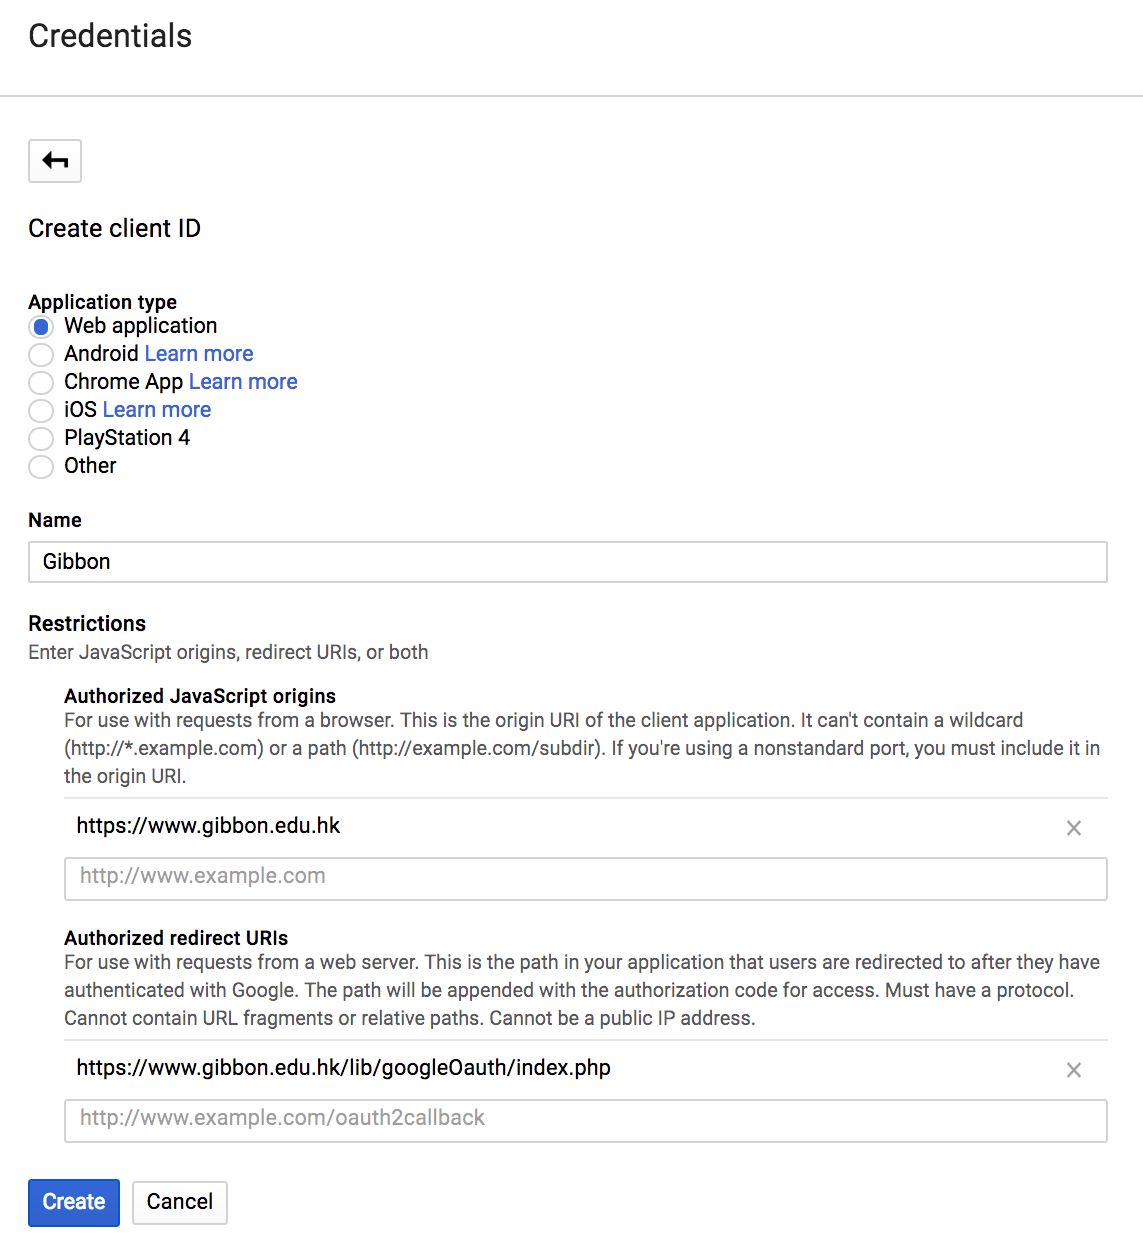
9. In the new client ID window, do the following:

  • Choose Web Application.
  • Set Authorised Javascript origins to the url of gibbon on your server.
  • Set Authorised Redirect URI to http://www.your-gibbon-install/lib/google/index.php. The googleOAuth folder is in the in the lib folder of Gibbon v14.0.00 and above on your server.
  • Click create client ID:

10. After this is complete, the client id details will be given to you: 
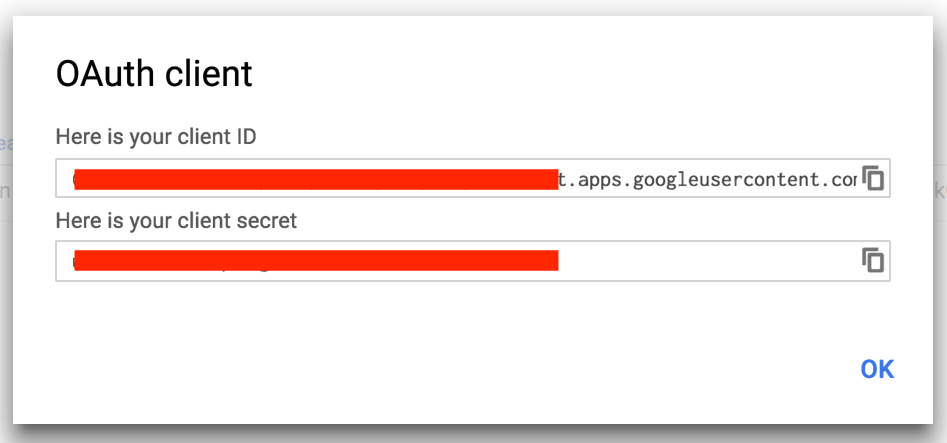
(Save the client ID and client secret for step 14.)

11. Create an API key:

12. Save the API Key for step 14:

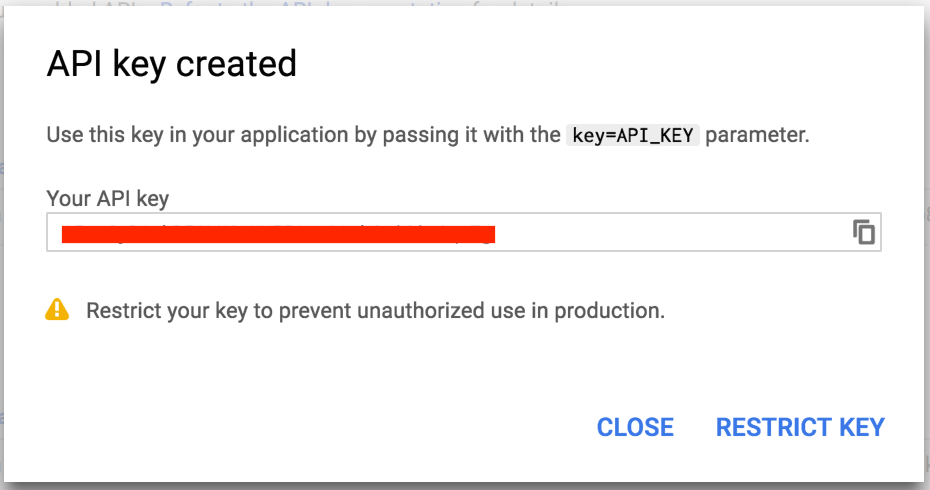
13. Leave the Key Restriction blank:

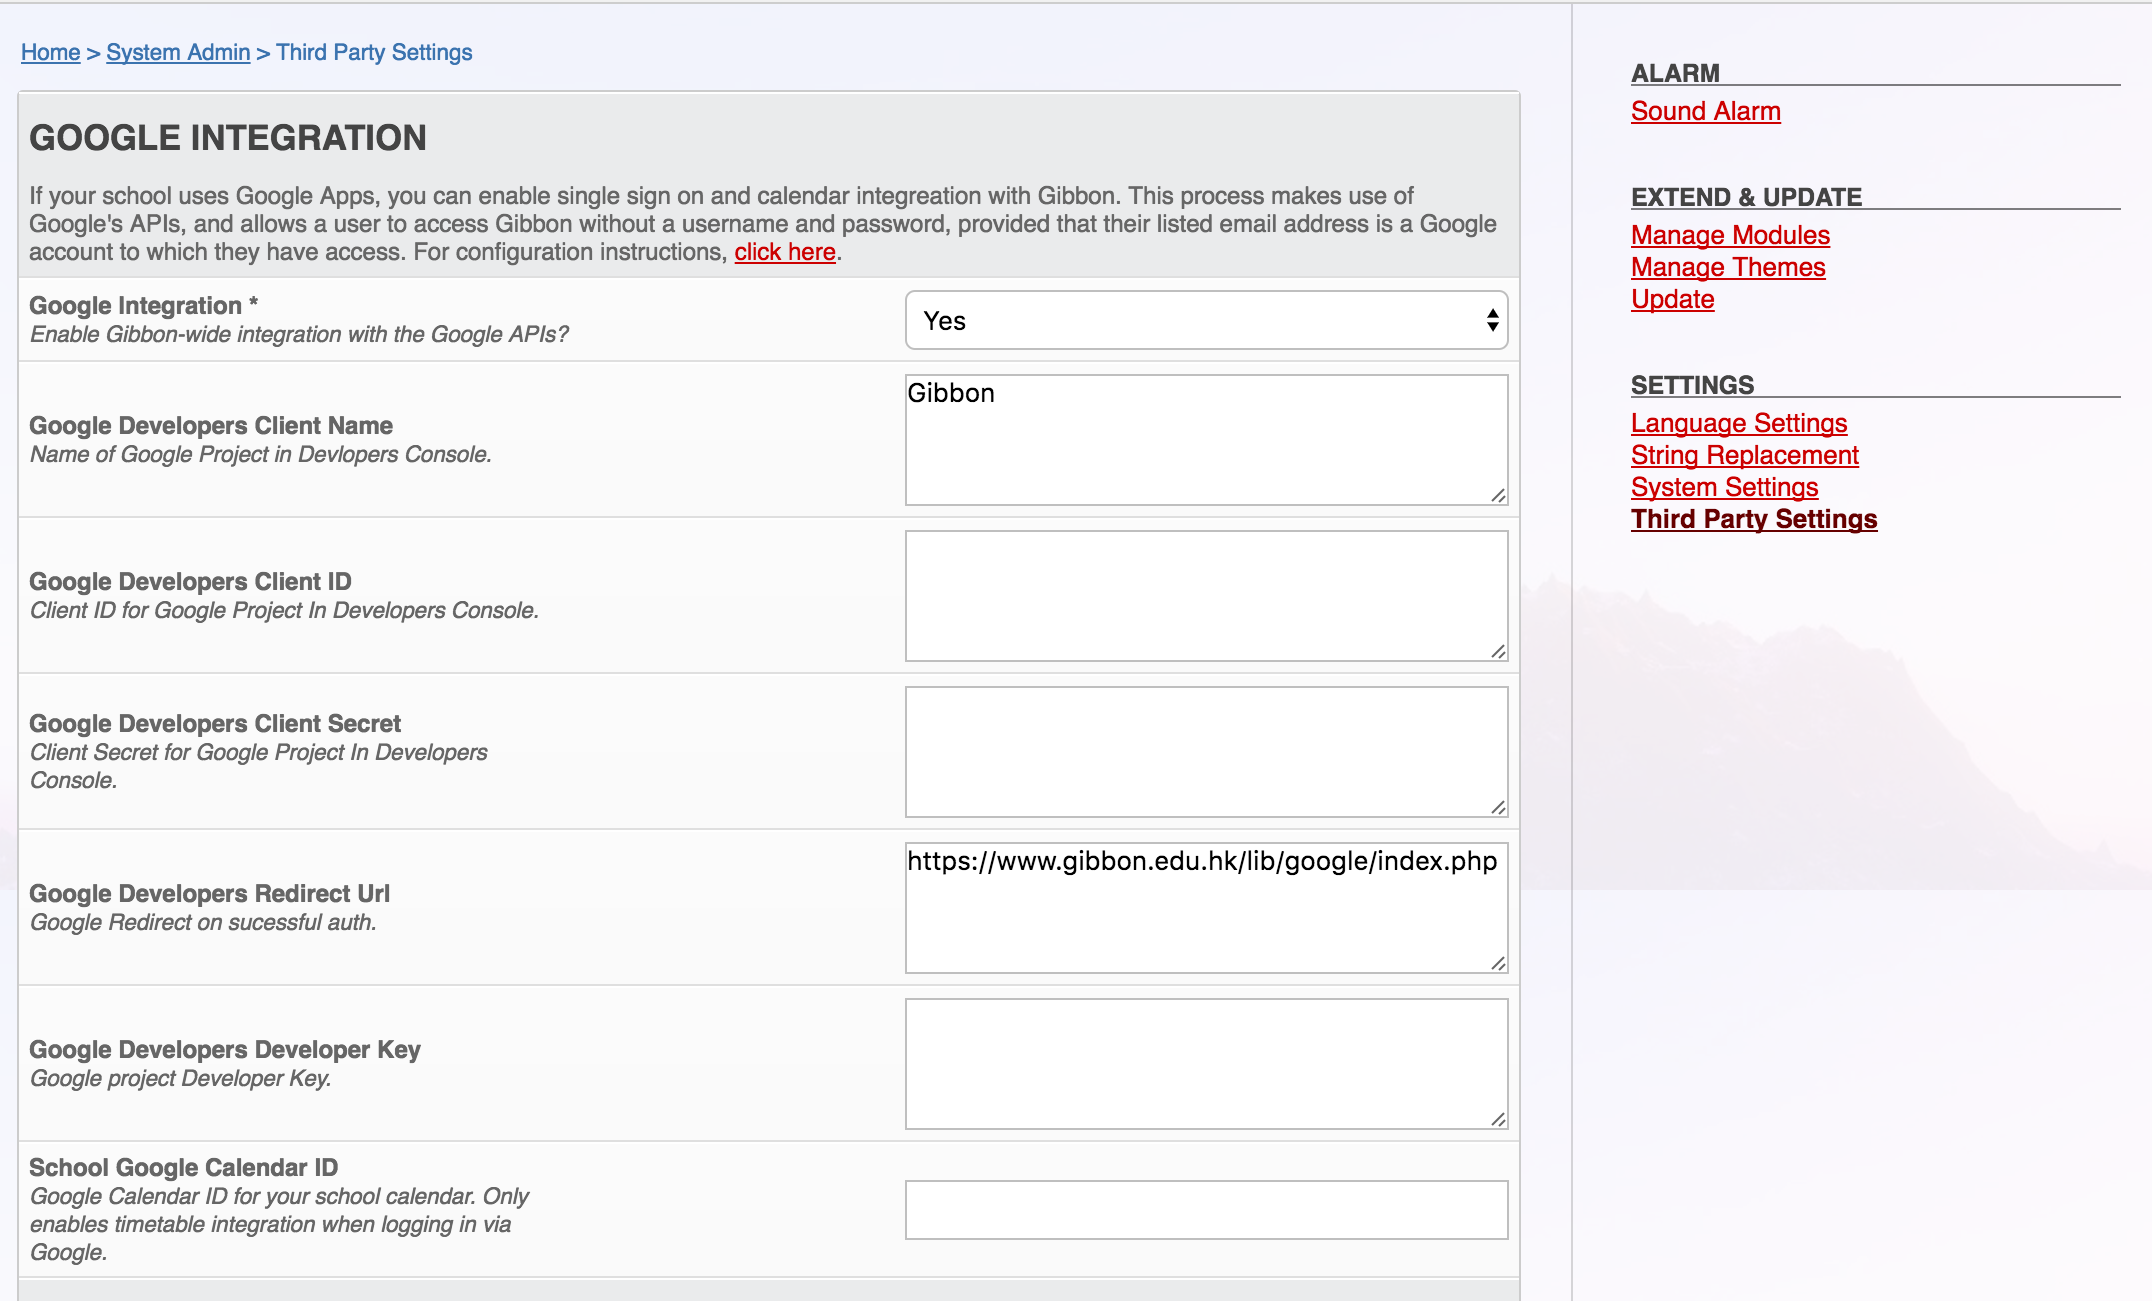
14. Everything is now set up on the Google side, so you can enter your details into Gibbon by going to Home > System Admin > Third Party Settings. The details you need to enter into are as follows.

  • Google Developers Client Name
  • Google Developers Redirect URI (See step 9 above)

Use details from steps 7-8 or click on the Credentials tab: For the following use: Google Developers Client ID = Yellow Google Developers Client Secret = Red Google Developers Client Name = Blue Google Developers Redirect Url = Green
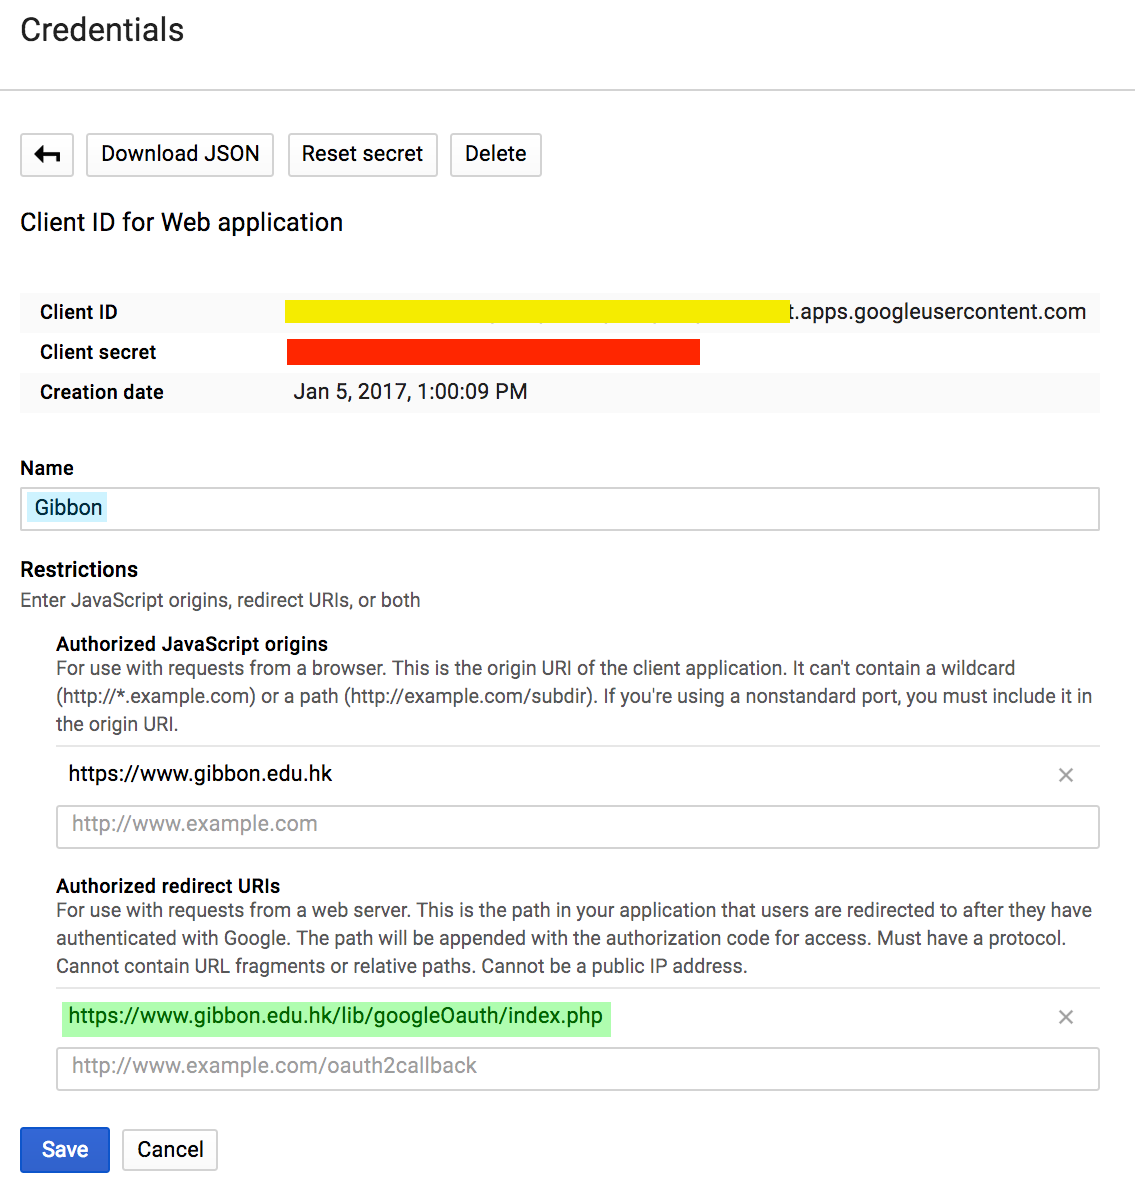
 API Key:

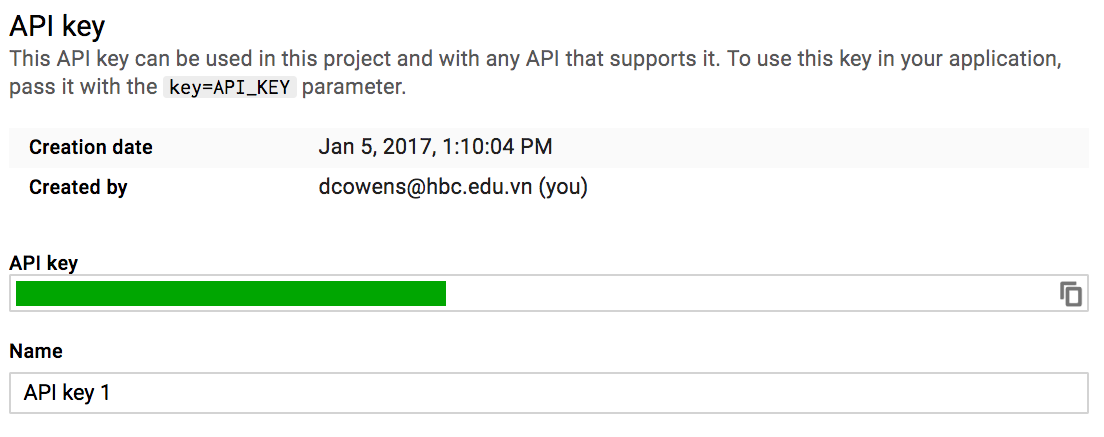
15. Gibbon requires a single Google API, the Calendar API, which can be turned on via the Google Developer Console.

16. On the Gibbon home page, you should now see a Sign In With Google button, which allows users to enter the system without their Gibbon username and password.

17. When a user logs in using Google, their personal calendar, if not yet set, will be set to their primary Google Calendar.

18. In additional, the school can specify a Google Calendar for all users to have in their timetable. To set this up, go to Home > System Admin > Third Party Settings and set the School Google Calendar ID School Google Calendar ID field to the ID of a shared Google Calendar.


The following are some quick instructions for setting up the Microsoft SSO in Gibbon. This documentation is a work in progress, but should help get users started. Please let us know in our forums if you have any questions: https://ask.gibbonedu.org

  1. Begin by logging into your Microsoft account via Azure Portal. If you don’t have an account you can set one up, however you may certainly need an enterprise level account from Microsoft if you are looking to enable SSO for your entire organization.
  2. Once logged in, select Azure Active Directory from the sidebar menu.
  3. Then select App Registrations from the list of Manage options in the sidebar.
  4. Click + New Registration and give it a name and select your account type.
  5. For the Redirect URI, this will come from Gibbon.
    • Go into System Admin > Third Party Settings and select the Edit pencil next to the Microsoft SSO option.
    • Screenshot 2022-03-21 at 10 42 09 AM
    • Select Yes next to APi Enabled to turn this API on.
    • Select and copy the value next to API Redirect Uri. This takes the form of http://yourdomain.com/login.php
    • Paste this into the Redirect URI field in the Microsoft page, selecting Web as the platform.
    • Click the Register button to create your app registration. Screenshot 2022-03-21 at 10 41 45 AM
  6. Once the app has been created, copy the value next to “Application (client) ID” in Microsoft. Go into the previous page in Gibbon and paste it under “API Client ID”. Screenshot 2022-03-21 at 10 34 01 AM

  7. Where it says Client Credentials, click the link “Add a certificate or secret”.

  8. Click the + New Client Secret button, use the default description and expiry.

  9. Immediatly copy the “Value” shown after creation (you will not be able to access it again without creating a new secret).

  10. Paste this value into the “API Client Secret” field in Gibbon, then press Submit to save your changes.

If you’ve successfully followed the above steps, you should now be able to log out and back in using the Microsoft SSO option. As an important note, the email used by Microsoft must match the email used in Gibbon, and must be unique in Gibbon, for this login method to work.

Give a shout on our forums if you have any questions: https://ask.gibbonedu.org


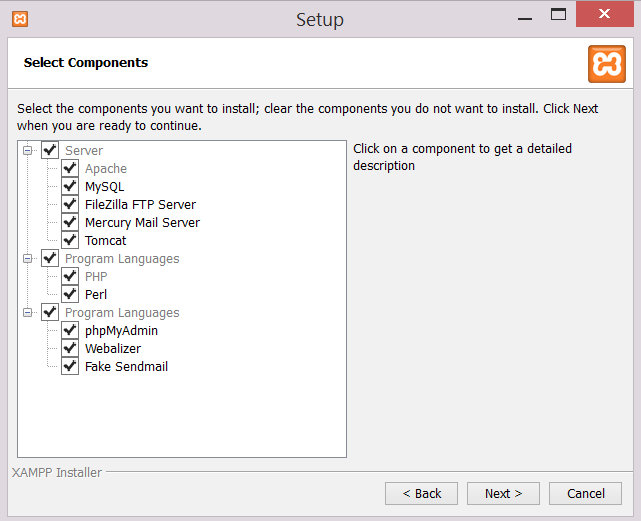
The Gibbon school platform requires the PHP programming language and the MySQL database. The industry standard is to use the Linux operating system which runs most publicly facing web sites. However there are packages (or stacks) of software designed to make it easy to run under Microsoft Windows. Two of these are XAMPP and WAMPP. Note that both of these packages are aimed at making it easy to set up and experiment with on a local machine rather than for production use. Because of this they are designed to ignore security issues and so should not be used to run live sites. For example the default installation would allow a person with passing knowledge to login to your setup and delete all databases. So please do not use on live sites. In this tutorial, we will look at setting up XAMPP, in order to be ready to install Gibbon. Download XAMPP from the Apache Friends website https://www.apachefriends.org/index.html. There are several different versions of the install, the one used here was called xampp-win32-5.6.3-0-VC11-installer.exe When you run it you will probably get an alert similar to the following XAMPP install first page 
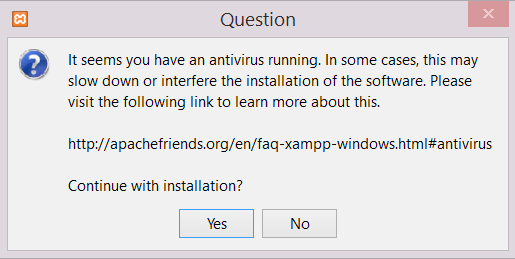
Don’t worry, it is part of the standard install process. You may then get a message that says

xampp_install_2

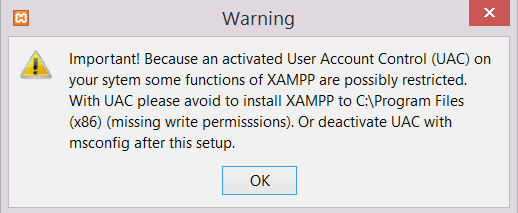
Again, don’t worry this is standard. Next you should see this xampp_install_3 
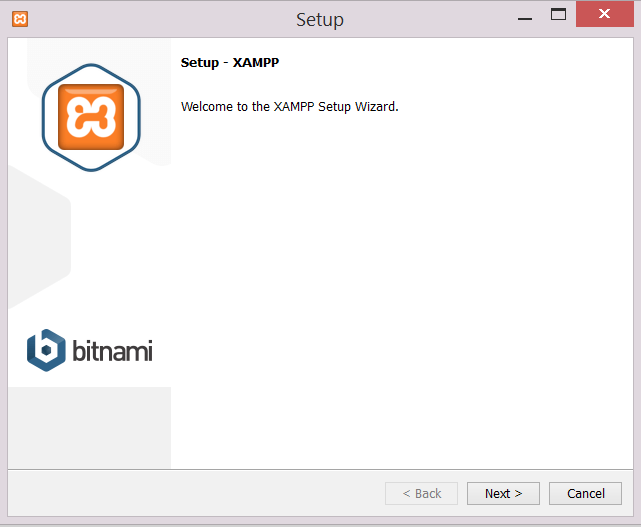
Click the next button to display the following

xampp_install_4

Click the next button and you will see a screen like the following

xampp_install_5

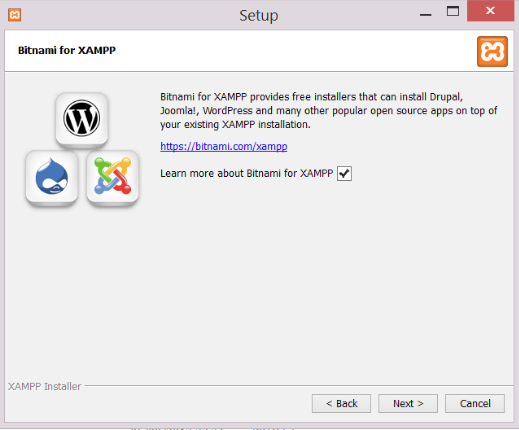
I recommend accepting the default, even though installing directly off the [c:](file:///c:/) root may seem a little odd. On the next screen uncheck the button after “Learn more about Bitnami for XAMPP” (otherwise it will fire up your browser and take you to the web site explaining how you install many other free web applications)

xampp_install_6

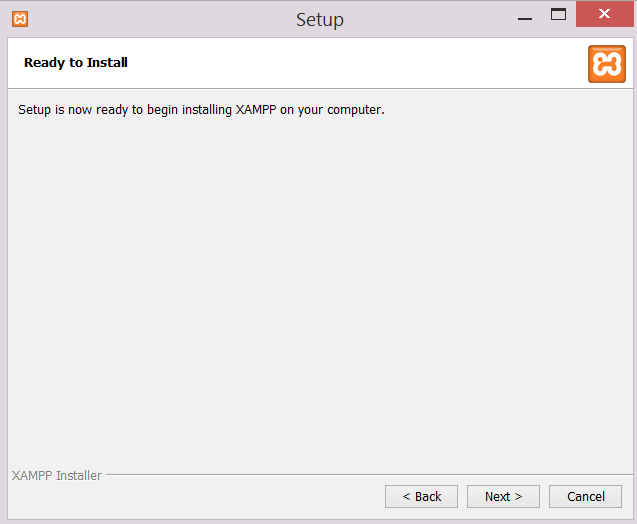
The installer is now ready to go

xampp_install_7

Now might be a good time to put the kettle on as it may take a while to unpack and install all the files depending on the speed of your computer. At the end of the install process you should see a screen similar to the following:

xampp_install_8

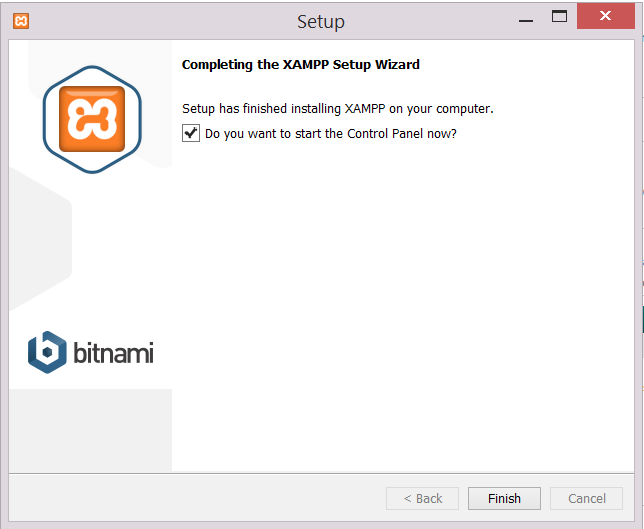
You do want to see the control panel so click Finish and you should see something like the following. By the way, if you ever need to run it from the file explorer the control panel program is called xampp-control.exe. XMPP_control_panel

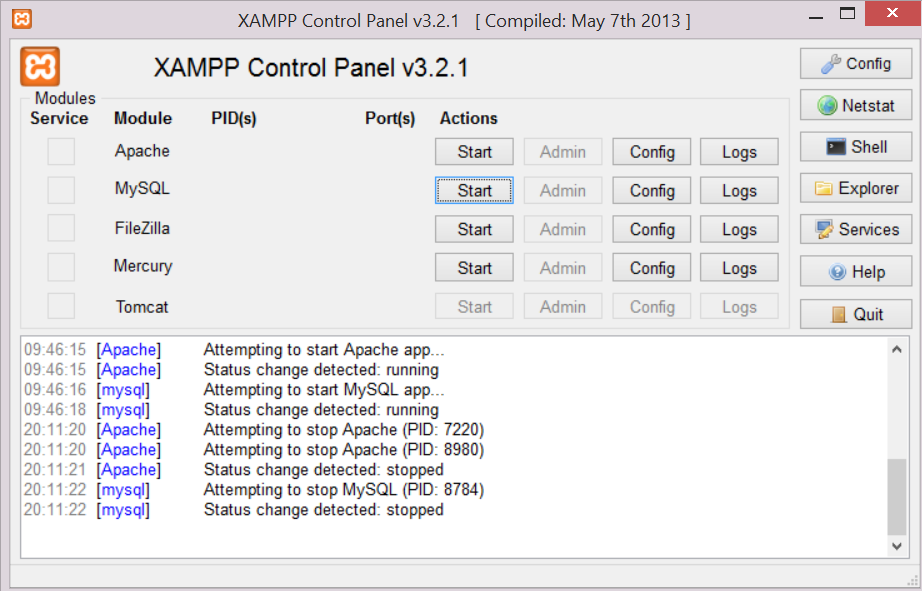
Click the Apache and MySQL start buttons and the start labels should turn into stop buttons as in the following screen shot. XMPP_control_panel_running

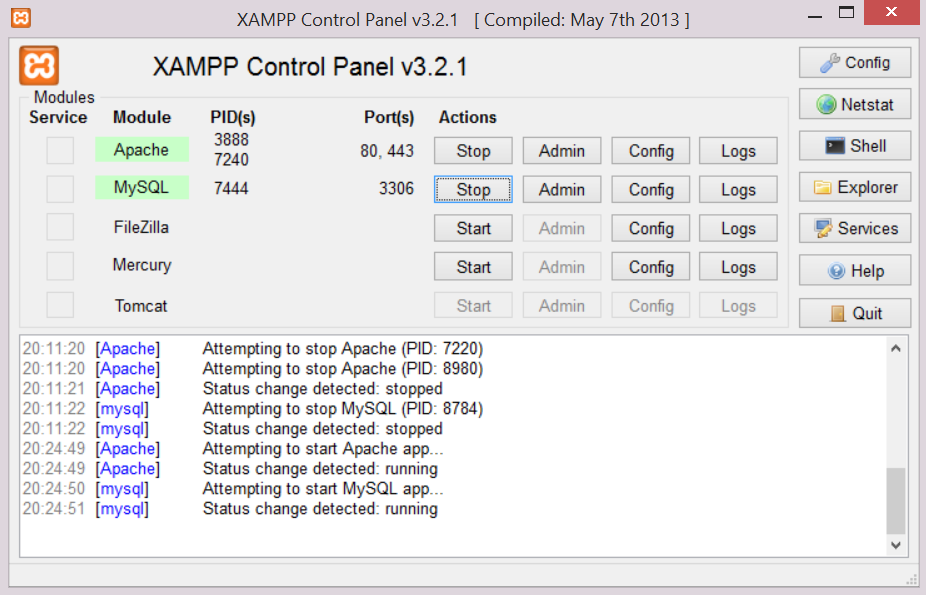
If either Apache or MySQL do not start you will need to do some web searches and trouble shooting as Gibbon cannot work without both running. To check that XAMPP really is working point your browser to http://localhost If you see a page like the following then things are going well xampp_start_page

You can now follow the Installing Gibbon guide, using C:/xampp/htdocs/ (aka the XAMPP document root) as the location into which you place the Gibbon files.


Gibbon aims to cater to all sorts of schools, and the back end has a correspondingly large assortment of options. This can be overwhelming to start with, so this page aims to highlight the most important options when first setting up a school. The video below gives an overview of the initial setup of Gibbon, with the following text going into more detail:

Additional Videos

In March 2021 we ran a training day with a number of sessions to help administrators setup their system. You can find the full playlist of sessions here: Gibbon Training Day 2021

Demo Data

Integrated into the Gibbon installer, opt to include demo data when you configure your database to see what Gibbon looks like in a fully operational school.

System Settings

Before setting up the structure of your school, complete as many of the settings as possible in Admin > System Admin > System Settings. This will help ensure that you have access to as much of the system’s functionality as possible.

School Structure

Use the following options in the main menu under Admin > School Admin to set up basic structures in your school.

Years, Days & Times

  1. Manage School Years - almost all of Gibbon’s functionality is reliant on the concept of a school or academic year: this helps you see only the information that is relevant in many views. To function your system needs a “Current” school year, and can have any number of “Past” and “Upcoming” years. Each school year has a unique “sequence number”, which shows how it is ordered in relation to other years.
  2. Manage Days of the Week - here you can turn on or off individual days in the week, as well as setting start and end times for your various school days.
  3. Manage Terms - if your school year is divided into terms or semesters, you should create one entry here for each term. Otherwise, just create a single term the same length as your school year.
  4. Manage Special Days - here you can specify public holidays, mid-term breaks and other school closures. This is important as it helps determine whether things like school attendance should be enabled on any given day.

Groupings

  1. Manage Year Groups- year groups represent the way that schools divides students on the basis of age. By default, Gibbon ships with Years 7-13 preset. Use this area to add, edit and delete school years. Each year group has a unique “sequence number”, which shows how it is ordered in relation to other year groups.
  2. Manage Form Group - form groups (aka roll groups, home room, tutor groups) are the groups in which students have their attendance taken and/or receive pastoral care. Roll groups can contain students from a single year group, or can be mixed across years.
  3. Manage Departments - departments, which can be either learning areas or administrative, represent staff groupings. These are mainly used in the Planner, Departments and Library modules. To make use of this area, you will most likely want to added staff to your school (see below).

Others

  1. Manage Spaces - spaces are any areas in your school that you might want to use in the timetable, including classrooms, labs, offices, sports facilities, etc.

The other settings in School Admin are not so fundamental to the running of a school, and so will not be covered here. Mostly, these are used to control the functioning of single module (e.g. Manage Student Settings).

Users

Most users of Gibbon will fit into three main categories: staff, students, and parents. Gibbon uses roles, actions and permissions to control access to various parts of the system. Use the following options in the main menu under Admin > User Admin to set up users and access.

User Management - Access

  1. Manage Roles - roles in Gibbon are groupings based on what a user can do within the system. Gibbon ships with the following default roles: Administrator (that’s you), Parent, Student, Support Staff and Teacher. Add new roles according to the way you want to allow access to the system. For example, if you have some students with extended system privileges, create a new role called something like “Student Ext”.
  2. Manage Permissions - permissions turn individual module actions on or off for selected roles, allowing you to control who can do what to a relatively fine-grained level. Gibbon ships with sensible, common defaults, but it is worth auditing this area thoroughly to avoid nasty surprises in behaviour. For example, you probably would not want to give parents access to full student profiles, preferring instead to stick with brief profiles for parents, and full for staff.

User Management - Users

  1. Manage Users - with your access rights ready, you can now start adding users, and the Manage Users area lets you do this by hand. There is also an Import from File option in System Admin which allows you to upload users in bulk using CSV-formatted spreadsheets. Later on, come back to Manage Users to reset passwords, assign new roles and much more. Note that users can be assigned multiple roles, and can use the Role Switcher on their homepage sidebar to access them. If you would like users to update their own information, this can be achieved under People > Data Updater.
  2. Student Enrolment - students much be enrolled in the current school year if they are to appear in most areas of the system. On enrolment, students are placed into year and role groups. When the end of year arrives, use Rollover under the Admissions sub-menu to automate enrolment for the following year.
  3. Manage Families - staff, students and parents can all exist within families, which act as the basic mechanism for granting parent users access to information on student users.
  4. Manage Staff - all staff users should be registered as staff in order that they can be used in various areas of the system.

Admissions

  1. Application Form Settings - if you are looking to reduce paper work and data entry, set up your Application Form parameters and make sure public applications are enabled. Your admissions officer (specified in System Settings above) will receive emails when new applications arrive, and can then manage these under Manage Applications.
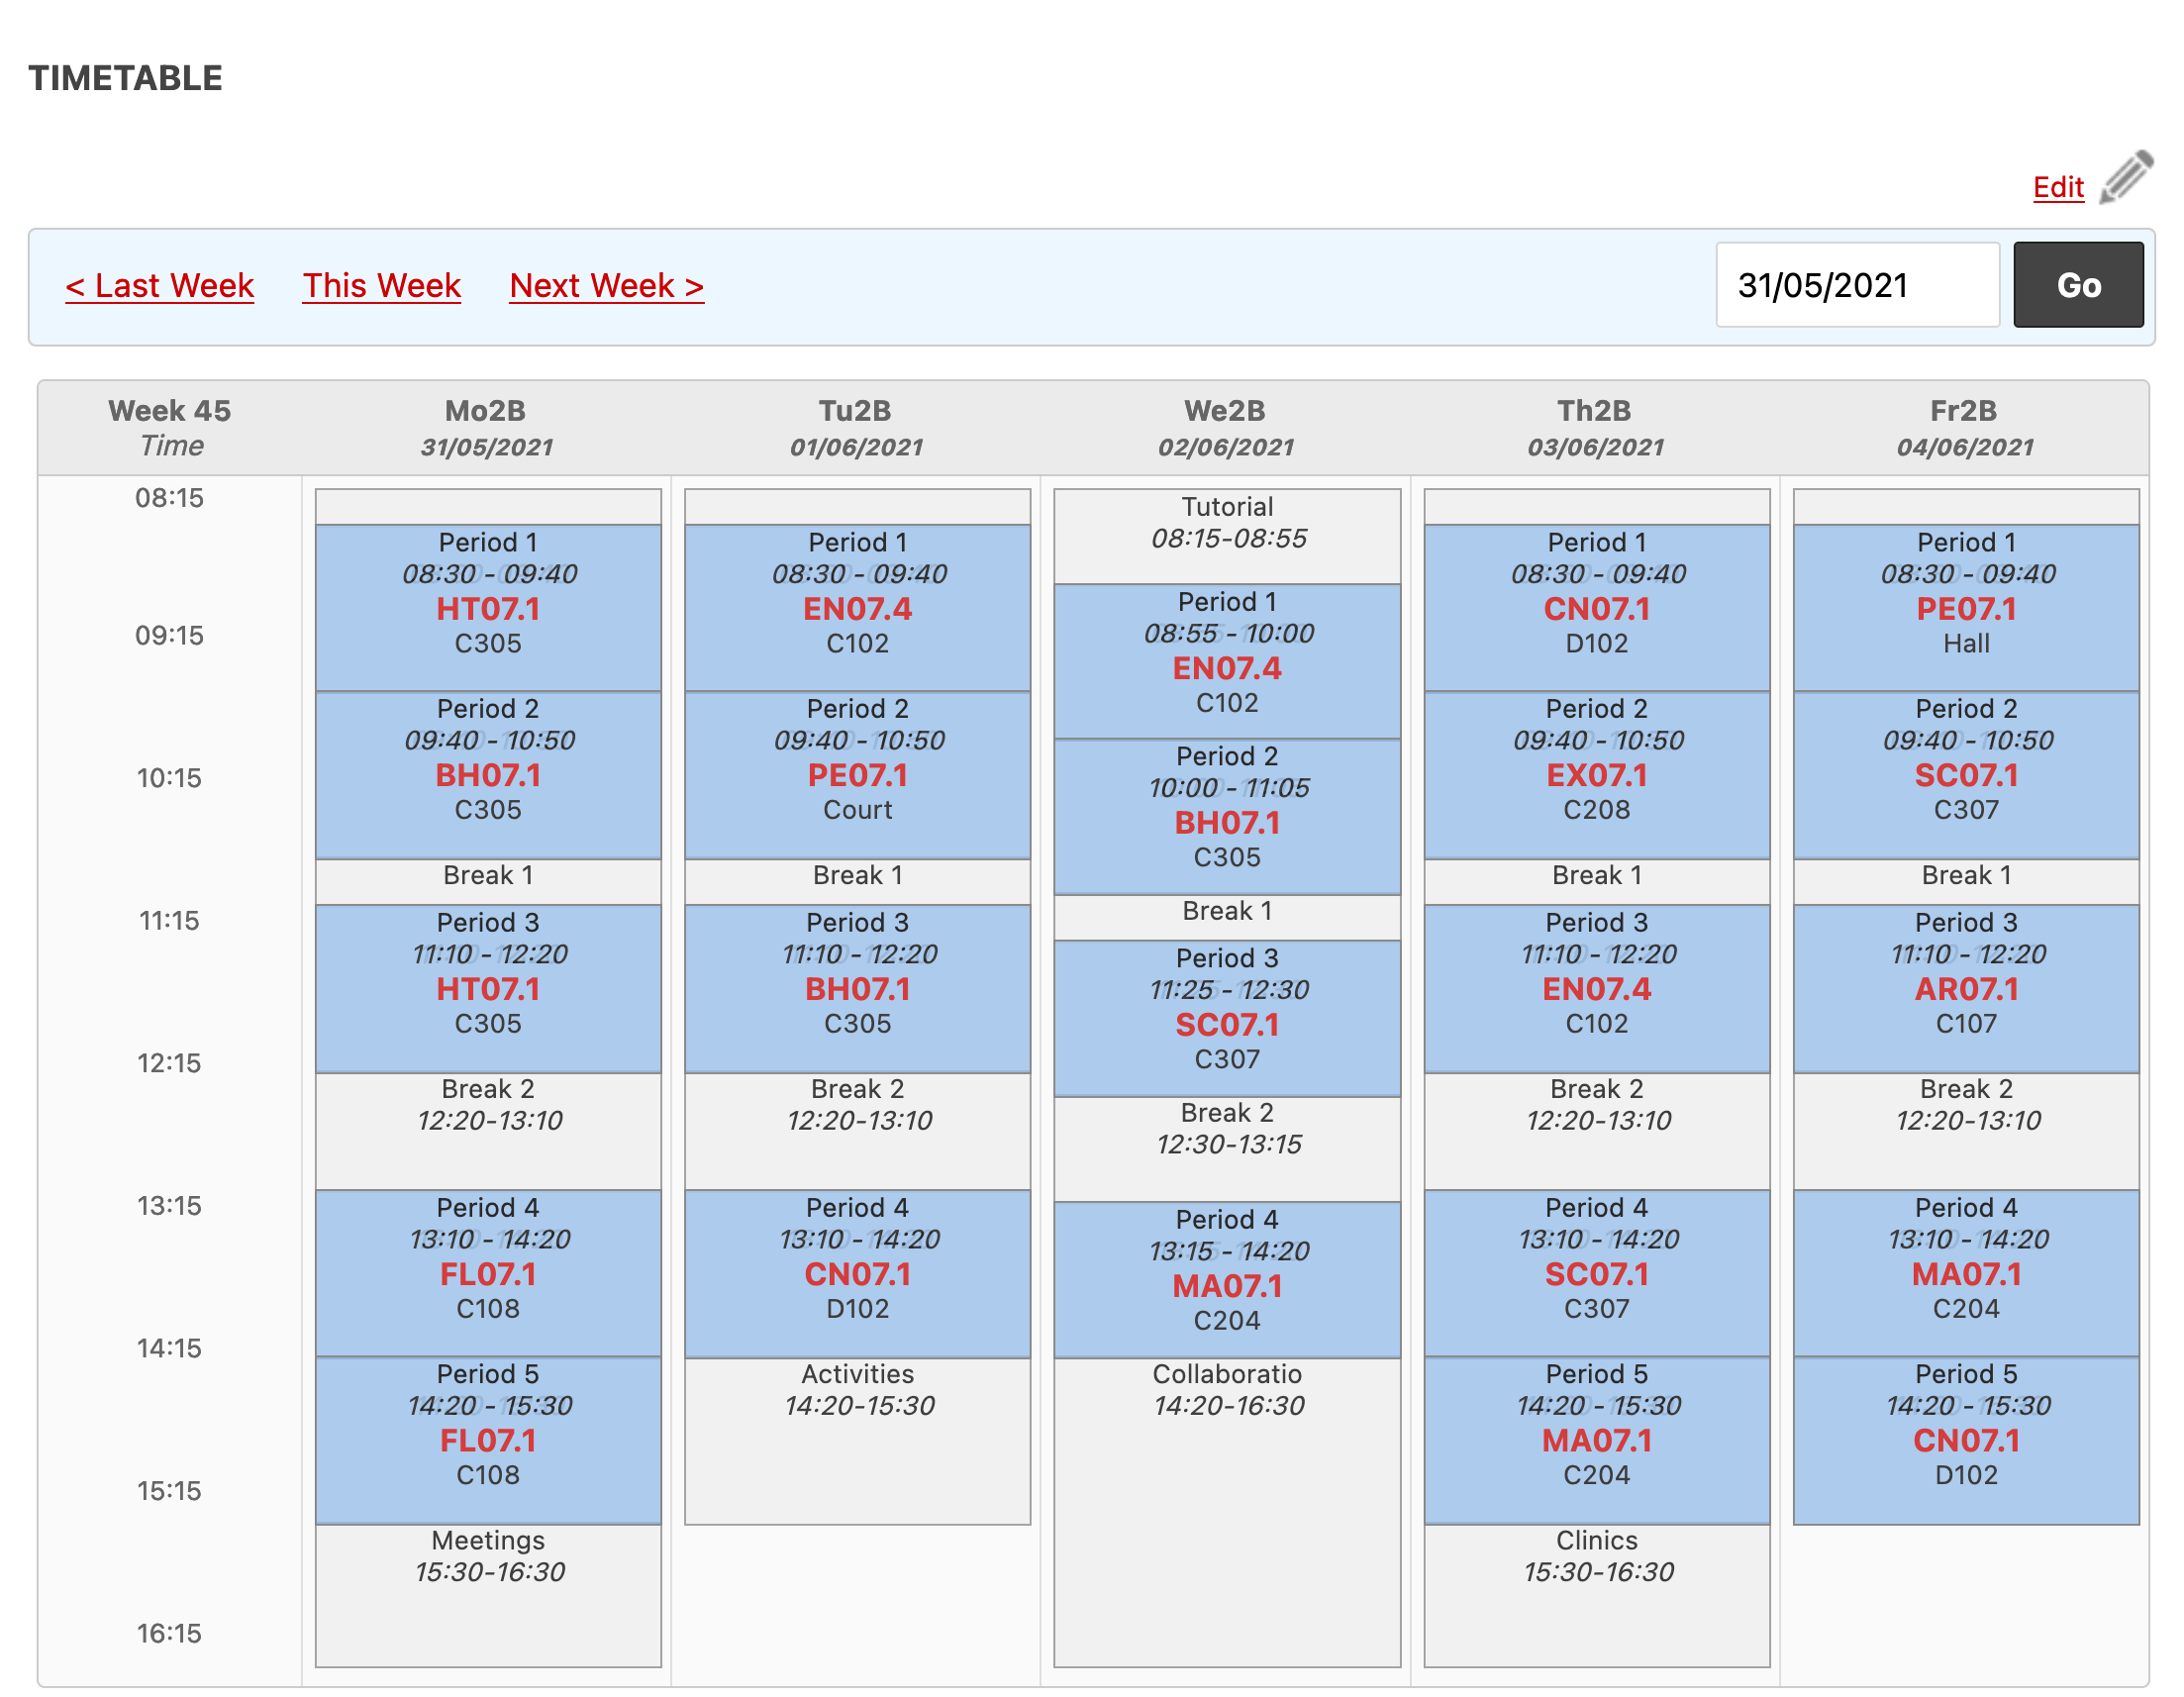
Timetable

Enabling and configuring a timetable improves staff efficiency in many of the other areas of the system (such as the planner). This is covered in more detail in the Timetabling section.


Gibbon allows you to use a variety of spreadsheet files (including CSV) to import data, including users, other systems and sources. As of v17, there is a unified import tool, which can be accessed under Admin > System Admin in the main menu, and then Import From File in the module menu.

This new tool allows you to export a file structure, which can then be populated and imported.


Gibbon is designed on the idea that every school is different, and hopes to provide tools to meet a wide range of needs. The approach to customizing Gibbon to your school needs depends on the scope of change you’re looking to make.

1) String Replacement

Gibbon has an internal String replacement system under Admin > System Admin > String Replacement, which helps with a lot of the minor cosmetic changes and differences in terminology between one school and another.

2) User Custom Fields

The built-in User Custom Fields feature under Admin > User Admin > Manage User Custom Fields allows a fair amount of flexibility to add data a school needs.

3) Managing User Permissions

Managing user permissions can be helpful when needing to hide certain modules from different roles.

If you find yourself needing to manage who can access what throughout your Gibbon system, you can do so by navigating to Admin > User Admin > Manage Permissions. From there, you can add, and remove permissions for the roles you have created in Gibbon. This will allow you to customize access to certain functions by role.

4) Module System

Beyond the built-in tools, Gibbon’s Module system allows you to extend the system quite considerably. A module can be anything from a few pages to a whole new set of tools and table data (the Free Learning module is a great example of a single module that can transform how Gibbon is used). There are also a few hooks that can be used by modules to insert content in specific places such as the dashboard: for more info view our Module Development page. Check out available modules on our Extend page.

To install a Gibbon module:

  1. Download and unzip the module file.
  2. Copy the first-level sub-folder with the same name as the module (e.g. “Free Learning”) into /modules in your Gibbon installation.
  3. Browse to Admin > System Admin > Manage Modules in your Gibbon interface.
  4. Scroll to the bottom of the page: the module will be listed in a table, highlighted in orange.
  5. Click the plus icon in the table row for the new module.
  6. The new module will appear in Gibbon’s main menu.

To update a module:

  1. Download and unzip the module file.
  2. Copy the first-level sub-folder with the same name as the module (e.g. “Free Learning”) over the old version of the module in /modules in your Gibbon installation.
  3. Browse to Admin > System Admin > Manage Modules in your Gibbon interface.
  4. Scroll down to find the relevant module in the list of installed module: it will be highlighted in green.
  5. Click the package icon in the table row for the upgraded module and follow on screen instructions.

5) Fork Gibbon Source Code

With Gibbon being open-source and available through Github it’s also possible to make modifications to a forked copy and merge new versions back into it. With each new version (generally twice a year) one would merge the new version back into their Github fork and manually handle any conflicts between the two. This direction likely requires the most programming knowledge, but is certainly one option to maintain a set of changes from one version to another. As with anything open-source, if it’s a change that the developer feels could benefit other schools they can try contributing it back to the core as a pull request.

6) Feature Request System

If there is an area that many schools may be needing to customize and there is a lot of interest in it, such features can be put forward in the Feature Request category of our forum. If you try something and find it’s working well for your school be sure to share your findings on our forum.
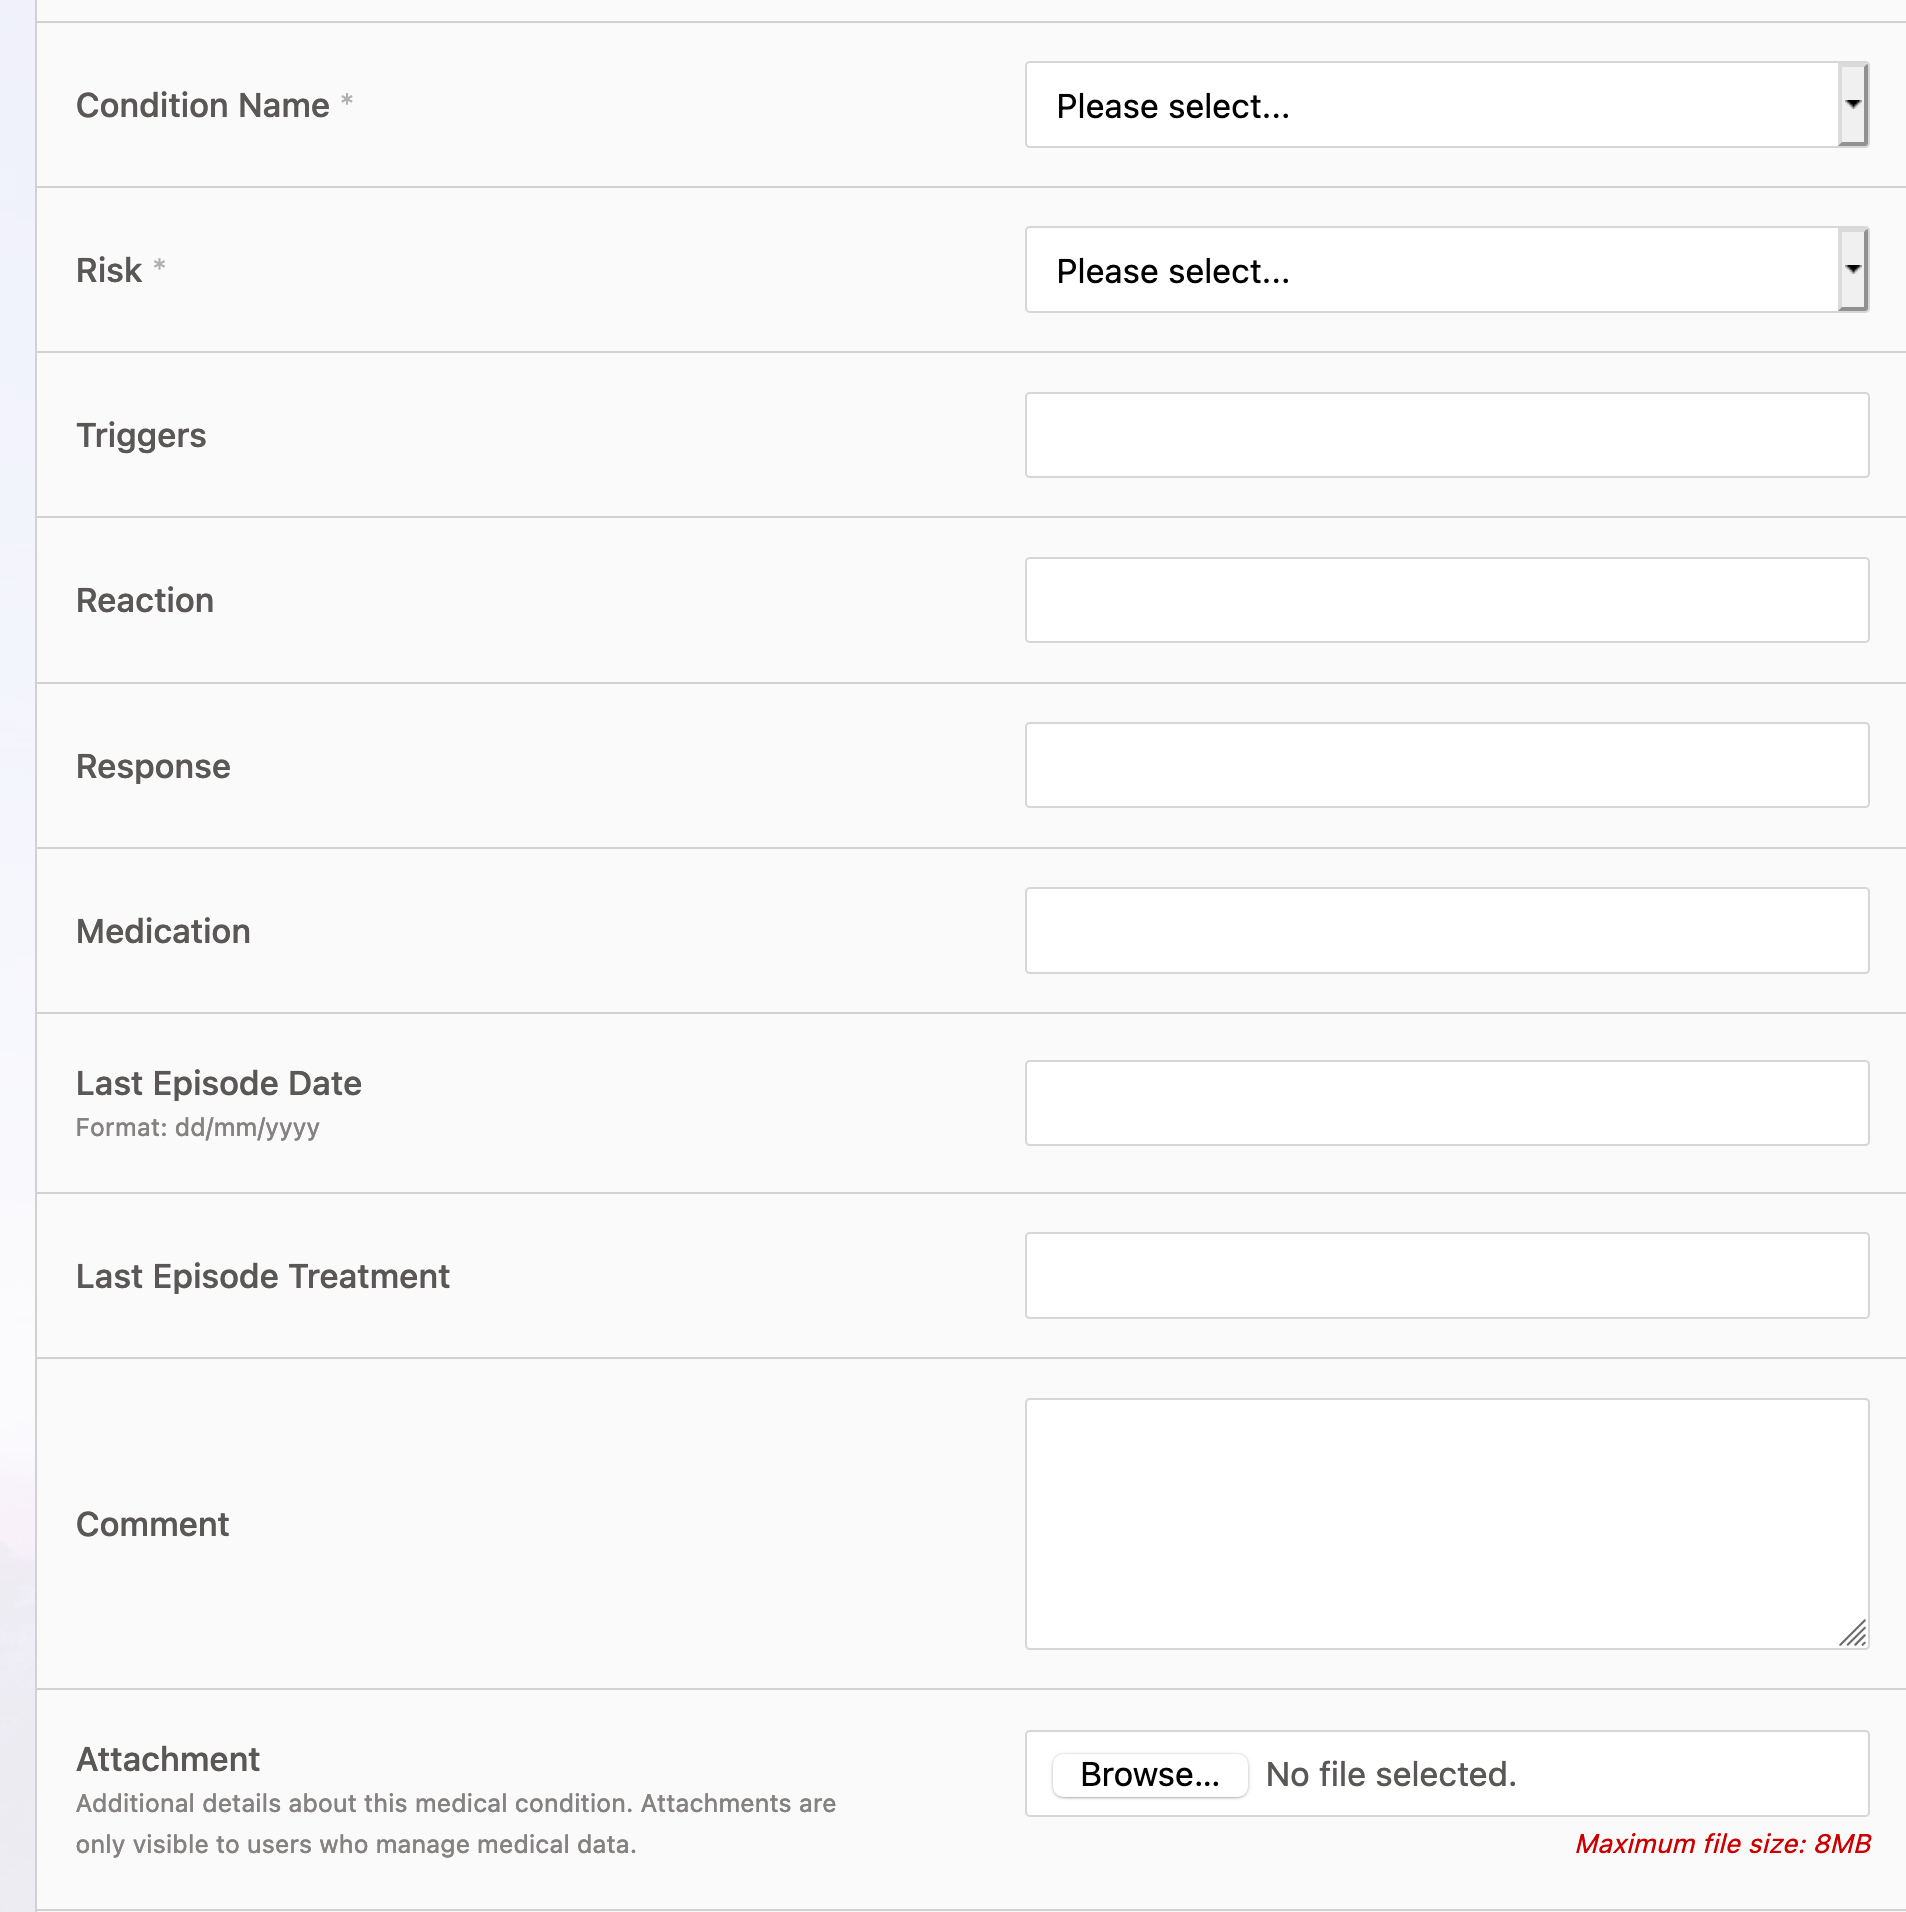

Introduction

Gibbon includes the ability to create and use custom fields for users. Once created, these fields are available for use within Admin > User Admin > Manage Users, and can be enabled to also work in the Application Form and Data Updater modules. Fields can be enabled be role category: student, staff, parent, other.

Getting Started

To create new fields, go to Admin > System Admin > Custom Fields. Click on the Add button to create a new field, which will give you the following options:
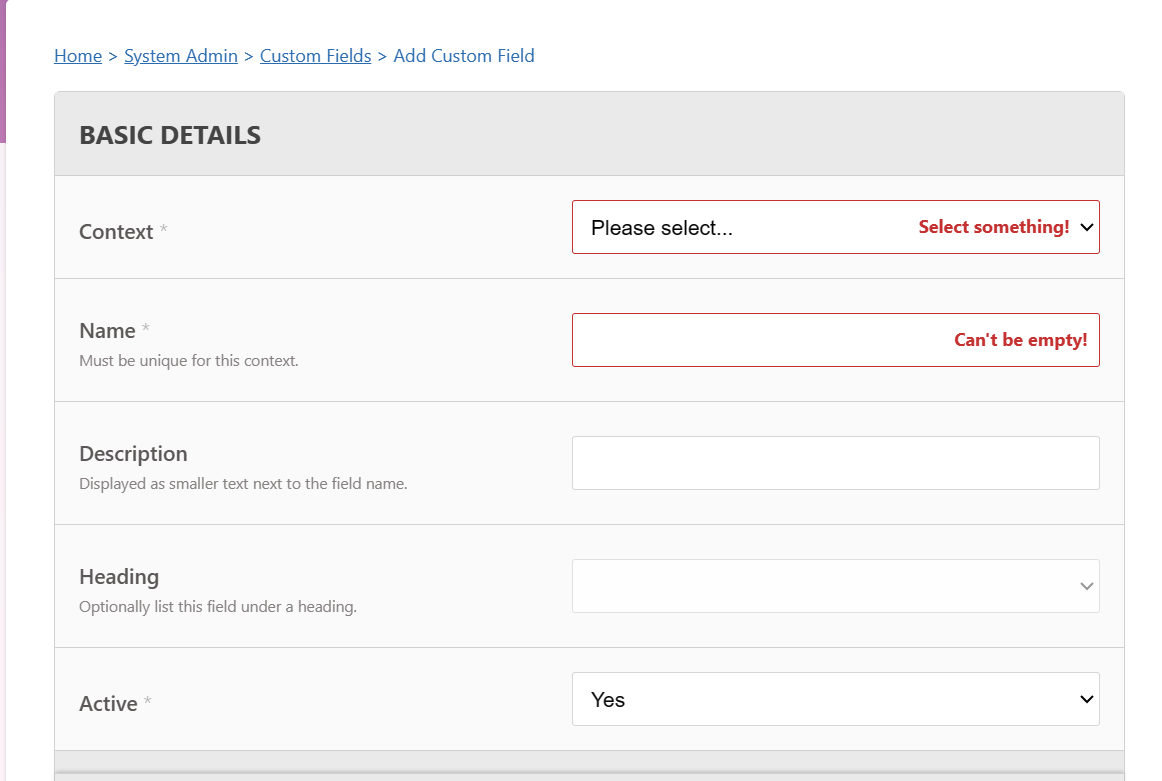
 custom_field1


Core Updates

  1. The system will alert you of new updates to the core, when you visit System Admin.
  2. Use the Update action in System Admin for semi-automatic updates to the core, as follows:

    1. Backup your database and installation files.
    2. Download and unzip the latest version of Gibbon.
    3. Login to your Gibbon installation and go to Admin > System Admin > Update.
    4. Update your install base with the newly downloaded files, taking care not to overwrite any additional modules and themes you have installed.
    5. Refresh the Update page, and it should show there are some database updates to be run. Run these by pressing the Submit button.
    6. If the new version includes a lot of theme changes, you may need to refresh your page a few times to see things correctly.
    7. In some cases you might need to log out and back in for all changes to be effective.

    Tips for updating via the command line

    For step 4: Supposing you have installed Gibbon in /var/www/html/c/ you could run the following commands on your system:

    The above commands are for upgrading to v22. You will need to get the URL for the version to which you are upgrading here: https://github.com/GibbonEdu/core . Also, your Gibbon install may use a different directory than “c” in the rsync command. Remember to run the database update from Gibbon’s Home > System Admin > Update page.

    Note that in the switch to v22 the module Roll Groups has been replaced with Form Groups. If you are updating using this method from a version prior to v22 you will need to run this command too (again assuming Gibbon is installed in /var/www/html/c/):

    • rm -rf /var/www/html/c/modules/Roll\ Groups

Module Updates

  1. Use the Update function in System Admin > Manage Modules for semi-automatic module updates, as follows:
    1. Backup your database and installation files.
    2. Download and unzip the latest version of the module in question.
    3. Login to your Gibbon installation and go to Admin > Manage Modules and press the Update icon for the relevant module.
    4. Update your install base with the newly module downloaded files.
    5. Press the Submit page to update the module.

Theme Updates

  1. Use the Update function in System Admin > Manage Themes for semi-automatic theme updates, as follows:
    1. Backup your database and installation files.
    2. Download and unzip the latest version of the theme in question.
    3. Login to your Gibbon installation and go to Admin > Manage Modules.
    4. Update your install base with the newly downloaded theme files.
    5. Reload the Manage Module page (all themes are then checked and updated in one go)

With Gibbon up and running, you will want to protect your installation in case of disaster, allowing yourself to recover. Our recommendation is to use a shell script (example here for *nix servers) to copy all important files and database data to an external drive, which should be rotated to maintain online and offline copies of your data. On *nix servers, you can use cron to schedule the script to run on a regular basis (e.g. every night at 01:00):

0 1 * * * cd /home/user/ ; script_backup.sh


Gibbon supports storing and rendering of timetables using a non-grid-restrained approach. The timetable is created in a systematic, interactive procedure that is easy to achieve and understand. Before you proceed:

  1. You should have created the school year(s) and the term(s).
  2. You should have a list of all the days the school is active
  3. You should have a list of all the activities the school does in all days the school is on.
  4. This should be in terms of the periods, the times and the activities of a particular time set.

Creating A Timetable

  1. Go to Admin > Timetable Admin
  2. Use Manage Courses & Classes to create courses, and within these establish necessary classes.
  3. Use Course Enrollment to assign teachers and students to classes.
  4. Use Manage Columns to create time structures for distinct day patterns you have in your timetable cycle (e.g. if Monday, Wednesday and Friday follow one set of times, and Tuesday and Thursday follow one set of times, you will need two columns). For each column, add rows for all time periods (e.g. add Lesson rows for each instructional period, some Break rows in between, etc)
  5. Use Manage Timetables to create as many timetables as you need in a given school year. Most schools will require one timetable, but some schools (e.g. through schools) may require more. Each year group in each school year can only be connected to one timetable, but a timetable can be shared by multiple year groups (e.g. you can have a timetable for Years 7-11 and a separate one for Years 12-13). In each timetable you can specify a day entry for each type of day in your cycle. Each of these days is tied to a column (see step 4.), whose rows give it its timing structure. Once the column is assigned to a day, you can associate classes with the periods in that day.
  6. The final step is to assign timetable days to calendar days, which is done using Tie Days To Dates. If no records show under Tie Days to Dates make sure you have set up school terms under School Admin > Manage Terms .

Example Columns, Rows, Timetables, and Days

Let’s say your school runs Monday to Friday using one set of time periods on Monday-Wednesday-Friday and another set of time periods on Tuesday-Thursday. Furthermore, the school uses different times for Year 7-11 (5 periods per day) than for Year 12-13 (a longer day with 6 periods). To set this up, you could do the following:

  1. Manage Columns - Add four columns: Upper MWF, Upper TuTh, Lower MWF, and Lower TuTh – one for each combination of year group and daily time pattern.
  2. Add Rows - Add to each of the four columns the rows needed to define the 5 Lesson periods and 4 Break periods for the lower year columns, and the 6 Lesson periods and 5 Break periods for the upper year columns.
  3. Manage Timetables - Add two timetables: Upper, and Lower – for each one, select the appropriate Year Groups (Upper = 12, 13; Lower = 7, 8, 9, 10, 11)
  4. Add Days - Add five Days to each of the two timetables: three Days named Monday, Wednesday, and Friday that refer to the column Upper MWF, two days name Tuesday and Thursday that refer to column Upper TuTh, three Days that refer to the column Lower MWF, and two days that refer to the column Lower TuTh.

Notes

  • Timetabling is always tricky. Gibbon’s approach is a little tedious at times, but gives great flexibility. If you have any questions, check out our support forum.

The Rollover is Gibbon’s tool for moving your installation from one school year to another, updating various records in one go.

  • To access the rollover, go to Admin > User Admin in the main menu, and then Rollover in the module menu.
  • Before attempting the rollover, backup your database as a precaution against unexpected behaviour. Without a backup, there is no way to undo this process.
  • The rollover consists of the following 3 steps:
    1. Warning - make sure you have backed up.
    2. Getting Ready - this step presents the following options, which allow you to control how the rollover proceeds:
      1. Add Year Following Current School Year - only displays if there are no Upcoming years succeeding the Current year.
      2. Set Expected Users To Full - this step primes newcomers who have status set to “Expected” to be enroled as students or added as staff (see below).
      3. Enrol New Students (Status Expected) - take students who are marked expected and enrol them. All parents of new students who are enroled below will have their status set to “Full”. If a student is not enroled, they will be set to “Left”.
      4. Enrol New Students (Status Full) - take new students who are already set as full, but who were not enroled last year, and enrol them. These students probably came through the Online Application form, and may already be enroled in next year: if this is the case, their enrolment will be preset automatically. All parents of new students who are enroled below will have their status set to “Full”. If a student is not enroled, they will be set to “Left”.
      5. Re-Enrol Other Students - any students who are not re-enroled will have their status set to “Left”. Students who are already enroled will have their enrolment updated.
      6. Set Final Year Students To Left - students in the last year of school will be set to left, unless set otherwise (e.g. to repeat a year).
      7. Register New Staff - Any staff who are not registered will have their status set to “Left”.
    3. Go - when Submit is pressed on Step 2, the school year will be incremented, and the actions specified above will be processed. Users (except the user running the rollover process) will need to log out and log back in to be in the new year. Feedback on each action will be given on screen as Step 3 is processed.
  • In order to have less work to do during the rollover, you can do the following in advance. When you run the rollover, the values set will automatically appear as form group choices for students in Step 5 above.
    • Form Groups - in the current years’ form groups, specify a form group for students to move into in the coming year. You can do this in Admin > School Admin > Manage Form Groups (a.k.a. Manage Roll Groups in US English). If the popup is blank you need to click “Copy All To Next Year”.
    • Individual Students - if form group progression is not so straight forward, you can set individual student form groups by enroling students ahead of time. To do this go to Admin > User Admin > Student Enrolment and use the Next Year link to jump forward a year. Then add enrolment records for the relevant students, setting their form groups.

The Reports module added to the Gibbon Core in v19.0.00 provides users with report writing, proof reading, PDF generation, and a visual template designer.


Getting Started

A reporting cycle is a period of time within the school year that reporting data is collected. Reporting cycles are separate from school year terms, which gives schools flexibility for when and how their reports are written.

Each reporting cycle can be setup through Manage Reporting Cycles. The start and end date determine when the reporting cycle occurs throughout the school year. These dates are separate from when users have access to the reporting cycle, which is set through Manage Access.

  • Cycle Number: If there is more than one reporting cycle in a year, you can set the Cycle Number and Total Cycles, which are used by report templates to display progressive and cumulative reporting data.

  • Milestones: A reporting cycle can have a number of Milestones, which are important dates within the reporting cycle. These can act as reminders for users, and are shown on the My Reporting page as a timeline of events. Milestones

Scopes and Criteria

The scopes and criteria in a reporting cycle determine what is being reported on, and who can report on it. For example, this is where you set up whether a reporting cycle involves comments and grades, or just comments, or a mix of different criteria.

Scopes determine the larger group of users who are involved in a reporting cycle.

  • The Year Group scope is available to users who have been set as the Head of Year in School Admin > Manage Year Groups.

  • The Form Group scope is available to users who have been assigned as a tutor for a form group through School Admin > Manage Form Groups.

  • The Course scope is available to users who have been added as a Teacher of a course through Timetable Admin > Course Enrolment by Class.

Criteria determine what kind of data is being recoded for each student. The criteria system is flexible, enabling different sets of data to be collected for different courses, form groups, and year groups.

  • The name and description of a criteria are displayed to users who are writing the reports, to help them know what kind of data they’re entering.

  • The target for a criteria determines if it is written individually Per Student, or collectively Per Group for all students in the selected course, form group, or year group. For example, schools may wish to differentiate between one comment written Per Student, as well as a single general comment written Per Group.

Criteria Types are the generic types of data being recorded. There are some Comment types added by default, and you’re encouraged to add criteria types as needed by your school. These are reusable from year to year, and enable template builders to design different layouts for different types of criteria in the reports. For example, if a school has two different types of grades on a report card, such as a Term Grade and a Final Grade, they may want to set these up as separate criteria types so they can differentiate this data.

Setting up Access

Users will not be able to enter reporting data until they have been granted access. Access for each reporting cycle is determined by role, and you can select multiple roles by holding ctrl/command. Access is also determined by scope, which can be limited to one or more reporting scopes.

Reporting access is limited by a start and end date, which automatically opens and closes report writing access for users based on these dates.

Users with Can Write access are able to write reports within their scope. If Can Write is set to No, users can view a read-only cope of the reports from the My Reporting page.

If Can Proof Read is enabled, users with this access can view and suggest edits on comments written by other users in the same reporting scope.

Access

Rolling Over to a new School Year

Once you already have reports, templates, and reporting cycles, it’s much quicker to setup for future school years.

Reporting Cycles

  • You can login to a previous school year (or use the Year Switcher on the dashboard) and navigate to the Reports > Manage Reporting Cycles page.

  • Then, use the Duplicate option on a reporting cycle to copy it to the following year. Be sure to select the target school year, enter the start and end date of the new reporting cycle as well as update the cycle numbers.

  • Duplicating a cycle will copy all the scopes and criteria, but not the grades, into a new reporting cycle.

  • Once you’ve duplicated your reporting cycles, use the Year Switcher to return to Reports > Manage Reporting Cycles in your target school year.

  • From here it’s a good idea to Edit the reporting cycle(s) and update the milestones.

  • If you have added any new form groups or new courses in the target school year, you will also want to go into Scopes & Criteria to add these into the respective areas.

Reports

  • Create new reports for these reporting cycles through Reports > Manage Reports. These will connect your templates to the criteria you’ve defined in your reporting cycles.

Templates

  • Templates can be re-used from year to year and are not attached to a school year, so they do not need duplicated.

  • If you are making large changes to your template, it’s best to create a new template and keep the old template should you need to re-generate old reports in the future.


Users who have access to a reporting cycle will be able to see their progress in My Reporting. This page lists any active reporting cycles and scopes that a user has access to: a user can be part of multiple reporting cycles at once.

Users with the Write Reports_editAll permission have a drop-down to select and view the My Reporting page for any user.

My Reporting

Writing Reports

From the My Reporting page, users can click Edit to access the report writing screen.

  • Write Reports: This page displays a kanban-style board where students move between To Do, In Progress, and Complete categories as users write their reports. This gives users a quick overview of what still needs done. Users can click any student in the list to write their individual reports, as well as access them in the sidebar. If there are Per Group criteria setup for a report, such as an overall comment per course, they are entered on this page.

  • Write Reports by Student: Each reporting page begins with the student name and picture, as well as quick-links to bring up their profile, attendance, markbook, and past reports.

  • Comment Helpers: As users write comments, the report system will check to see if the student name is present, and if any of the pronouns appear to be mis-matched. These are just helpers, users can feel free to ignore them if they’re happy with the comment. Users can also paste a comment with a placeholder {name} and this will be automatically replaced with the student name. Comment Tools

  • Report Completion: Each student report has a Complete checkbox. This tells the system that the report for this student is done, and displays a “Save & Next” button to quickly progress to the next student in your class. Users can always save incomplete reports with the normal “Save” button. The sidebar also highlights complete reports in green.

Reporting Progress

Users who have been granted permission have access to the overall report progress screens. These are broken down by reporting cycle, by scope, and by person. There is also a page for viewing proof reading progress by scope.

Progress


There is built-in system for helping to proofread other users’ comments. Users can easily view comments for a whole class, and suggest changes which the recipient can click to accept, reject, or edit and incorporate those changes.

  • Self-review: When a user visits the Proof Read page, it will show them their comments by default. This screen lets users read and directly edit their own comments, as needed.

  • Peer-review: At the top of the Proof Read page, users who have Can Proof Read access can select any other user from within their reporting cycle.

  • Proof reading: When reading peer comments, selecting “Looks good” indicates that the comment has been proof read. Users can also select “Edit Comment” to suggest edits, as well as add an optional reason. Proof Read

  • Saving: There is a save button on every comment, for convenience. The whole page will save, so users only need to click Save as needed (not once per comment).

  • Reviewing: As users edit each other’s comments, they will appear as Done or Edited in their own Proof Read screen. If edits have been suggested, users can see them highlighted on their page (removed text in red, inserted in green). From there, users can choose to Accept the changes, Decline them, or Edit and incorporate the changes into their comments. Proof Read Accept

  • Progress: The progress bar at the top of the Proof Read page will fill up in green as comments have been proof read. Comments collapse automatically once they’ve been proofed, but users can expand and continue editing them with the arrow icon.

Proof Reading Progress

Users who have been granted permission can see an overall progress of proof reading broken down by reporting cycle using Reports > Proof Reading Progress.


Data from within Gibbon can be published to PDF by setting up a report and selecting an appropriate template. The most common type of report is for publishing Reporting Cycles, but the flexibility of the reports system enables it to be used for other types of reports, such as transcript and progress reports.

Setting up Reports

Each report in Manage Reports represents a single type of PDF document that can be generated. They commonly relate 1-to-1 to a reporting cycle, but they can also be used for a standalone document such as a transcript.

  • Template: The template you select determines what the PDF looks like. Templates are created and edited in the Template Builder.

  • Archive: Each report will save its PDF files into an archive. The archive determines who can access the report and where it is stored on the server.

  • Go Live Date: Both a date and time can be specified for a report. It will not be available to users through the archive before this time, unless they have the View Draft Reports permission.

Generating Reports

You can generate two types of report PDFs: a combined batch-report of all students per Year Group, as well as a single individual report per Student. Generate Reports

  • Batch Generation: Depending on the complexity of the report, the PDF generation may take several minutes. The system will display a progress indicator for reports that are running, and will email the person who started the process once it it complete. You can cancel a batch-report while it is generating. When you batch-generate a report, it will also generate the individual reports per-student, to ensure these always match.

  • Single Report Generation: You can run a single report per student, as well as use the bulk-action checkboxes to select a number of students at a time. This is handy if the data for one student has changed, but you don’t want to re-run the whole batch.

  • Draft Reports: By default, reports will be generated as a draft copy. This add a message and timestamp to the top of the report, disables any digital signatures, and ensures it cannot be viewed by parents or students. Drafts are labeled as such in all screens, and users must have the View Draft Reports permission to view draft reports in the archive.

  • Final Reports: When a report is generated as Final, it becomes available to view in the archive. For a report to be visible to parents and students, it must be a Final report, have passed its Go Live date, and the user must have been granted access the report’s archive through Manage Archives.

  • Background Processing: Gibbon v19 uses background processing to generate report PDFs. If your system does not support background processing, or you wish to disable it, you can find a system-wide Background Processing setting in System Admin > System Settings.

Teacher and Admin Access

Teachers and other staff can access the archive through View by Report as well as View by Student. Archive by Student

  • View by Report: This shows a combined view of available reports, further subdivided by year group and form group. The Read progress indicator shows the overall number of student reports that have been accessed by a parent in their family. Users with permission van view and download batch PDF files through this page.

  • View by Student: This shows individual reports per student, with options to search and filter the archive page. Reports that have been accessed by a member of the family are highlighted with a Read indicator.

  • Draft Reports: By default, users will only be able to view reports marked as Final. With the View Draft Reports permission, they can see and download draft reports. This is useful for proofing the reports before they are shared with parents and students.

  • Past Reports: Users will only be able to access reports from the current school year, unless they have the View Past Reports permission.

  • Archive Access: Access to an archive is toggled per role category through the Manage Archive page. Is is possible to have an archive that is viewable by staff only, and not to parents or students.

Parent and Student Access

Parents and student access to reports is optional, and can be controlled per report as well as per archive. There are a number of factors which control which reports are visible to them:

  • User Permissions: Parents and students must have access to View Reports_myChildren or View Reports_my, respectively. This can be set in User Admin > Manage Permissions. Without this access they cannot view any reports.
  • Go Live Date: Only reports which have passed the Go Live date and time will be visible to parents and students.
  • Archive Access: Access to an archive is toggled per role category through the Manage Archive page.
  • Final Reports: A report must be marked Final before it is visible to parents and students.
  • Past Reports: Reports which do not belong to the current school year will only be visible if users have the View Past Reports permission.

Managing Archives

Archives control where on your server the report files are stored. You may chose to store different types of reports in different archives, in order to control who has access to them.

  • Path: The path you supply must be relative to the Gibbon root folder, which is the same as your Base Path defined in System Admin > System Settings. You can use a /../ at the beginning of your path to save files in a directory above your root folder.

  • Visibility: Each archive can toggle visibility by role category. This gives administrators a definitive control over who can see and download reports.

  • Importing Reports: An importer has been included to help migrate archived PDFs from the Reporting module by Andy Statham. This is an experimental feature, and may not work with older versions of the Reporting module. Visit the Import Reports page and select an archive to import into. The page will indicate if it detects reports that can be imported. Reporting data and criteria will NOT be transferred: only the archived PDFs will be imported. Once successfully imported, the Reporting PDFs should be accessible through the Archive > View by Student page.


The template builder provides a visual drag-and-drop interface for building reports. Templates control the PDF layout of each report generated, can be re-used across multiple reports.

Managing Assets

A number of template components have been included by default. For a fresh install, visit the Manage Assets page and run the Scan Asset Directories action once to update your components. Be sure to scan for changes again any time you manually change the template files.

You can duplicate and edit one of the built-in template files, as a basis for customising your reports. Template files are written in HTML and Twig template-tags, with some YML front-matter at the top for important settings. Check out the Twig Documentation for more info about templating.

Creating a Template

To create a new template, visit the Template Builder click Add to setup the basic document details, such as the page size, layout, and margins. The context determines whether the template will be used for reporting cycles (eg: report cards), or whether it is generated from student enrolment data (eg: transcripts).

Template Builder

  • Preview: Each preview uses a set of fake data, which enables you to rapidly generate sample reports without exposing any private student information. The HTML preview provides a quick approximation of a report. It is for sample purposes and may not be an exact match to the final PDF. The PDF preview is a more accurate representation of the report template.

  • Add Sections: Add a section by dragging it from the right-side into either the Header, Body, or Footer of the report. You can drag and re-arrange sections on the left-hand side. There is a tab for Core template components, and any templates you have customised will show up under the Additional tab. You can preview a template section before adding it to your report with the hover-over icon in the top-right of the component.

  • Edit Sections: Each section you add to the template can have a number of settings. There are a number of Flags which are used to control page-breaks and other properties of the generated document. There are also a number of Configuration options that depend on the type of template component. For example, the Signature Box component lets you specify a digital signature image file, image height, and title.

  • Headers & Footers: These are special sections that can show up on the top and bottom of your report. You can have more than one header and footer, and specify specific pages for each. For example, you may have a header with a logo on the first page of the report, and a simple header with report info on all other pages.

Using Custom Fonts

The template builder can support custom fonts, enabling full UTF-8 support for your reports, including CJK characters. This will generally require some template editing, to either apply the font to your entire report or to select areas.

  1. Be sure to scan your asset directory in Template Builder > Manage Assets to see your available fonts. If they are not listed as installed, check the file permissions of the font files in your system.
  2. If you have a custom asset directory set in Reports > Reports Settings, be sure to add your font files into a /fonts folder inside this directory (eg: /uploads/reports/fonts/YourFontName.ttf)
  3. If you’re using the mPDF renderer, the font family name needs to be lowercase with no special characters and match the “File Name” listed in the font definition (not always the same as the filename in your system.) Click the pencil next to the font in Manage Assets to check these settings and make changes.
  4. After scanning and setting the font family name, be sure to edit your template in Template Builder and select the font in the list at the top of the template settings. For mPDF, you should see it lowercase, otherwise be sure to change it in Manage Assets.
  5. You can now apply the font in your templates using the CSS font-family attribute and the lowercase name of your font family (eg: yourfontname);
    • This can be done for specific areas the template by editing your templates and applying the style=“font-family: yourfontname” attribute to an HTML tag.
    • This can also be set by using a stylesheet. Duplicate the default stylesheet in Manage Assets, give it a distinct filename and edit it to change the name at the top of the template definition. You can apply your font-family attribute using CSS rules in the stylesheet. Once you have setup your stylesheet, be sure to edit your template in Template Builder and select your custom stylesheet.
  6. If your font is not showing up in your reports, be sure to check that the font family used in your CSS matches the one listed in Manage Assets, and that the font is selected at the top of your template options in Template Builder.

Developer Info

The Reports module is new as of v19. We will be expanding on the template functionality and providing more developer info in the upcoming versions. Currently, the template functionality uses the limited HTML capabilities of the TCPDF library for PHP, and not all HTML tags or CSS attributes are supported. The PDF library may change in the future to enable better CSS support.


The Form Groups module allows you to browse through the form groups (also known as Roll Groups in US English) in your school. In the main table, you can see the names of any form tutors, what room they are based in, and how many students are in each form group. There is also a View button that takes you to an overview of each individual form group.

At the bottom of the page is a Year Group summary, which shows heads of year if they are defined in the system, and the total number of students in each year.


Staff Directory

The Staff module allows you to get a clear and detailed overview of every member of staff in your school system. The main page, Staff Directory, gives a full list of every teacher and all support staff, their staff type, and their job title and roll group if applicable. This can also be viewed as a grid with photos, or in a card view that also shows staff email addresses. You can filter this view to show only teaching or only support staff, and search for preferred names, surnames or usernames.

Staff Directory top menu

Manage Staff

The Manage Staff tab allows you to add, edit and delete members of staff in the system.

  1. For a user to become a member of staff, they must first exist in the system - Manage Staff does not have the power to create new users. Clicking the Add button will bring up a form that allows you to choose an existing user, such as a student or parent, and turn them into a member of staff. You can give them a job title, a country of origin, a list of qualifications and a biography - these elements will appear on their staff profile.

  2. The Edit button allows you to edit certain elements of a staff member’s data pertaining to their role in the school. You can also link facilities to a particular staff member, and add records of their contracts.

  3. Deleting a member of staff will revert them to being a regular user, but it is generally good Gibbon practice to avoid deleting records whenever possible.

Staff Profiles

A staff profile looks a bit different from a student profile. The aforementioned elements such as the job title and biography appear near the top, as opposed to the large block of personal information that appears at the top of a student profile.

  1. The Personal tab adds some additional information about the staff member, such as their first aid qualification status and vehicle registration number.

  2. The Family tab shows the staff member’s family information, such as their home address and important family members.

  3. The Emergency Contacts tab provides contact details for relevant individuals should there be an emergency involving this member of staff.

Under the School heading, information can be found about things the staff member is involved in around the school, according to what is in the system.

  1. The Activities tab shows an overview of which extracurricular activities the member of staff is involved in.

  2. The Facilities tab shows which facilities around school the staff member uses, along with contact numbers for the school phone system.

  3. The Timetable tab shows the staff member’s timetable, which can also be seen at the bottom of the main staff profile.

Staff Applications

For a user to apply to become a member of staff, a job opening must exist first. Click the Add button in the Job Openings tab to create one.

Job Opening screen

When creating a job opening, you can choose what kind of job it is based on the roles defined in your system (Teaching and Support by default), as well as giving it a job title and opening date. You can also fill in the pre-assigned description fields, modify them, or create new ones.

Once you have created a job opening, it will appear in the Staff Application Form menu. If “Public Applications” is active in User Admin -> Staff Application Form Settings, then members of the public can apply for job openings without needing an account in your Gibbon installation.

Staff Applications frontpage button


Absences and Coverage

The Absences section allows you to view, manage, approve and create staff absences. This is useful as an integrated method of keeping track of when staff members are out of school for various reasons.

To create an absence for yourself or another member of staff, go to New Absence. This form allows you to select the reason for absence, how long it will last, who to notify, and whether or not a cover teacher will be required.

The Coverage section is linked to the Absences section - once an absence is in the system, you can use this section to create and manage cover for the absent teacher’s lessons.

Coverage menu

As the ability to manage absences is a fairly new part of Gibbon, the ability for teachers to request their own absences or cover is disabled by default. If you wish to enable this functionality, go to User Admin > Manage Permissions, filter down to Staff, and enable the following permissions for the necessary roles.

  • New Absence_mine
  • Request Coverage
  • View Absences_mine

With these enabled, your staff should now be able to create absences for themselves and request cover in their Staff section.


The student profile is a key component of Gibbon, as it gives administrators and teachers full access to all the necessary information about an individual student. As well as this, students are able to view their own profiles, and parents can view the profiles of their children. Other users may see a brief or full version of any profile, depending on the permissions set in Manage Permissions.

General information

The General Information panel lives at the top of a student profile, and provides key information about a student, such as their name, form group, age and email, at a glance. The field types in this area are fixed in the data structures and cannot be modified.

Teachers of student

Below General Information is an overview of all the student’s teachers, based on their timetable. This includes teachers, form tutors, educational assistants, and heads of year. Each entry has the teacher’s photo, their name, and what subject they teach the student. If the same teacher teaches one student multiple subjects, they will appear twice. There is an option to select a list view of teachers, and in the list view the teacher’s names and email addresses can easily be copy-pasted to send emails to a student’s teachers.

Timetable

At the bottom of the main landing page for each student is their timetable, which shows what lessons they have in the current week. You can click on any lesson’s name to see further information about it.

Student timetable

Personal

Apart from the student overview, the Personal tab contains a few more tabs that contain information that can be useful to know about a student.

  • Personal - This tab contains more detailed personal information about the student, as gathered by the application form.

  • Family - This tab contains information about the student’s family: their name, where they live, languages spoken at home, and detailed information about any parents in the system.

  • Emergency Contacts - This tab contains emergency contact details, should the student be involved in an emergency. In such a situation, prioritise attempting to contact the parents.

  • Medical - The student’s medical records are kept here. This will show some basic medical information, along with any extra medical conditions that have been entered for the student.

  • Notes - Student Notes provide a way to store information on students which does not fit elsewhere in the system, or which you want to be able to see quickly in one place. Please remember that notes are visible to other users who have access to full student profiles (this should not generally include parents).

Module Connections

The student profile features connections to many of Gibbon’s other modules, as students, of course, form the core of a school and are interlinked with many aspects of it. The connected modules are listed below, as they are seen in the sidebar menu.

  • External Assessment - see an overview of any externally assessed work a student has done
  • Internal Assessment - see a record of major internal assessments a student has completed
  • Markbook - view a student’s markbook records
  • Reports - view a student’s report cards
  • Activities - see which activities a student is enrolled in
  • Homework - view a record of a student’s completed and upcoming homework
  • Individual Needs - if a student has individual needs, they can be viewed here, along with a list of educational assistants assigned to the student and an overview of their individual education plan
  • Library Borrowing - see what items a student has borrowed from the library
  • Timetable - see a student’s timetable for the current week, like on the main profile view
  • Attendance - view a detailed summary of a student’s attendance record, with a full breakdown of which days they have been present, absent or late on
  • Behaviour - view a summary of any positive or negative behaviour records a student has received


Introduction

The following page explains how to use the Data Updater module to keep your school’s data for students and families up to date. There are four types of data that can be updated: Family, Finance, Medical and Personal.

Be warned: depending on the size of your school, working through data updates can be a time-consuming process at the beginning of a new school year.

Family Data

Family data updates keep track of information pertaining to families in a school.

Finance Data

Finance data updates keep track of who invoices for school fees should be sent to. This is usually the student’s family, but can also be a company that is paying fees on their behalf.

Medical Data

Medical data updates keep track of student medical data. Some fields are mandatory, such as whether students are on any long-term medication.

At the bottom of the Medical section is a checkbox that allows a medical condition to be added to a student.

Medical Checkbox

This will open an additional form that shows a parent a list of elements of a medical condition.

Medical Conditions

This section allows parents to go into more detail about any serious medical issues their child may have. When going through data updates, it is important to keep an eye on any updates that show a new medical condition, as this information may need to be relayed to other members of staff depending on risk level. There is an option in System Admin > Notification Events to send a notification to certain people when a new medical data update with a medical condition of a specified risk level is sent in.

Personal Data

Personal data updates keep track of personal information about students and parents. This data update type has the most fields, and contains many important elements such as emergency contacts.

Data Updater Settings

In User Admin, the Data Updater Settings menu allows you to modify the requirements that parents are held to when they update their data. You can make certain data updates required, and set a cutoff date by which data updates must be completed. You can also force users who have not yet submitted their data updates to be redirected to the data updater on login.

Workflow

A good practice for data updates is to establish the workflow of checking them. When a new data update arrives, you will receive a notification based on your notification settings. This will allow you to navigate to the data update. Click on the Edit button, and check the two columns - Old on the left, and New on the right - to make sure there are no discrepancies. Common issues include parents changing student email addresses from the school email to something else, and the occasional instance of a parent changing a student’s name on accident. Once you have verified that the update is correct, scroll to the bottom and hit Submit.


Gibbon features command line tools that allow you to automate certain tasks using cron, including the following:

Weekly Parent Email Summary of Homework & Behaviour

This script generates emails to contact priority 1 parents of each student, outlining their homework deadlines and giving a behaviour summary for the last week. It can be set to run on any day, but is best run after school on the last day of the week (e.g. Friday afternoon for many schools). Parents can use a link in the email to confirm that they have received and read the email. Form tutors can use a report (still being developed) to show which parents have read the reports for a given week. To run this script, run the following commands, or put them within cron on a *nix machine:

cd [absolutePath]/cli php planner_parentWeeklyEmailSummary.php

User Management

This script:

  • Finds users who are ‘Expected’ and have reached or exceeded their start date, and sets their status to ‘Full’.
  • Finds users who are ‘Full’ and have exceeded their end date, and sets status to ‘Left’.
  • Finds parents of students who have exceeded their end date, have no other active children in school and are not staff members, and sets their status to ‘Left’.

To run this script, run the following commands, or put them within cron on a *nix machine:

cd [absolutePath]/cli php userAdmin_statusCheckAndFix.php

Incomplete Attendance Email

This script checks attendance taking for the current day, and emails those tutors who have not taken attendance. The report is also sent to the system administrator. To run this script, run the following commands, or put them within cron on a *nix machine:

cd [absolutePath]/cli php attendance_dailyIncompleteEmail.php

Behaviour Letters

This script works to automatically send letters to parents of children who have reached certain threshold levels of negative behaviour. The script uses a variety of settings, which can be accessed via Admin > School Admin in the main menu and then Manage Behaviour Settings in the module menu. To run this script, run the following commands, or put them within cron on a *nix machine:

cd [absolutePath]/cli php behaviour_letters.php

Overdue Library Loan Items

This script works to automatically notify the person responsible for each overdue loan item in the Library. To run this script, run the following commands, or put them within cron on a *nix machine:

cd [absolutePath]/cli php library_overdueNotification.php

Using Cron

Cron is different on different *nix systems, but the following should generally get the User Management script above to run at 1am each day:

0 1 * * * cd /var/www/gibbon/cli/ ; php userAdmin_statusCheckAndFix.php

By using the Gibbon module “Moodle” you can use Gibbon to populate Moodle with users and courses. To do this you will need to install the module (see Extend) and then configure 2 areas of Moodle with the settings shown below:

  • Home > Site administration > Plugins > Authentication > External database (click on the image for more detail)

Moodle Users

  • Home > Site administration > Plugins > Enrolments > External database (click on the image for more detail)

Moodle Enrolment

Beyond this, follow the Moodle instructions for using cron to periodically pull data across from Gibbon to Moodle.


Translation

Gibbon v8.0.00 was the first version of Gibbon to be translatable, and thanks to some great volunteers, it is now available in several different languages. If you would like to help translate Gibbon, please email support@gibbonedu.org. Your help would be most appreciated!

Troubleshooting

The most common cause of Gibbon’s multilingual features not working is the server’s OS not having the correct locales installed. This is usually fairly trivial to solve, as shown in the example below, which installs the Great Britain locale for use with English, under Ubuntu: sudo locale-gen en_GB There is plenty of guidance online for the equivalent commands for other languages and platforms.

Setting up Locales in Windows

Setting up languages and locales in Windows is a bit different than Linux systems. Our community member, Manuel A. Ruiz P., has shared the following video to help Windows users setup a language variable to use for Gibbon.

Steps:

  1. Make sure your Gibbon installation has a 100% passed system check (you will need to installed certain PHP extensions).
  2. Install the Languages you want.
  3. Create a System Variable in Windows called LANG
  4. Change the variable to the language code you prefer (requires adding the language to the Gibbon installation). For example: LANG=es_MX to use Gibbon in Spanish
  5. Restart Apache server
  6. Refresh browser
  7. Start using Gibbon in the language you prefer. (Note: Windows must be set to the language that will be used in Gibbon).

Please ask any questions on this forum post if you get stuck. Thanks!


Migrating Gibbon from one server to another can involve the following considerations and steps:

  1. Files
    • Download or copy your files to a staging location.
    • Edit /config.php to adjust the database settings for your new server.
    • Upload your files to your new server.
  2. Database
    • Download your entire database (e.g. structures, content, auto_increment) to an SQL file.
    • Use find and replace in a text editor to locate all instances of your system’s current URL and update them to the new URL (this will include absoluteURL in the gibbonSettings table).
    • Locate the absolutePath entry in the gibbonSettings table, and update its value field to contain the location of Gibbon in your new server’s file system.
    • Upload your edited SQL file to your a database on your new server.
  3. Config
    • Ensure the file permissions on your new server are secure, and that /uploads is writable by your web server.
    • Ensure that the configuration of your new server meets Gibbon’s requirements.
    • Admin > System Admin > System Check can help in both of these regards.
  4. Decommissioning
    • Once your new server is up and running, and well tested, decommission your old server, backing up and scrubbing data as needed.

Introduction

Gibbon has the ability to sound an alarm to all users currently logged in with a role whose category is Staff. Alarms can be one of three types: general, lockdown, custom. Staff receiving the alert are asked to click to confirm their receipt, and those users with alarm-sounding privileges are presented with a report of who has and has not confirmed the alarm.

Sounding An Alarm

  • To sound an Alarm either go to Admin > School Admin in the main menu, followed by Sound Alarm in the module menu:

Sounding An Alarm_1 Sounding An Alarm_2

  • Or search for “Sound Alarm” or “Sound Lockdown” in Fast Finder:

Sounding An Alarm_3

  • Once in the Sound Alarm screen, choose the alarm type and press the Submit button:

Sounding An Alarm_4

Managing An Alarm

  • Once an alarm is activated, all users who have alarm-sounding permission will see the alarm, along with the alarm report. Users who do not manually confirm their receipt can be contacted by phone, and ticked off by hand using the icons under the Action column.

Sounding An Alarm_5

  • Other staff users will see the alarm, and need to click on the confirm link in order to be checked off the report.

Sounding An Alarm_6

  • Once a staff user has clicked the link, it will be confirmed, and they will be updated on the confirmation report for alarm sounders. The alarm will continue to sound, and will reappear even if closed: this will occur until the alarm is no longer actuated.

Sounding An Alarm_7

  • Once the alarming situation is over, the alarm sounder can disable the alarm using the “Turn Alarm Off” link at the top right of the alarm screen.


The following SQL statements can be run on a Gibbon installation in order to extract the specified data. Use of a mySQL client (such as phpMyAdmin) is be required to run these commands.

Markbook Entries for Year Group

This example is for students in Year 11, but its effectiveness depends on your standard for naming courses (e.g. having “11” in your course name).

SELECT gibbonCourse.nameShort, gibbonMarkbookColumn.name, surname, preferredName, attainmentValue, effortValue FROM gibbonMarkbookColumn JOIN gibbonCourseClass ON ( gibbonMarkbookColumn.gibbonCourseClassID = gibbonCourseClass.gibbonCourseClassID ) JOIN gibbonCourse ON ( gibbonCourseClass.gibbonCourseID = gibbonCourse.gibbonCourseID ) JOIN gibbonMarkbookEntry ON ( gibbonMarkbookEntry.gibbonMarkbookColumnID = gibbonMarkbookColumn.gibbonMarkbookColumnID ) JOIN gibbonPerson ON ( gibbonMarkbookEntry.gibbonPersonIDStudent = gibbonPerson.gibbonPersonID ) WHERE gibbonSchoolYearID =(SELECT gibbonSchoolYearID FROM gibbonSchoolYear WHERE status='Current') AND gibbonCourse.nameShort LIKE '%11' AND gibbonPerson.status='Full' ORDER BY gibbonCourse.nameShort, gibbonMarkbookColumn.name, surname, preferredName;

Subject Selections for Year Group

This example is for students in Year 12, but its effectiveness depends on your standard for naming courses (e.g. having “12” in your course name).

SELECT gibbonCourse.nameShort, gibbonCourseClass.nameShort, surname, preferredName FROM gibbonCourse JOIN gibbonCourseClass ON (gibbonCourseClass.gibbonCourseID=gibbonCourse.gibbonCourseID) JOIN gibbonCourseClassPerson ON (gibbonCourseClassPerson.gibbonCourseClassID=gibbonCourseClass.gibbonCourseClassID) JOIN gibbonPerson ON (gibbonCourseClassPerson.gibbonPersonID=gibbonPerson.gibbonPersonID) WHERE role='Student' AND status='Full' AND gibbonCourse.name LIKE '%12%' AND gibbonSchoolYearID=(SELECT gibbonSchoolYearID FROM gibbonSchoolYear WHERE status='Current') ;

Applications in Current Year

SELECT surname, preferredName, dob, gender, schoolName1, schoolDate1, schoolName2, schoolDate2, languageHome, languageFirst, address1, address1District, address1Country, parent1surname, parent1preferredName, parent1phone1CountryCode, parent1phone1Type, parent1phone1, parent2surname, parent2preferredName, parent2phone1CountryCode, parent2phone1Type, parent2phone1, timestamp as dateSubmission FROM gibbonApplicationForm WHERE gibbonSchoolYearIDEntry=(SELECT gibbonSchoolYearID FROM gibbonSchoolYear WHERE status='Current') ORDER by surname, preferredName

Applications By DOB

SELECT * FROM gibbonApplicationForm ORDER BY dob DESC

Parent Contact Details by Student in Current Year

SELECT student.surname AS studentSurname, student.preferredName AS studentpreferredName, gibbonFamily.name as family, homeAddress, homeAddressDistrict, homeAddressCountry,gibbonRollGroup.name as rollGroup, student.officialName AS studentOfficialName, student.nameInCharacters AS studentChineseName, student.studentID AS studentID, student.email AS studentEmail, student.phone1 AS studentPhone1, student.phone2 AS studentPhone2, parent1.title AS parent1Title, parent1.surname AS parent1Surname, parent1.preferredName AS parent1PreferredName, parent1.gender AS parent1Gender, parent1.email AS parent1Email, CONCAT(parent1.phone1Type,' ',parent1.phone1CountryCode,' ', parent1.phone1) AS phone1, CONCAT(parent1.phone2Type,' ',parent1.phone2CountryCode,' ', parent1.phone2) AS phone2, CONCAT(parent1.phone3Type,' ',parent1.phone3CountryCode,' ', parent1.phone3) AS phone3, CONCAT(parent1.phone4Type,' ',parent1.phone4CountryCode,' ', parent1.phone4) AS phone4, parent1.address1 AS parent1Address, parent1.address1District AS parent1AddressDistrict, parent1.address1Country AS parent1AddressCountry, parent1.vehicleRegistration AS parent1VehicleRegistration, parent1Fam.contactCall, parent1Fam.contactSMS, parent1Fam.contactEmail, parent1Fam.contactMail, parent1Fam.contactPriority, parent2.title AS parent2Title, parent2.surname AS parent2Surname, parent2.preferredName AS parent2PreferredName, parent2.gender AS parent2Gender, parent2.email AS parent2Email, CONCAT(parent2.phone1Type,' ',parent2.phone1CountryCode,' ', parent2.phone1) AS phone1, CONCAT(parent2.phone2Type,' ',parent2.phone2CountryCode,' ', parent2.phone2) AS phone2, CONCAT(parent2.phone3Type,' ',parent2.phone3CountryCode,' ', parent2.phone3) AS phone3, CONCAT(parent2.phone4Type,' ',parent2.phone4CountryCode,' ', parent2.phone4) AS phone4, parent2.address1 AS parent2Address, parent2.address1District AS parent2AddressDistrict, parent2.address1Country AS parent2AddressCountry, parent2.vehicleRegistration AS parent2VehicleRegistration, parent2Fam.contactCall, parent2Fam.contactSMS, parent2Fam.contactEmail, parent2Fam.contactMail, parent2Fam.contactPriority FROM gibbonPerson AS student JOIN gibbonStudentEnrolment ON (student.gibbonPersonID=gibbonStudentEnrolment.gibbonPersonID) JOIN gibbonRollGroup ON (gibbonRollGroup.gibbonRollGroupID=gibbonStudentEnrolment.gibbonRollGroupID) LEFT JOIN gibbonFamilyChild ON (gibbonFamilyChild.gibbonPersonID=student.gibbonPersonID) LEFT JOIN gibbonFamily ON (gibbonFamilyChild.gibbonFamilyID=gibbonFamily.gibbonFamilyID) LEFT JOIN gibbonFamilyAdult AS parent1Fam ON (parent1Fam.gibbonFamilyID=gibbonFamily.gibbonFamilyID AND parent1Fam.contactPriority=1) LEFT JOIN gibbonPerson AS parent1 ON (parent1Fam.gibbonPersonID=parent1.gibbonPersonID AND parent1.status='Full') LEFT JOIN gibbonFamilyAdult AS parent2Fam ON (parent2Fam.gibbonFamilyID=gibbonFamily.gibbonFamilyID AND parent2Fam.contactPriority=2) LEFT JOIN gibbonPerson AS parent2 ON (parent2Fam.gibbonPersonID=parent2.gibbonPersonID AND parent2.status='Full') WHERE gibbonStudentEnrolment.gibbonSchoolYearID=(SELECT gibbonSchoolYearID FROM gibbonSchoolYear WHERE status='Current') AND student.status='Full' AND NOT (parent2.surname IS NULL AND parent2Fam.contactPriority IS NOT NULL) AND NOT (parent1.surname IS NULL AND parent1Fam.contactPriority IS NOT NULL);

Sibling List In Current Year

SELECT gibbonFamily.gibbonFamilyID AS familyKey, student.surname AS studentSurname, student.preferredName AS studentpreferredName, gibbonFamily.name as family, homeAddress, homeAddressDistrict, homeAddressCountry,gibbonRollGroup.name as rollGroup, ((SELECT COUNT(gibbonFamilyID) FROM gibbonFamilyChild JOIN gibbonPerson ON (gibbonFamilyChild.gibbonPersonID=gibbonPerson.gibbonPersonID) WHERE gibbonFamilyChild.gibbonFamilyID=familyKey AND status='Full' GROUP BY gibbonFamilyID)-1) AS siblings FROM gibbonPerson AS student JOIN gibbonStudentEnrolment ON (student.gibbonPersonID=gibbonStudentEnrolment.gibbonPersonID) JOIN gibbonRollGroup ON (gibbonRollGroup.gibbonRollGroupID=gibbonStudentEnrolment.gibbonRollGroupID) LEFT JOIN gibbonFamilyChild ON (gibbonFamilyChild.gibbonPersonID=student.gibbonPersonID) LEFT JOIN gibbonFamily ON (gibbonFamilyChild.gibbonFamilyID=gibbonFamily.gibbonFamilyID) WHERE gibbonStudentEnrolment.gibbonSchoolYearID=(SELECT gibbonSchoolYearID FROM gibbonSchoolYear WHERE status='Current') AND student.status='Full' HAVING siblings>0 ORDER BY family, rollGroup DESC;

Students With No Family

SELECT student.surname AS studentSurname, student.preferredName AS studentpreferredName, student.email AS studentEmail, student.phone1 AS studentPhone1, student.phone2 AS studentPhone2 FROM gibbonPerson AS student JOIN gibbonStudentEnrolment ON (student.gibbonPersonID=gibbonStudentEnrolment.gibbonPersonID) JOIN gibbonRollGroup ON (gibbonRollGroup.gibbonRollGroupID=gibbonStudentEnrolment.gibbonRollGroupID) LEFT JOIN gibbonFamilyChild ON (gibbonFamilyChild.gibbonPersonID=student.gibbonPersonID) LEFT JOIN gibbonFamily ON (gibbonFamilyChild.gibbonFamilyID=gibbonFamily.gibbonFamilyID) WHERE gibbonStudentEnrolment.gibbonSchoolYearID=(SELECT gibbonSchoolYearID FROM gibbonSchoolYear WHERE status='Current') AND student.status='Full' AND gibbonFamily.gibbonFamilyID IS NULL;

Citizenship Frequency

SELECT citizenship1, count(*) FROM gibbonPerson JOIN gibbonStudentEnrolment ON (gibbonStudentEnrolment.gibbonPersonID=gibbonPerson.gibbonPersonID) WHERE gibbonSchoolYearID=019 AND status='Full' GROUP BY citizenship1 ORDER BY citizenship1 LIMIT 0, 440

Activity Choices in Current Year

SELECT surname, preferredName, main.name AS Main, main.type AS mainType, gibbonActivityStudent.status AS mainStatus, backup.name AS BACKUP , backup.type AS backupType, transport, gibbonRollGroup.name AS roll FROM gibbonActivityStudent JOIN gibbonPerson ON ( gibbonActivityStudent.gibbonPersonID = gibbonPerson.gibbonPersonID ) JOIN gibbonStudentEnrolment ON ( gibbonStudentEnrolment.gibbonPersonID = gibbonPerson.gibbonPersonID ) JOIN gibbonRollGroup ON ( gibbonStudentEnrolment.gibbonRollGroupID = gibbonRollGroup.gibbonRollGroupID ) JOIN gibbonActivity AS main ON ( gibbonActivityStudent.gibbonActivityID = main.gibbonActivityID ) LEFT JOIN gibbonActivity AS BACKUP ON ( gibbonActivityStudent.gibbonActivityIDBackup = backup.gibbonActivityID ) WHERE gibbonStudentEnrolment.gibbonSchoolYearID = (SELECT gibbonSchoolYearID FROM gibbonSchoolYear WHERE STATUS = 'Current' ) AND main.gibbonSchoolYearID = (SELECT gibbonSchoolYearID FROM gibbonSchoolYear WHERE STATUS = 'Current' ) ORDER BY surname, preferredName

All Staff

SELECT surname, preferredName, email, type, gibbonStaff.jobTitle, dob, CONCAT(phone1Type,' ',phone1CountryCode,' ', phone1) AS phone1, CONCAT(phone2Type,' ',phone2CountryCode,' ', phone2) AS phone2, CONCAT(phone3Type,' ',phone3CountryCode,' ', phone3) AS phone3, CONCAT(phone4Type,' ',phone4CountryCode,' ', phone4) AS phone4, address1, address1District, address1Country, firstAidQualified, firstAidExpiry, vehicleRegistration FROM gibbonPerson JOIN gibbonStaff ON (gibbonStaff.gibbonPersonID=gibbonPerson.gibbonPersonID) WHERE status='Full' ORDER BY surname, preferredName

Number of Years Students Have Been In School

SELECT count(gibbonPerson.gibbonPersonID) AS years, surname, preferredName, username FROM gibbonPerson LEFT JOIN gibbonStudentEnrolment ON (gibbonStudentEnrolment.gibbonPersonID=gibbonPerson.gibbonPersonID) WHERE gibbonRoleIDPrimary=3 AND status='Full' GROUP BY gibbonPerson.gibbonPersonID ORDER BY years, surname, preferredName

Hong Kong Education Bureau Survey

SELECT surname, preferredName, gibbonYearGroup.name AS Year, gibbonRollGroup.name AS rollGroup, gender, dob, citizenship1, citizenship2, ethnicity, languageHome, languageFirst, homeAddressDistrict, residencyStatus FROM gibbonPerson JOIN gibbonStudentEnrolment ON ( gibbonStudentEnrolment.gibbonPersonID = gibbonPerson.gibbonPersonID) JOIN gibbonYearGroup ON (gibbonStudentEnrolment.gibbonYearGroupID=gibbonYearGroup.gibbonYearGroupID) JOIN gibbonRollGroup ON (gibbonStudentEnrolment.gibbonRollGroupID=gibbonRollGroup.gibbonRollGroupID) JOIN gibbonFamilyChild ON (gibbonFamilyChild.gibbonPersonID=gibbonPerson.gibbonPersonID) JOIN gibbonFamily ON (gibbonFamilyChild.gibbonFamilyID=gibbonFamily.gibbonFamilyID) WHERE gibbonPerson.status = 'Full' AND gibbonStudentEnrolment.gibbonSchoolYearID=(SELECT gibbonSchoolYearID FROM gibbonSchoolYear WHERE status='Current') ORDER BY rollGroup, surname, preferredName;

Setting up a new server, or migrating Gibbon from one server to another, can involve the following considerations and steps:

How to Set Up SMTP Email Settings

  • Setup an email account in your domain to use for sending emain from Gibbon, such as gibbon@yourdomain.com
  • Navigate to Admin > System Admin > Third Party Settings > SMTP Mail
    • Set “Enable SMTP Mail” to “Yes”
    • Input the hostname of your SMTP email provider. (This is whoever services your email; GSuite, Microsoft Outlook, Zoho, etc.)
    • Some Common Examples of email providers:
      • GSuite: smtp.gmail.com
      • Outlook: smtp.office365.com
      • Zoho: smtp.zoho.com
    • Input your SMTP port: Most Commonly 587 or 465 (occasionally 25)
    • Select your SMTP Encryption type
      • Suggested: Automatic (Gibbon will automatically select the correct encryption type based on the port selected.)
    • SMTP Username: Enter the username for your account.
      • This may be the same as your emails set in Admin > System Settings > Organisation Email, otherwise this account needs to be able to access and send from the organisation email. If this account is not able to send from your “Organisation Email” listed in Gibbon, you will not be able to send emails from Gibbon.
    • Enter a password for the username entered above. Make sure you’re using an app specific password if you have two-factor authentication (2fA) enabled.
    • Finally, click submit to save your changes.
    • Use the “Test Email” box to test your new settings!

Common Issues with SMTP Email

Important Update about Google SMTP Relay and Less Secure Apps

  • As of June 15, 2024, the use of plain passwords with Less Secure Apps enabled will no longer be supported by Google. If you are using Gmail SMTP Relay via smtp.gmail.com, you will need to use an App Password to continue sending email, which also requires enabling two-factor authentication (2FA) for your email account. See the instructions below to create an App Password.

App Specific Passwords

  • Some service providers may require you to use an app specific password to bypass two-factor authentication.
    • If you are using Google, or an account with 2FA enabled, this will be necessary to make your SMTP email settings work.
    • The App Password works like a regular SMTP username and password, however the password is replaced with a special token that can be tracked and revoked as needed.
    • Follow the instructions below to create your App Password, then be sure to update the password field in Gibbon to use this new password, and test your email sending.
    • Google App Specific Password Instructions
    • Microsoft App Specific Password Instructions
    • Zoho App Specific Password Instructions
    • If you are unsure about the correct actions to take, contact your email provider.

Less Secure Apps

Some service providers block legacy authentication requests by default, in order to make their systems more secure. When using SMTP email, the service provider might block your request, and your email won’t be sent. Here are some guides to enable legacy authentication.

  • If you are using a Google Apps account, Less Secure Apps will no longer be supported after June 15, 2024. Please switch to using an App Password for authentication.
  • If you are using a Microsoft Office 365 account, you may need to enable legacy authentication in your office admin center.
    • Navigate to your office admin center and click “Azure Active Directory” > “Properties” > “Manage Security Defaults” > “Enable Security Defaults”
    • Set to “No”
    • Click “Save”
    • If you are still having issues, please contact your domain administrator.
  • At this time, it is not possible to enable less secure apps for Zoho. However, their current setup still allows you to use SMTP. 😄

If you experience any issues with setup, please reference the Gibbon Support Forums, and to the documentation provided by your SMTP provider.